Wednesday 30 March 2011

Death by Design

I recently finished reading an excellent book on British tank development between the wars and during WWII. Death By Design is written by Peter Beale - a former Troop Leader with the 9th Battalion RTR from 1943 to 1945 - in a frank and to-the-point style that often leaves the reader in no doubt how angry his subject matter has made him.

In the opening pages Beale makes it clear how he feels when he says "Tank crews were murdered because they were sent into battle so ill prepared.". The central thesis of this book is that tank crew lives were wasted because of incomplete training, uncertain doctrine (on how best to use tanks), poor leadership and sub-standard tank design.

Britain, the inventor of the Tank in WWI should have been ideally placed to lead the world in tank design and doctrine by 1939 but the inter-war years had seen army funding cut significantly and the role of 'offensive' land forces played second fiddle to the development and funding of the Navy and Air Force. The charge laid against the Government and military planners of those years is that they failed to plan for the eventuality of another war in Europe. Even when the harbingers of war began to press on the national consciousness the increase in funding and urgency failed to take into account the potential consequences of defeat. By the time the war started Britain's armed forces were woefully inadequate to the task before them.

This book covers all the reasons for this appalling situation, from the political backdrop of the inter-war years to the failure of planners to consolidate thinking on the correct role of the tank. This latter point is most starkly explored in the chapter on tank design which shows the wide and conflicting range of designs developed.

"..in the period 1930-35 work was done on fifty seven different designs of tank. Of these...twenty eight were never produced in a suitable form to issue to field units....Of those delivered to field units to be used in actions, 75 per sent were useless at the time they were delivered."

There is a lot of interesting information in this book. The personal opinions of the author are given full reign but I don't consider this to be a negative thing. On the contrary Beale's writing fully conveys the anger and frustration of many tank crews during the second world war, who often felt they were expendable assets rather than valued and highly trained soldiers. Ultimately weight of numbers and mechanical reliability were the key to defeating the technically superior tanks of the German Army. But I think Beale is very eloquent when he makes his case that many lives (both British and American) were expended unnecessarily.

One of the things that also made this book stand out to me was the political, pre-war story of budget cuts and  lack of development in Tank technology. In many respects it felt like a warning to current governments about the dangers of underinvestment in times of global military uncertainty. Given the pace of current world events - unpredicted and wholly unforeseen only six months ago - this book might be considered a warning from history. It's certainly an interesting read and one that is guaranteed to stir strong emotions in the reader.


Paperback: 224 pages
Publisher: The History Press Ltd (1 Sep 2009)
Price: £10.49 from Amazon

Tuesday 29 March 2011

200 to go with my 300

Following on a few days ofter the milestone that was 300,000 hits I've just gained my 200th Follower! Welcome REDTROOP! I'm afraid you don't get a prize for such a milestone (unless you count a special mention and a link to your Blog a prize). But thanks for joining up.  

Indeed thanks to all the followers of this site for joining the ranks and reading my thrice weekly ramblings. Your input, comments and feedback make all the effort worthwhile.

Monday 28 March 2011

Forged in Battle Panzer IV's

Yesterday afternoon I found myself alone in the house and deafened by the silence. So I took advantage of the lack of background noise and had a go at a short video review of some Forged in Battle miniatures I bought recently. Its a bit rough and ready but it kept me happily occupied until the clan returned. I may do a few more like this in the future and I may even make the effort to improve the quality of the finished product!


The first layers of paint are on and I'm working towards getting these finished before I go away on holiday in a couple of weeks time.

Sunday 27 March 2011

Big Picture : Gladiatorial Combat

Dragonmeet 2003 and the Dagenham Dungeon Delvers enjoyed a full day of games and shopping at this annual convention in London. This game used the 3rd Edition D&D Rules in a Gladiatorial Combat game, complete with Arena.
From left to right in this picture are Pete (Aka The Evil GM), Derek (DJK's Fantasy World) and Dave (Sketchbook and Blackfriars).

Saturday 26 March 2011

300k While I was Sleeping

Some time during the night my hit counter recorded BLMA's three hundred thousandth hit. I only realized this because I was updating some small items and scanned to the bottom of the page. And I have to admit I was very surprised and not a little amazed at this figure. According to Statcounter my blog has received over 300,000 page loads. Wow! Thank you everyone for taking an interest in my semi-lucid ramblings. It's humbling and encouraging at the same time. I just hope I can live up to this in future!

Friday 25 March 2011

Wargames Illustrated 282

This months issue of Wargames Illustrated landed on my doormat a few days ago and now that I've had a chance to read most of it here's my review of the contents. Regular readers will know that each issue is 'Themed' and this month Flames of War returns to Vietnam - a subject that was touched upon with a small selection of models and rules last year.

Battlefront have now issued a much wider selection of miniatures to expand the current range and this issue of the magazine also comes with a pull out Inteligence Handbook called Tropic Lightning. I'm not about to rush out and buy the models but I have to admidt I'm really tempted. Vietnam is an interesting period and I think the job Battlefront have done on this limited range is really good. (Must resist!)

My issue of the magazine turned up a lot later than normal this month, possibly because it was a larger issue and came with the free handbook. As usual I'm enjoying WI immensly although I have to admidt this issue was very much BF oriented. The following articles are linked into this months Theme:

Search and Destroy - Refighting Battles in Vietnam with Flames Of War, Tropic Lightning - America’s 25th Infantry Division in Vietnam, and Hanoi’s Saigon Front - Vietnamese forces in the Battle for Saigon.
Contact! Contact! - A search and destroy mission in Vietnam
Diamond Head Cobras - Tropic Lightning’s helicopter gunships in Vietnam
Tracks in Vietnam - American tanks and APCs 1965-1971
Painting US tanks and helicopters of the Vietnam War
Stoner vs Kalashnikov - Infantry weapons in Vietnam.

Despite the heavy Vietnam theme this month there are also a nice selection of non FOW articles to read as well as the usual show reports and hobby news. I particuarly enjoyed the article Rethinking Saxon Wargaming by Dr Ryan Lavel. Here he presents his alternative views on some of the long-held tenets of Saxons in wargaming. Another great article was the second part of Rick Priestly's Running a Wargames Campaign. I'm not likely to ever run a campaign but any article from a giant of the hobby like Rickm is always worth reading. Rick also featured in another interesting article, Boudica's Last Stand in which WI's current UK Editor joined Rick for a game of Hail Caesar, a new set of rules from Warlord Games.
Once again an intresting and varied issue although the Battlefront/Vietnam theme was very prevelent this issue.  

Wednesday 23 March 2011

Making Smoke and Flames

This tutorial is my version of how to make Smoke and Flame Markers for use in Flames of War and other tabletop wargames. Battlefront sell a pack of coloured acrylic 'wool' as Smoke and Flame (product XX601) but it was the spectacular Smoke and Flame markers that have often graced the pages of Wargames Illustrated that I wanted to recreate.

I can't take credit for all of the techniques described below as much of this tutorial is a combination of ideas gathered from several sources, in particular this YouTube Video by the Terrain Guy on RHQ-TV (the tutorial starts at 3:40 into the video). However I have tried to experiment with different materials and techniques as much as possible to come up with what I think is the simplest and quickest method for making Smoke and Flame markers.

Materials Required:
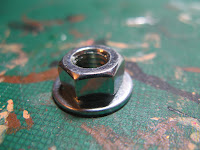
  • 3/4" washers & Nuts - Used as a heavy base
  • Thick wire or pipe cleaners - To form an armature
  • Wire Clippers - To cut wire armatures
  • Clump Foliage -  The 'smoke' itself
  • Superglue - Lots of it
  • Acetone or Acetone based Nail Varnish Remover to unstick glued fingers!
  • Cocktail Sticks -  To stand model on when gluing
  • Black spray paint for smoke
  • Red/Yellow Paint for flames
  • Varnish (optional)

Stage One : A Heavy Base - The finished smoke columns are very light and easily knocked over. To prevent this I wanted a heavy base, preferably with a wide 'footprint' for stability. Some online tutorials suggest using coins as a base but as this is illegal in many countries I won't be recommending this method. Instead I bought a pack of nuts and 1" bolts with corresponding metal washers. Initially I used the bolt as a heavy core for my smoke markers but this resulted in rather fat looking smoke columns. In the end I found that super gluing a single Nut onto a larger washer (about the size of a penny) formed a perfectly stable and weighty base on which to build the model.

Stage Two : Making an Armature - I've read six or seven tutorials on how to make smoke and flame markers and they all recommend different materials from which to construct an armature on which to build the smoke column. Some advise using thin wire, others thick wire. The versions in WI281 used bamboo skewers and other sites suggested pipe cleaners. All have their merits and in the course of experimenting with this build I tried them all. Wire armatures work fine if you want thinner columns of smoke but it can be quite hard to fix the clump foliage to such a small core. The skewers worked best but frankly the idea of putting little sharpened stakes on my games table (ready for me to accidentally lean on them) didn't seem all that safe. The best option - and the one used here - were pipe cleaners. The furry surface gives plenty of surface for the clump foliage to 'key' onto and the wire core means these can be shaped pretty much as desired.

Stage Three : Adding Clump Foliage - I used cheep pound store superglue throughout this project, mainly because I needed so much of it. The main advantage of superglue is of course that it sets fast and it sets reasonably hard. The downside is that no matter how careful you are it will get on your fingers. Top Tip; don't start this project until you have a ready supply of Acetone or Acetone based nail varnish remover on standby! Take the pipe cleaner armature and - working one small section at a time - add a small amount of glue and then press on small clumps of the foliage material. Work your way around and up the armature until the whole thing is covered. Then go back and fill in any small gaps. Its worth giving the model a squeeze to compact the foliage and make sure its stuck firmly all round the armature.

Stage Four : Superglue, lots of itWarning! What I'm about to suggest is probably extremely hazardous and ill advised, but bare with me. Put the clump foliage covered model on a couple of sticks (cocktail sticks are fine) laid over an old dish of some kind to catch drips. Then soak the whole model in cheep superglue! The glue will set hard in a few minutes and results in a tough and durable model. However... the glue sets with an exothermic reaction (it produces heat) and gives off noxious fumes. Needless to say this stage is best done in a very well ventilated area! Some tutorials I have read suggest soaking the model in watered down PVA but I found this didn't produce as hard a finish as I wanted. Also the soaked model takes ages to dry out whereas my method means you're ready to start painting in a few minutes... assuming of course you haven't passed out from the fumes!

Stage Five : Painting - There are actually three simple steps to this process and you'll be amazed how fast this is to complete. First spray the whole model with red primer making sure to cover all the green foliage material. Give this ten minutes to dry then spray from above with black primer. This tops the fire with black oily smoke and adds definition to the billowing column. You may need to add a little more red to the bottom of the columns but I found that with short bursts of spray paint from between 10-15cm from the model a good look can be achieved easily. Leave this to dry thoroughly and then just drybrush the bottom third with bright yellow. Another method you could use is to paint red, add solid yellow to the lower portion of the model then dust with black so that the yellow and read are 'inside' the black smoke.

Stage Six : Varnish - The model is essentially finished at this point and you could stop here. However I wanted to make them even more durable so I sprayed the whole model in GW Purity Seal (a satin varnish) and then with Testors Dullcote to return the matt finish to the model.

And that's it. This method is fast and easy and I was able to make a dozen smoke and flame markers in just a couple of hours. Looking at my pictures I think I need to add a little more black to the tops of the models but on the whole I'm very happy with the completed markers. And here's what they look like in action.

As stated earlier I'm not taking credit for coming up with all the ideas described here, as much of the above technique can be found in other tutorials on the web. This is just my attempt to bring together the advice and ideas I found from many different sources, with a few experiments and disasters of my own thrown in for good measure. I hope you've found this useful and if you have any suggestions of your own please feel free to leave feedback (good or bad) in the comments below.

Tuesday 22 March 2011

First Blood with Flames of War

After nearly two years painting and collecting I have finally been able to get a game of Flames of War with my good friend and Brother-in-law, Raymond. This was his first wargame and one I think he'll remember for a long time.

For our first game I decided to keep things simple and use just tanks. This way we could avoid dealing with the Assault or Artillery rules until we had the basics under our belt. I made up an order of battle for both sides based on the models I had available, trying as best I could to balance the forces. Ray took control of a Tank Company from the 2nd Armoured Division (Hell on Wheels) while I faced him with my Lehr Panzerkompanie. The order of battle was as follows:

US 2nd Armoured
HQ - 2x M4A1 Sherman's
1st Combat Platoon - 5x M4A1 Sherman's
2nd Combat Platoon - 5x M4A1 (76mm) Sherman's

Lehr Panzerkompanie
HQ - 2x Panther A
Combat Platoon - 4x Panther A

I was outnumbered 2:1 but I also knew that the guns on the Sherman's were no match for the frontal armour of my Panthers. Plus while I had a working knowledge of the rules - and experience of many different wargames - my opponent was the ultimate newbie, a veritable wargaming virgin.

I set up the battlefield and then Ray chose which side to play. We didn't bother with a scenario or objectives as the primary aim of this game was to learn the basics, movement and shooting. It would be a straightforward battle to the death. I tried to put a variety of terrain on the field while not cluttering it up too much. I certainly didn't want to put Ray off by thoroughly confusing him while I thrashed him soundly. As it was neither event happened.

The setting for our game probably wasn't the best for a 'lets learn the rules' session. For a start my table was too small (we played on a 3x6 surface) so there was actually very little room for maneuver. Also we had family over in the afternoon so the house was busy and noisy. Then a group of my daughters friends turned up. So while we tried to concentrate and work our way through the rules we had to do so to a backdrop of bedlam, riotous noise and continual interruptions.

As already mentioned the table was far too small (I need to figure out an alternative for future games) so the first turn of movement brought our respective tanks almost nose to nose. Ray did exactly what I thought he would do and basically charged his mass of Sherman's straight at my panthers. So for the first two turns all that happened was that his shots bounced off my frontal armour while I picked off his tanks one by one.

Things changed when I finished off the platoon on my left flank. I thought the game was wrapped up so I moved my panthers onto a hill in the center and turned to face the remaining Sherman's. But this gave the American M4A1 (76mm) Sherman's a chance to swing round my flank and hit me with a series of side shots. Yes he was very lucky with his dice rolls but I should never have given him the opportunity to hit me in the flank. In just one turn the advantage shifted and soon I found myself down to one Panther facing 5 Sherman's, three of which had the 76mm gun.

That was it for me, and the game ended with the destruction of my lone Panther in a hail of fire from the US Tanks. I was a little miffed at loosing but on the plus side I think Raymond had a great time and will definitely come back for more games. He literally pulled victory from the jaws of defeat and earned himself some well deserved battle honors.

Tomorrow I will be posting a Tutorial on how to make the Smoke and Flame markers seen in the above pictures.

Monday 21 March 2011

Tasker Watkins

I made an interesting discovery last weekend while taking my daughter over the local park. On the front of one house across the road was a new looking Blue Plaque. London's blue plaques scheme was founded in 1866 - it is believed to be the oldest of its kind in the world - and are usually placed to commemorate the link between notable figures of the past and the buildings in which they lived and worked. This particular plaque honours the former Dagenham resident Sir Tasker Watkins.

Tasker Watkins was born in Wales but lived in Dagenham for 15 years until the end of the War. He was awarded the Victoria Cross for bravery in north-west Europe in August 1944. The Plaques page on the local council website has the following details:

"Sir Tasker Watkins was a lieutenant in the Welsh Regiment in 1944. His company came under heavy fire as they crossed a cornfield full of traps. There were many casualties and Tasker was the only officer to survive. He charged two machine-gun posts, disabling them, before coming upon an antitank gun manned by an enemy soldier. When his rifle failed, he threw it in the soldier's face and shot him with his pistol

Backed by 30 men, Watkins charged against 50 enemy infantry. At dusk they found themselves surrounded, but the order to withdraw had not reached them because their wireless set had been destroyed.
Tasker led his men round the flank and was soon challenged by an enemy post at close range. He told his men to scatter and charged the post with a Bren gun, taking it out of action."

Watkins' Victoria Cross is on display in the Lord Ashcroft Gallery in the Imperial War Museum.

Sunday 20 March 2011

Big Picture : Imperial Stormtroopers

Salute 2008 and the Imperial Stormtroopers have finally caught up with me!
Mind you, the one on the left looks a bit short to be a Stormtrooper...

Friday 18 March 2011

Resin Pond Terrain

Another day, another terrain piece completed. I bought this Pond (made by TSS) at Cavalier a couple of weeks ago and have now completed it. However it wasn't a straightforward job and took a lot longer than anticipated.

The 'water' was a big problem as I just couldn't get a decent flat surface on it. Even after base coating I found that any consistency of paint 'pooled' on the surface, even when flow improver was added to the mix. This meant that it took several coats of paint to get good coverage and resulted in a 'lumpy' surface that just didn't look like water.

I tried using a product I bought a while ago (but havn't had an excuse to use until now) called 'Scenic Water'. This product is a meltable jelly that can be poured and shaped as required. But what I didn't realise was that when it cools it remains in a jelly like state. Once set it looked truely terrible and didn't even provide a shiny water like shine to the surface. This was the first time I used this product, and it'll be the last time as well! In the end I was forced to strip the whole model and start again.

Second time round I still had problems with paint coverage but I tried to keep coats to a minimum, allowing each to dry thoroughly before moving to the next stage. I then used three very thin layers of Winsor and Newton Gloss Varnish to give the surface a shiny 'wet' look. The final coat took over 24hrs to dry fully so this was a very slow process on what should have been a simple paint job.


Despite the problems I'm reasonably happy with the finished piece. I used some of the grass 'tufts' I bought at Skirmish and I think they make a lot of difference. However for such a 'simple' piece of terrain it gave me a lot of grief and I'm glad to move on to other projects.

Wednesday 16 March 2011

Scratch Built MG Nest

I've started preparing the Forged in Battle tanks I ordered on eBay, but while I was waiting for them to arrive I was working on several terrain projects. One of these was inspired by the excellent article on building an MG Nest featured on Model Dad's. Even if I do say so myself I think the finished result looks pretty good. I'm certainly very happy with this model and I'll probably make a couple more in due course.

My first attempt at building an MG Nest went spectacularly wrong. To use the terminology of D&D it was an Epic Fail. The reason for this lack of success had nothing to do with the guide mentioned above and more to do with my lack of preparedness and being in the wrong frame of mind when I started. After half an hour of cursing loudly all I had successfully managed to stick together were my fingers. At this point I had to retire to the bathroom to apply liberal quantities of acetone based nail varnish remover to my fingers to unstick myself.

My second attempt couldn't have been more different. I cleared my work area before starting, gathered all the tools and materials I needed and only then did I start. I cut cocktail sticks with a pair of clippers and trimmed the edges with a modeling knife to tidy them up a little. I used superglue for speed but placed the 'logs' using tweezers rather than my big chubby fingers. Then I carved the earthen banks from some polystyrene packaging and glued them onto the base using a simple contact adhesive. The log roof was similarly fixed into position using the same glue and the allowed to dry.

I then built up the earthen bank using a special mix of quick drying plaster. I use this material to cover infantry bases and it dries quite strong and resilient. I mixed in a little gravel for texture and some dark brown paint (if the dried plaster chips it'll still be brown all the  way through). What I ended up with was a mixture that had the colour and consistency of dog poo but was sticky enough to be easily applied to the model and then shaped and sculpted as desired.

I allowed this to dry for 24 hrs before painting and applied a generous coat of base black to make the surface more resilient. Similarly when painted I applied several coats gloss varnish to strengthen the surface before covering with Dull Coat varnish. The last stage was to apply the grass.

Monday 14 March 2011

Panzer IV's from Forged in Battle

I recently ordered some Panzer IV's by Forged in Battle from Maelstrom Games and they have just arrived this afternoon. I was so excited by their arrival I got them out to look at on my desk in work. My colleges know about my mental problems 'hobby interests' so weren't too suprised to see me playing with my new toys and grinning like a kid at Christmas!

I've only had a chance to give these models a quick look over but I'm really impressed by the quality and detail of the moulding on these resin tanks (the turrets are metal). Every tank is individually sculpted with battle damage and stowage on each.

I'm really looking forward to painting these but I'm not going to rush headlong into a new project until I have finished off several small terrain items I'm working on. I'll clean, assemble and undercoat these models while I finish off the other items and should be able to get stuck into some proper work by the weekend.

Skirmish 2011

Yesterday I took my daughters to the Skirmish show in Sidcup. I didn't have a great deal to buy and knowing the show was small I decided it was the perfect venue to take my youngest daughter to. This was her first show and she really enjoyed it - particularly the Dr Who Dalek vs Cyberman game run by Medway Wargames Club. For obvious reasons I didn't take many pictures but here's what I did get:


I met a few friends at the show although I wasn't able to chat as much as I would have liked. As well behaved as my little Padawan Learner was I still needed eyes in the back of my head! I also bumped into a few followers of this blog which is always nice. So if I met you but seemed distracted I should apologise. I'm sure there will be more opportunities to chat at other shows.

We only stayed for about 2hrs but that was more than enough time for me to pick up a few items. One thing I particularly wanted to get was a new display case. I only have a small area in which to put my models out on display and currently I use a display box normally reserved for the larger scale model cars. I knew I could pick up a larger box (the sort used for model ships) so I bought one that was 501mm x 148mm x 148mm (pictured above). One of these days I'll get a proper display cabinet but in the meantime this is a good alternative.

My daughter bought a big bag of 54mm plastic skeletons, which she has already started to paint. She also picked up a mint condition LoTR 'Combat Hex' TMG Starter Set. I thought this was a particularly good buy because it's a whole game in a box (Miniatures, rules and hex battle map) and we were able to play it when we got home. I had to streamline the rules a little so she could understand them (she is only 6 after all) but we can add in more detail next time we play.

All in all a nice morning out and one more step in my Geek Training Programme for my two girls. Our hobby may be male dominated at present but I'm doing my bit to change the gender demographic of the next generation of gamers!

Sunday 13 March 2011

Big Picture : White Winter in Russia

With the recent release by Battlefront of its Polish Armored Train I was trying to remember where I saw a battle involving a train, and then I found the picture I was looking for. This game "White Winter in Russia" wasnrun by the Southend-on-Sea Wargames Group at Salute 2009. It  was based on 20mm miniatures and a converted train set to represent a Partizan attack on a German supply train.

Friday 11 March 2011

Pillbox and other stuff

I've been working on some more of the scenery items I bought at Cavalier a couple of weeks ago. In the process I have learned an important lesson about the dangers of buying in a hurry and full of adrenalin! Before the show I had made a list of items I wanted to get and a list of traders I knew made these items and more importantly would be at the show. On the whole this was a successful strategy, but I made a few 'dodgy' purchases non-the-less.

One item I bought was a 15mm hexagonal pillbox from TSS, the same company that made the Dragons Teeth I was so happy with earlier in the week. I know from experience that resin models can vary in quality enormously but when I opened the packet I was shocked by what I found. The basic construction was strong enough with a separate roof and moulded base but the quality of the casting was appalling. The roof in particular was horrendous. It consisted of an uneven and wonky hexagon of resin that no matter how I tried to align it just didn't match the shape of the pillbox building. It was twice as thick at one end than the other and looked like an off cut (I know resin isn't cut, but that was the first impression I had).

In the end I decided to make my own roof for the pillbox. I marked out the correct shape (using the pillbox as a template) on a sheet of thick (2mm) plasticard. I cut it out and then trimmed the edges make it a better fit. I decided to glue the roof in place and used Milliput putty to seal any gaps. I also glued a scatter of sand on the roof to simulate a rough concrete finish. Painted and dressed with vegetation I don't think its come out too bad.

I'm currently working on another objective marker, this time using a spare Stug vehicle I found in my bits box. I've started some conversion work so that I can paint it up as a knocked out vehicle. This is still at the early stages but I'll post pictures when it's completed.

Wednesday 9 March 2011

Blackfriars Webcomic

I've written about my enjoyment of Webcomics several times on this blog. I've never been a big reader of the traditional printed version (except as a kid) but I have enjoyed following several on the Internet over the years. Now Dave Stokes of the Dagenham Dungeon Delvers has started his own Webcomic called Blackfriars. The first two pages of a prologue story are now available to view and so far I think its looking pretty good indeed.

Here's the lowdown in Dave's own words. "It’s a contemporary fantasy story set in present day London about three unlikely heroes, an ancient threat from Britain's mythic past, Magick as a secret resource of the British Government, all converging on a long-lost gateway to the Fey realm situated in the tunnels of the London Underground beneath St. Paul’s Cathedral... As if rush hour wasn’t bad enough."

Dave did a lot of research before starting on this project and this clearly shows in his work. At last years British International Comic Show he was able to pick the brains of professionals like 2000AD artist PJ Holden. His advice helped convince him to get started on his own comic. Dave claims to be no good at drawing architecture, but I think you'll agree these first few pages are excellent.

You can see more of Dave's amazing artwork on his other site, Dave Stokes Sketch Blog.

Monday 7 March 2011

Dragons Teeth

I've been working on some of the resin terrain pieces I bought last week at Cavalier. The Dragons Teeth were really cheep, weighing in at only £3.00 for two bases from Total System Scenic. They were also very easy to paint and I was able to knock these four out in a couple of hours. In fact it took longer to wait for the varnish to dry between coats than it took to paint them.

I'm nearly finished a couple of other items (a pillbox and a pond) and I'll post pictures of these when they are completed.

Sunday 6 March 2011

Big Picture :

This weeks Big Picture is a two for one offer. These two pictures were taken at the Military Odyssey living history event in August 2006. The Vietnam reenactment display was notable for its recreation of a helicopter landing in a hostile LZ.


Battlefront are about to release more rules and models for Flames of War Vietnam so I thought these pictures were worth sharing.

Friday 4 March 2011

March Poll - Finding BLMA

Time for another poll and this time I'm asking the question, How did you first 'discover' BigLee's Miniature Adventures? Even if you're not a follower and this is your first visit I'd be interested to know how you landed on my blog. In effect I'm asking you the readers to help me identify the best way to promote and grow this blog in the future.

This weeks I've spoken to several other bloggers about the benefits of the 'online community' and the interconnectivity of our sites. I suspect that many of the sites followers first stumbled on BLMA through a link on another sites blogroll. This is why I keep a blogroll in the sidebar of this page, as I think its a great way to build connections and meet new gamers.

Another tool I use regularly are hobby forum sites like The Miniatures Page or the Lead Adventure Forum or even the Flames of War Forum. I'm definitely a lurker of these sites most of the time (not enough hours in the day to write on every site regularly) but now and again I post comments or 'advertise' my site via a blog update announcement. Its easy to overdo this route so I keep such posts to a minimum and target selected forums depending on the nature of the announcement. This approach certainly generates a lot of traffic on my blog and its quite likely this is the source of first contact for many of this sites readers.

Of course the main way people find most sites is via search engines like Google or Ask. This is where high traffic utility posts come in useful. These have lots of keywords and links in them and are the worm on the end of the hook drawing new readers to the site. Hopefully these new readers don't recoil in horror when they land on BLMA and maybe they stay a while and look around before moving on. I use Statcounter to record site hits but it also records visit duration statistics. When I first started BLMA up to 75% of new visitors only lingered on the site for less than 30 seconds. That percentage has dropped to 40-45% meaning when random visitors drop in they are finding something of interest to keep them around longer.

Another important source of site hits - and hopefully new followers - are social bookmarking sites like StumbleUpon, Digg or Delicious. I've been using these myself for years now and found several interesting sites through this route. This pathway has been made easier by the fact that most sites (my own included) provide fast and easy links to bookmarking sites and to social network sites like facebook.

They may be other ways that readers arrive here, and I'd be interested to learn what these are. As always your comments and discussion are very much appreciated and of course I'll post the final results in the comments section below after the poll closes.

Wednesday 2 March 2011

Zombiefest at the Angry Lurker's

On Sunday I met up with Posties Rejects to visit the Cavalier Wargames Show in Tonbridge. After the show we all retired to the ManCave of the Angry Lurker for a very enjoyable Zombie game. Ray of Don't Throw a 1 posted his pictures of the game yesterday, as did the Lurker himself. Check them out for the full story of this Z-fest from multiple perspectives.


Much havoc was wrought by the zombies and by me (I keep knocking terrain over). It was a pretty fast paced game and very deadly for anyone foolish enough to get into hand to hand combat. However my decision to avoid combat and focus on collecting resources saw me take the fewest casualties but come in third in terms of points. Clearly not such a good strategy after all. The laurels of victory eventually went to Postie who earned them with the largest number of zombie kills.

Thanks to the Angry Lurker for hosting the game and feeding us on our return from the show. It rounded off what was a great day out.

Tuesday 1 March 2011

Cavalier Loot

In yesterdays post about the Cavalier show in Tonbridge is mentioned I forgot to mention my purchases. I spent a little over £100, mostly on unpainted terrain items. I also picked up two books and a small model case for my D&D character models.
  • 15mm WWII Normandy Stucco House (JR Miniatures)
  • 15mm Hexagonal Pillbox (TSS)
  • 15mm  Dragons Teeth Tank Traps 2x2 Packs (TSS)
  • 15mm Barn (Chiltern Miniatures)
  • Pond/Lake 20x15cm Unpainted Resin (TSS)
  • FoW Mixed Bases (Battlefront)
  • Book - D-Day Fortifications in Normandy (Osprey)
  • Book - Panther vs Sherman (Osprey)
  • 2 x Hills - Pre painted & flocked
  • 1 x Swamp - Pre painted & flocked 

I was particuarly happy with the two Osprey books at a very reasonable £5 each. All in all not a bad haul for a small trade show. I bought a couple of pre painted items but mostly unpainted resin terrain for 15mm wargaming. I've already started work on the Resin barn by Chiltern Miniatures and this should keep me busy for a little while!