Friday 30 October 2020

Dragons Teeth for Normandy

I was supposed to have a Panzer finished for today but I got a little bit sidetracked because a very nice parcel arrived a couple of days ago. I ordered some scenery items from Peter Pig and they turned up quicker than expected, including these rather nice dragons' teeth. I don't know why, but I had it in my head these were going to be hollow, but they're not. A very nice, solid and quite sharp set of teeth, so I'll have to make sure I don't drop them on the floor. These babies will make stepping on LEGO look positively comfy.

Dragons Teeth (or Drachenzähne in German) are a form of static defence that was first deployed in WWII. Their purpose is to restrict the movement of tanks and sometimes (as in the Seigfried Line) funnel those vehicles into preprepared killing zones. Along the Atlantic Wall, they were often used in conjunction with landmines, anti-tank walls and ditches. Although they look like they are individual concrete blocks they were often laid as part of buried concrete 'mats' so they couldn't just be bulldozed out of the way. There were also some 'mobile' versions that could be moved and this sort of obstacle wasn't exclusively pyramidal in shape, although these are the most common. This type was typically 3-4ft tall, enough to ground any tracked vehicle that tried to cross them. 

Like other concrete defences from this period, many survive to this day, simply because their removal is too expensive or complicated but also because there are so many of them. Variations on this design were - and still are - a common sight in the south of England. Most were constructed in the summer of 1940 when an invasion was a very real threat. They were used to restrict access to strategic points such as checkpoints, railway junctions and bridges. They are still a common sight around railway embankments and along the south coast, particularly around potential landing grounds. Indeed there are some only mile or so from where I live, along the embankment of a busy rail link into London. These are large pyramidal blocks with flat tops but in other areas of the country there are conical versions sometimes referred to as 'pimples'. Whatever the design, they all serve the same purpose, restricting the movement of vehicles, but in particular tracked vehicles. 

These blocks were used around a Kent railway junction. The Pole in the top was used to hold barbed wide. These examples were relocated to Fort Amherst in Chatham.

These Bouy type blocks were designed to be used on roads and would have been chained together in pairs making them very hard to move. 

This set comes with ten individual teeth and I deliberately kept the bases 'muddy' so they would blend in if I used them with my existing country roads or in the fields either side. Having now taken some pictures I think I'll add some grass to half of them so I can mix and match depending on what terrain I use them. 

Wednesday 28 October 2020

Battle of River Cottage

I have a few days off work this week and decided that I would try to get a couple of solo games in to occupy myself. Back in January the wife and I had been discussing various trips, including some long weekends, to coincide with games shows or exhibitions we wanted to visit. Needless to say, these fell to COVID one by one, leaving just this week as the last possibility for a trip away. Sadly the closer we have got to the week, the more unlikely has seemed a break, and in the end, we decided it just wasn't worth booking anything. Our area has recently entered the High Tier of Covid restrictions and the places we wanted to visit are in the Very High Tier...so unnecessary travel seemed a little foolhardy. The half-term holiday has therefore turned into Groundhog Day again, and we are trying to keep ourselves busy at home. At least I have my little metal men to keep me occupied! 

The Setup

My first game is for Chain of Command and as is my way I created the setting first before looking at scenarios to play. The layout of the table took me a couple of days of tinkering to get it looking how I wanted it and ironically it turned out that I spent more time designing the layout and setting up than it took to play the actual game! (To get more from it I'm going to re-use the layout for a game of What a Tanker). The scene opens on a Normandy farm nestled against the banks of a small stream. Chalet de Riviere was only recently abandoned by its owner Monsieur Hugh as the front got nearer. The recent bombing of the road just outside his property was the final straw so he gathered his family together and they fled in their ageing Citroën. 

With the scene set, I had to pick a Scenario from the rulebook. I picked Scenario 3 'Attack and Defend' so it was clear that someone was going to find themselves in the farmhouse and associated buildings. I rolled a dice to decide if it would be the Americans or Germans, and as in the previous game (here) the Germans found themselves on the defensive. Both sides rolled well and started the game with a Force Morale of 11. Should one or both sides drop below three the game will end. 


The next step was to decide on what support the platoons would have. I rolled 5 for the Americans so I picked the M5 Light Tank which I recently painted. This would give them access to another MG and of course some HE to use against the buildings. The Scenario says that the defenders have half the support of the attackers (rounded down) but because the german platoon has a force rating one below the Americans I can add one point of support giving them 3 points to spend. After a bit of thought, I decided to take another Senior Leader (an experienced NCO) to give the Germans some additional flexibility. I used their last support point on a Medical orderly because I had a feeling they were going to need it.

US Rifle Platoon with an M5 Light Tank as Support

German Infantry Platoon with an additional Senior NCO and a Medical Orderly


The Scenario states that the Germans can place their Patrol Markers up to 18" onto the table edge but because my table is small I made this 12" instead. Then the Americans place their markers on their table edge and roll to see how many patrol moves they can make before the Germans respond. I rolled two moves. As in my previous game, I reduced the patrolling movement to 6" rather than 12" because of the table size but even that brought the Americans within 12" of the enemy, locking them down. The jump-off markers are then placed away from the enemy, in cover, so for the Germans basically inside the buildings, and in the Large Wood on one flank and in the Bocage on the other flank. The Americans were able to set up jump off markers in the small wood and in various fields on their side. All fairly predictable given the constraints of my small table. 

The Action

The Americans go first as they are the aggressor in this scenario. As before I'll list the Command Dice rolled at each stage so you can see how I chose to use them.

Turn One

(A) 66441- Well the Americans keep the Phase but as I don't want to bring on my Bazooka Team or a Senior Leader yet I decide to hold any actions and go straight to rolling the command dice again.
(A) 64421 - Again I had no desire to bring on a Senior leader just yet but I combine the two and one to allow me to bring on a Junior Leader. The M5 Light Tank comes on at the end of Green Lane, but without any clear targets, I decide not to fire the main gun. 

(G) 65321 - The Germans gain one Chain of Command Point and decide to start deploying Squads to defend the Farm. I imagine the site - on the main road and with easy access to the phone lines - would make a good forward command point and is, therefore, worth defending. Squad One deploy to the upper floor of the Farmhouse which not only gives them good all-round visibility from an elevated position but also gives them an advantage if they need to defend in hand to hand fighting. The Second Squad deploy to the upper floor of the Granary, again giving them an elevated position with good forward visibility. Now I decide to take a chance and deploy the Panzershrek Team out in the yard. From here it has line-of-sight on the tank and it is worth the risk of exposure if they can take that out quickly. The range is effective and the target is partially obscured by intervening terrain so I need to roll 8 on 2d6 to hit the target. I roll a nine! Now I roll Thirteen hit dice knowing full well the M5 only has thin armour (he gets to roll just 4 armour dice for a save). Out of 13 dice, only one hit and the M5 saves two...the shot skids off the tanks frontal armour! 

(A) 55432 - The Americans start this phase with two extra Chain of Command Points. They then deploy Squad One into the small woods (marked Les Copes on my earlier map). Unlike the last game, I made sure these deployed more than 4" from the front of the wood so they wouldn't be targeted by any Germans in the Farmhouse. I also deployed the Platoon Sergent with them to give them the flexibility I think they will need for their location. I then deploy Squad Two in the long field between South Lane and the Stream. They are just able to reach the tree line behind what turns out to be a bush covered bank (possibly the remnants of earlier bocage) which will give them some hardcover. 

(G) 66551 - The Germans retain the next Phase and gain two Chain of Command points. This just leaves the Panzershrek team to have another pop at the M5...This time they miss the tank entirely! 
(G) 63222 - It's clear the Americans in the small wood plan on taking up a firing position against the Farm so the German Player (that'll be me of course) decided to try to outflank their position by deploying the third Infantry Squad behind the bocage on the edge of the Upper Wheatfield. It's a strong position in hardcover and in combination with the fire from the farmhouse - both penetrating up to 4" into the wood - means the Americans can't 'hide' in this bit of terrain. They open fire immediately and while no Americans are killed they do take 4 points of shock. Meanwhile, the Squad in the Granary open fire on the infantry in the long field and despite the hardcover manage to inflict one kill on the newly arrived squad. 

(A) 65322 - The Americans gain another Chain of Command Point and sense an opportunity... Squad one was going to move to the front of the wood and take up a position along the wall that separates it from the small pasture (now home to dead cows). However with the Germans on their flank, its clear this plan would be virtual suicide. Instead, they keep the bulk of the woods like a shield between themselves and the farmhouse, and move to the western side of the wood, overlooking the Upper Wheatfield. Moving means that when they open fire it is at half effect this turn, but they still manage to inflict some shock and a kill on the Germans. Then the Americans deploy their last remaining infantry squad to support the position. The BAR team deploys against the wall overlooking the field and opens fire, inflicting another shock and a kill (the Obergefreiter manages to avoid injury...I haven't forgotten to check for leader casualties this time!). I realise that now the German Squad is facing two American Squads and is in an unequal firefight...not the first time I have managed to outwit myself in a solo game!! 

Just when it looked like this was already developing into a significant phase in the game (possibly a decisive one) the American 2nd Squad in the long field opens up on the Granary. These citizen-soldiers must have really been paying attention in their training back in the States because they are deadly accurate. They inflict two kills on the German defenders and one is a hit on the Obergefreiter. I roll on the wound chart and, you guessed it, I roll a one... killed outright! I consult the 'bad things happen' table and the Germans lose their first force moral point. Worse still this squad is now leaderless.

(G) 65541 - Two more Chain of Command points are small comfort after that last phase. I bring on the Senior NCO (one of my support options) and deploy him to the Granary to take command of the Squad in there. I decide not to take any chances and also deploy the Medical Orderly in here. 

(A) 55311 - The American Commander (also me!) is anxious to deal with the German infantry over by the Upper Wheatfield but also wants to use the tank this turn. I could combine the double ones into a two and activate a whole squad but instead, I decided to activate the BAR teams from each squad. The BAR gets to re-roll 1's which may give them an edge when shooting against an enemy in hardcover like bocage. I make the right choice as the re-roll option turns two misses into hits and after rolling for effect the overall result of these teams firing are two kills and point of shock on the German 3rd Squad. 

Then the Junior Leader in charge of the M5 light tank acts. He is getting more than a little rattled by seeing incoming rockets from the Panzerschreck. His tank's armour is no match for a shaped charge designed to breach much tougher vehicles and so far they have been lucky not to be destroyed. The prospect of losing his men, or being burned alive if the tank explodes, galvanizes him to action. He decides not to move forward but instead orders the bow gunner and the main gunner to target that Panzershreck team before they are themselves destroyed. A hail of bullets and a HE shot from the main gun kill one infantryman in the German team and seriously rattle the remaining guy with two shock inflicted.  This unsurprisingly Breaks the team. The remaining man remembers his training and keeps hold of his rocket launcher but quickly flees to the other side of the Farmhouse and relative safety. 

(G) 55421 - Things aren't going well for the Germans but they pick up two more CoC points (giving them one full dice and starting on a second) and ponder their next move. I deploy the Platoons Unterfeldwebel to the Farmhouse to support the Squad in there. He immediately instructs the MG team to open fire on the US infantry in the long field. I needed to use a laser pointer at this stage to check they had line-of-sight between the trees, but they could see the target and opened fire...to absolutely zero effect! Meanwhile, the beleaguered Squad Three (on the main road overlooking the Wheatfield) open fire on the Americans in the small wood, but again with little effect.

(A) 44331 - The Americans bring on their Platoon Leuitenant who orders Squad 2 in the long field to continue to fire on the Granary. This inflicts another kill and point of shock on the occupants. Then the Senior NCO, the Sergent with Squad One, orders them to lay down covering fire against the Germans across the field. The Rifle team provide the covering fire, while the BAR team continues to pick away at the enemy piling on another point of shock. Then the Junior Leader in the tank, still feeling relieved at seeing off the Panzershrek, orders his tank forward. Progress down Green Lane is cautious but as they move they put a HE round into the Farmhouse sending dust and plasterwork flying. None of the Germans inside of the building are killed, but that are shocked by the impact. Then the Americans deploy their Bazooka and, for want of a better target, it also fires at the building. However this time the round hits the outside and aside from shaking free some dust it has no effect on the defenders. 

All Squads, Teams and Leaders have now been deployed by both sides. 

(G) 52221 - Another chain of command point. I decide not to use the full CoC dice to end the turn because the Panzershrek team is still Broken. If I can get the shock reduced I can get them back in the game later after ending the turn. For now, Squad Three is sticking to its position behind the Bocage. They open fire at half effect (due to the suppressing effect of covering fire) but they still manage to inflict two kills on the Americans. Squad two in the Granary continue firing on the Americans in the long field, inflicting more shock. Meanwhile Squad One in the farmhouse has few targets to choose from. Only the MG team has something to shoot at and this turn he goes for the Bazooka team, sensing an easy kill. One of the two-man team is killed but the Bazooka will work as well with one man so it's not out of action yet. 

(A) 64311 - The Americans keep up with their existing targets but fail to hit home or inflict any shock this phase. A welcome, but brief, respite for the Germans. 

(G) 65332 - Another Chain of Command point is added to the collection. The Platoon NCO in the Granary opens the door, pokes his head out and shouts encouragement and orders down to the Panzerschrek team in the road. One point of shock is removed and the team is no longer Broken, 'just' Pinned. Meanwhile, his squad continue to fire down on the Americans in the long field killing another infantryman. The 3rd Squad continue to exchange fire with the GI's across the field but are having a hard time dodging covering fire and taking shock. The squad is looking dangerously tattered and probably ought to withdraw. 

(A) 44432 - The Platoon Seargent with Squad One continues to order his men to lay down covering fire while the BAR team tries to take out anyone it can see. However, the real punch is about to be landed as US Squad three managed to get into position the last turn. The whole squad now opens fire on the Germans across the wheatfield, killing the last of the rifle team. This brings the whole squad down to breaking point and they fall back off the table and are lost. Worse still this precipitates severals rolls on the Bad Things Happen table resulting in the loss of 3 Force Morale points. The Germans are now down to just five morale. 

(G) 65554 - Three more CoC points give the Germans two full dice to use. I decide to activate the Senior NCO in the Granary again and he is once again able to remove a point of shock from the Panzerschrek team. They no longer have equal men and markers but will remain pinned until the end of the turn. The NCO then uses another command initiative to activate squad 2 in the Granary and orders them to continue firing on the Americans in the long field, inflicting another kill and another point of shock. Then I  use one of the Chain-of-Command dice to end the turn. The Panzerschrek team can now remove the Pinned marker and I plan to get them back in the fight if I can. 

Turn 2

There is a brief lull in the shooting. The Germans are shocked at the loss of one of their squads but they know how important this location is and are determined to fight on. Ammunition is passed around, words of encouragement are spoken and men on both sides brace themselves for the fighting to resume. This is the situation at the start of Turn two. 


(A) 53321 - The Americans now have a full Chain of Command dice which is a useful asset to have when the battle is going your way. The Tank moves forward again while pumping another HE round into the Farmhouse. Smoke is coming from the broken windows so it must be having a deleterious effect on the men 'sheltering' inside. 

Meanwhile, the Platoon Seargent orders Squad One to move from the western side of the small wood to the wall that runs along the north. They can't all make the move but a few of then get far enough to shelter behind the wall looking east. The BAR team also doesn't have enough movement to get into position this phase but next time it will be in a strong position and will enable the whole squad to start laying down fire on either the Granary or the Farmhouse. Behind them, Squad three crosses the wall into the wheatfield with the intention of swinging around and supporting the final assault on the farmhouse...if the fight lasts that long. 

(G) 54221 - Yet another Chain of command point is added to the pile. Both Squad one in the Granary and the MG from the Farmhouse train their fire on the Yanks in the Long Field dealing two more points of shock on them. This Squad is close to breaking and the Germans can sense it. 

(A) 44421 - Combining the two and one give the US player (still me!) a chance to utilise all his main assets. The M5 Light Tank stays in position this time, fires another HE round into the Farmhouse increasing the dust and smoke hovering around the building. The bow Gunner targets the windows with his Hull MG. Meanwhile, Squad two, while looking a bit battered still has some fight in it yet. The Platoon's Leuitenant orders them to continue targeting the Granary, dealing another point of shock. Then, over in the small woods, the Platoon Seargent directs Squad One to use the rifle squad to lay down covering fire on the Farmhouse while the BAR team gets into position along the wall. 

(G) 55322 - The Germans get two more Chain of Command points. Looking at options I decide to combine the double 2's to allow them to activate a senior leader. The Senior Leader in question is the NCO in the Granary, who rallies some shock from his squad. Despite coming under covering fire they also manage to inflict two points of shock on the Americans in the long field, finally Pinning them. As this happens the MG in the Farmhouse picks off the Bazooka Team down by the bridge. The remaining riflemen in the Farmhouse, also suppressed by covering fire, still manage to kill one infantryman in the small woods. The German options seem to be dwindling but they still have teeth and are ready to fight on to the bitter end. 

(A) 63321 - Once again the American Player (moi!) combines the two and one to enable activation of all the combatant squads. Starting with the M5  it once again slams a HE round into the farmhouse and opens with the hull MG. This kills one german and inflicts another point of shock on the occupants. Then the Jnr Leader of Squad One in the small woods orders his rifle team to continue covering fire on the farmhouse while the BAR team targets the Granary. This deals another point of shock on the beleaguered occupants. Finally, squad two continues to put down covering fire on the Granary. The Americans are inching towards a position of fire dominance and its just a matter of time before they break the Germans. 

(G) 55331 - The Panzerfaust team has finally moved to a position where it can get a shoot at the American Tank....and he misses again!! This guy needs a job in the Canteen because he's clearly not cut out for combat operations!! Both the Squads in the Granary and the Farmhouse try to fire but both are dodging covering fire and manage to hit nothing this phase. Their morale is flagging and is about to take the final knock. 

(A)  64443 - The American Leuitenat rallies a point of shock off squad two and directs their fire against the Granary. The fire from here has become more and more desultory and he senses the unit inside must have taken significant casualties and is close to breaking. A few dozen yards away Squad one in the woods also targets the Granary. Between them, they manage to inflict another point of shock which finally breaks the unit and kill another German, finishing the rifle team. This is decisive as the unit has now been broken and lost a team so there will be two rolls on the Bad Things Happen table. While the German commander (yep, me) tries to use one of his Chain of Command dice to avoid one Morale check its a bit pointless because the unit flees from the table taking the NCO with it initiating yet another Force Morale test. 

The German Force Morale now has fallen below the threshold for this scenario and the remaining unit in the Farmhouse beat a hasty retreat. 

Analysis

That was a fun game to play out, especially as I managed to surprise myself... quite a feat when playing a solo game! I'm keener than ever to get this game in the Shed-o-War for the Rejects, although that's likely to be some time away. 

Once again I don't think I made any serious errors with the rules, but I'm open to comments if you think I missed something. The only downside to this game was that I spent more time setting up the terrain than it took to actually play the game... Which leads me to an idea. I'm going to keep the table set up but switch to a game of What-a-Tanker later in the week. They can fight over the same ground with a different set of rules by TooFatLardies, so expect another BatRep probably early next week. 

Sunday 25 October 2020

The Problem with Magazines

Many Hobby Magazines have come and gone over the years and the universally accepted truth is that the sector has struggled to maintain circulation, especially in this internet age. And while I accept that each magazine will contain a proportion of articles and adverts that have no interest for the niche wargamer, the majority of us will find something in each issue to pique our interest. Magazines are by their very nature a broad church of articles designed to appeal to as wide an audience as possible. I rarely read an issue cover to cover - on average I'll read about 50% - but I'm OK with that because I'm connecting with my hobby in a way that even the internet can't compete with. 


As usual, if you enjoyed the video I'd ask that you share a link to it, hit the like button and consider subscribing to my channel. If there is any subject you'd like me to discuss, please let me know in the comments below and I'll do my best to make a video about it. Next week I'll be discussing why I think Museums are so important to the Wargamer and Miniatures Painter, but until then, stay safe, keep playing games and keep rolling high!

Friday 23 October 2020

Sandbag topped dug-in markers

Last week I posted pictures of some small hedges that I bought from Pendraken and wondered if there were any other scatter terrain items I could produce. Then I remembered that I had some old prepainted terrain that I had bought for my Western Desert games of Flames of War (many moons ago). These had seen better days and needed a repaint anyway, so I decided to start afresh and paint them for my NW Europe/Normandy games. 

These are actually Dug-in Markers for Flames of War and originally came prepainted for European games. However, when I bought them I converted them for use in the desert with some selected dry brushing to turn the earthen banks into 'sandy' banks topped by sandbags. As I mentioned, they had seen better days, having been stored poorly and bashed around a bit so they were due for a repaint anyway. So I cleaned the models and gave them a new basecoat of Brown primer. 

The paint job was very simple after that, with several layers of dry brushing on the earthen banks and the sandbags, followed by some careful inking of the sandbags to increase the contrast. Once they had dried I gave all the models my prefered practice of using multiple layers of varnish (two Gloss followed by one or two Mat/dull cote) to give them a tough protective layer. I didn't do that with the originals because they were pre-paints and the resulting chips and scrapes were why I needed to repaint them. When everything was thoroughly dry I added turf and grass tufts so they will blend into my other terrain for this setting. 

Hopefully, these will see action soon and I think they will be very versatile.  

Wednesday 21 October 2020

M5 Light Tank from Skytrex

One thing that quickly becomes clear when looking at American tanks in WWII is that the nomenclature is often very very confusing. The M5 Light Tank was a modified version of the Earlier M3 (sometimes known as a 'Honey' to the British). The M5 was originally designated the M4 Light Tank but that was changed to M5 to avoid confusion with the M4 Medium Tank (the Sherman). Meanwhile the British just gave up trying to understand American designations and called it the Stuart VI. 


The M5 grew out of the fact that by 1941 the Americans were looking ahead and expected a shortage in radial engines (which were needed for aircraft) and started looking around for alternatives to power their tanks. They naturally looked at the automobile industry and so the M5 was powered by twin Cadillac V8 engines. The result was a tank that was lighter, roomier and cooler, and the automatic transmission also made crew training simpler. 


The hull was all-welded and the designers moved the glacis armour out slightly making more room for the drivers. They had their own hatches (enlarged on later models) and in the later M5A1 even had access to a hull escape hatch behind the assistant driver's seat. This feature was only possible because American tanks put their track wheel suspension on the outside of the tank in easily replaceable vertical volute spring arrangements. The Germans, on the other hand, used a much more sophisticated torsion bar arrangement that traversed the underside of their vehicles. Arguable the German solution made for a smoother ride but repairs were much more difficult and of course, there was no room for a floor escape hatch. The American approach fitted their philosophy perfectly; vehicles could be replaced easily, highly trained crews could not. 


The M5's turret was essentially the same as in the earlier M3A1, but its lower height (due to new transmissions and driveshafts) meant the turret traverse mechanism could be attached to the underside of the turret basket. This gave the turret crew more room and as any modern tanker will tell you, good ergonomics in a tank is worth its weight in extra ammunition! As already indicated there was a later version, the M5A1 (also called the Stuart VI by the British!) which incorporated a new turret design with a distinctive radio bustle on the rear. The .30cal AAMG mounted on the new turret was moved from the rear of the turret to its right side. 


My model came from Skytrex and the moulding was really good with very little clean up needed. I needed to do a little work drilling and epoxy glueing the MG to the Turret in the hope that the resulting bond can survive handling in a game!  Next week I'll be showing off a Panzer that I've not painted before.  

Sunday 18 October 2020

Are you throwing your dice wrong?

This week The Quarantined Wargamer take a somewhat tongue-in-cheek look at how we throw dice. Some players I have met have an almost superstitious adherence to 'their method' for throwing dice in a game. They swear it gives them better results than other ways of throwing those little polyhedral randomisers. So today's video takes a look at some of those tried and trusted methods for rolling 'good dice'. 


As you may have noticed this week is the first time I have shifted the video release to Sundays, with a simultaneous announcement here on the blog. I'm hoping that this will free up a bit of time in the week for me to work on other things, but it should also ensure that I'm available to join in 'live' on any discussion in the comments (it not like I'm going anywhere at the weekend for the time being!). 

As usual, if you enjoyed the video please hit the 'Like' button and consider subscribing to my Channel. Until next week, stay safe, keep playing and keep rolling high!

Friday 16 October 2020

Small Hedges from Pendraken

Following on from my last Chain of Command game, the
Battle for Le Renau Farm, I decided I needed more terrain options. In particular, I want terrain that would offer some cover but also be easily crossable. I have already painted up a lot of stone field walls and now I decided I needed some small hedges. So I turned to the internet for inspiration and I am really happy with what I found on the Pendraken Website. They make several sets of resin hedges that were ideal for my needs and at just £2.50 per foot wouldn't break the bank in terms of cost. 

As with all resin, I started by washing and scrubbing the models in hot soapy water to remove any oily residues from the casting process or from handling, and then left them overnight to dry. Once dry they were sprayed with my usual Brown primer and then given a coat of Dark Green (a can of Tamiya that I picked up for a couple of pounds on eBay) as a basecoat. Several layers of highlighting followed and with the ground and the gates picked out that was it. As usual, I sealed the models with several coats of varnish to protect the paintwork, so hopefully, these should be featuring in my games for many years to come. 

I bought enough straight sections for 6' of hedge with some additional gate sections and a couple of sets of curves and set of corners to make a total of about 10' of the hedge. Hopefully, that should be ample for my needs, but knowing me I'll end up buying more at some point in the future!


I'm now giving some thought to what other 'scatter terrain' I can work on to continue to enhance the look of my Normandy Games. I have some old prepainted sandbag emplacements that need a repaint so I may work on them next. Any other suggestions folks? 

Wednesday 14 October 2020

Armoured Cars - The M20 Utility Car & Sdkfz 222

This week I have a couple of Armoured Cars for my WWII Normandy games using Chain of Command. Both models were purchased from Skytrex and will compliment my existing forces nicely. The castings on these are pretty good and there was very little flash to be removed (more on the angular surfaces of the 222 than on the M20). I have left specific unit markings off these vehicles but included things like national symbols, number plates and names. 

Sunday 11 October 2020

Why is Undercoat so controversial?

This weeks video from The Quarantined Wargamer discusses the apparently controversial subject of Undercoat and how it gets some painters quite worked up. This is a 'discussion' that has a long pedigree, certainly its been a subject of heated discussion for as long as I have been painting and looks set to continue for many years to come. I discuss some of the issues around what colour your undercoat or primer should be, and why I think a lot of the debate is actually just as a matter of definition. As always, my conclusion is that whatever works for you is the best choice. 


From next week The Quarantined Wargamer videos will be broadcast on Sundays rather than Fridays. I decided on the change for a variety of reasons, mostly to do with my own workload and time constraints. Since April I have been sticking to a fixed timetable for publishing on my blog and the videos and it's really helped instil a bit of routine at a time when in all other aspects of my life (especially at work) nothing has been routine. So from next week, TQW will be released at midday on Sunday with a simultaneous announcement post on my Blog. I'll continue to post a weekly article on the blog on Wednesday at noon, but now I have space in my schedule to do a second Blog article on a Friday if I have something to talk about. 

As usual, I'd ask that if you enjoyed the video please hit the like button and of course consider subscribing to my channel. Next week I'll be taking a tongue-in-cheek look at how we throw dice and ask, are you doing it wrong? Until then, stay safe, and keep rolling high!

Wednesday 7 October 2020

Battle for Le Renau Farm

Over the weekend I played out another solo game of Chain of Command. I'm getting the hang of the rules now but there are still some things I need to work on. I played the game over a couple of days, and for a few phases of it, I live-streamed the game with Posties Rejects using Zoom. I was able to talk then through the basics of the rules and they could see the table. By the end of the game, my scribbled notes extended to five pages and I'd taken over 60 pictures...so this BatRep may be a bit longer than my normal output! 

The Setup
It's early July 1944 and the Americans are starting to probe the German defences in their sector. The Germans have been severely depleted by weeks of fighting, and much of their armoured support has been diverted to the British Sector where several large battles have been barely contained. A US Rifle Platoon, supported by a Mortar team and a Sherman M4 are pushing towards a Normandy farm which could be used by the enemy as a strong point. Their mission is to take the farm and hold it. However, the Germans have got their first and have managed to get a whole Platoon into this vital location. They have control of several large buildings and have clear lines of sight, making any attack very difficult. 

The Action
Based on some feedback from my last Battle Report I'll be including a little more information, namely the results of the command dice rolls for each phase. Experienced players may see some tactic or advantage I missed in these, but for now, I'm new to this and I know I still have a lot to learn. Where possible I'll accompany the text with pictures, but there were a few occasions when the excitement of the action meant I forgot to take a photo. You'll just have to use your imagination! 

(A - 6,4,4,3,2) The Americans started the game with the highest Force Morale (11 compared to 9 for the Germans) so they go first. I took advantage of the fact that a US Rifle Platoon has two senior leaders - the Lieutenant and a Platoon Sergent - to deploy a senior leader quickly. He deployed into the small woods, waiting for a Squad to join him later. Then I deployed the 3rd Rifle Squad in the large woods. Lastly, I brought the Sherman on and started moving it down the road. I expect its firepower to be invaluable against the Farmhouse. 

(G - 6,6,5,1,1) Now the Germans bring on both their Panzershrek Teams, I want to make sure they are available when and if a target presents itself and I can already hear the noise of an approaching tank. One team hides behind the farmhouse, within a single move of the farmyard wall. The Other is placed in the 'Buttery' a small lean-to attached to the Barn. Again this is within an easy move to the wall so the team can deploy quickly when needed. The Germans also get the first CoC point and retain the phase with the double 6.

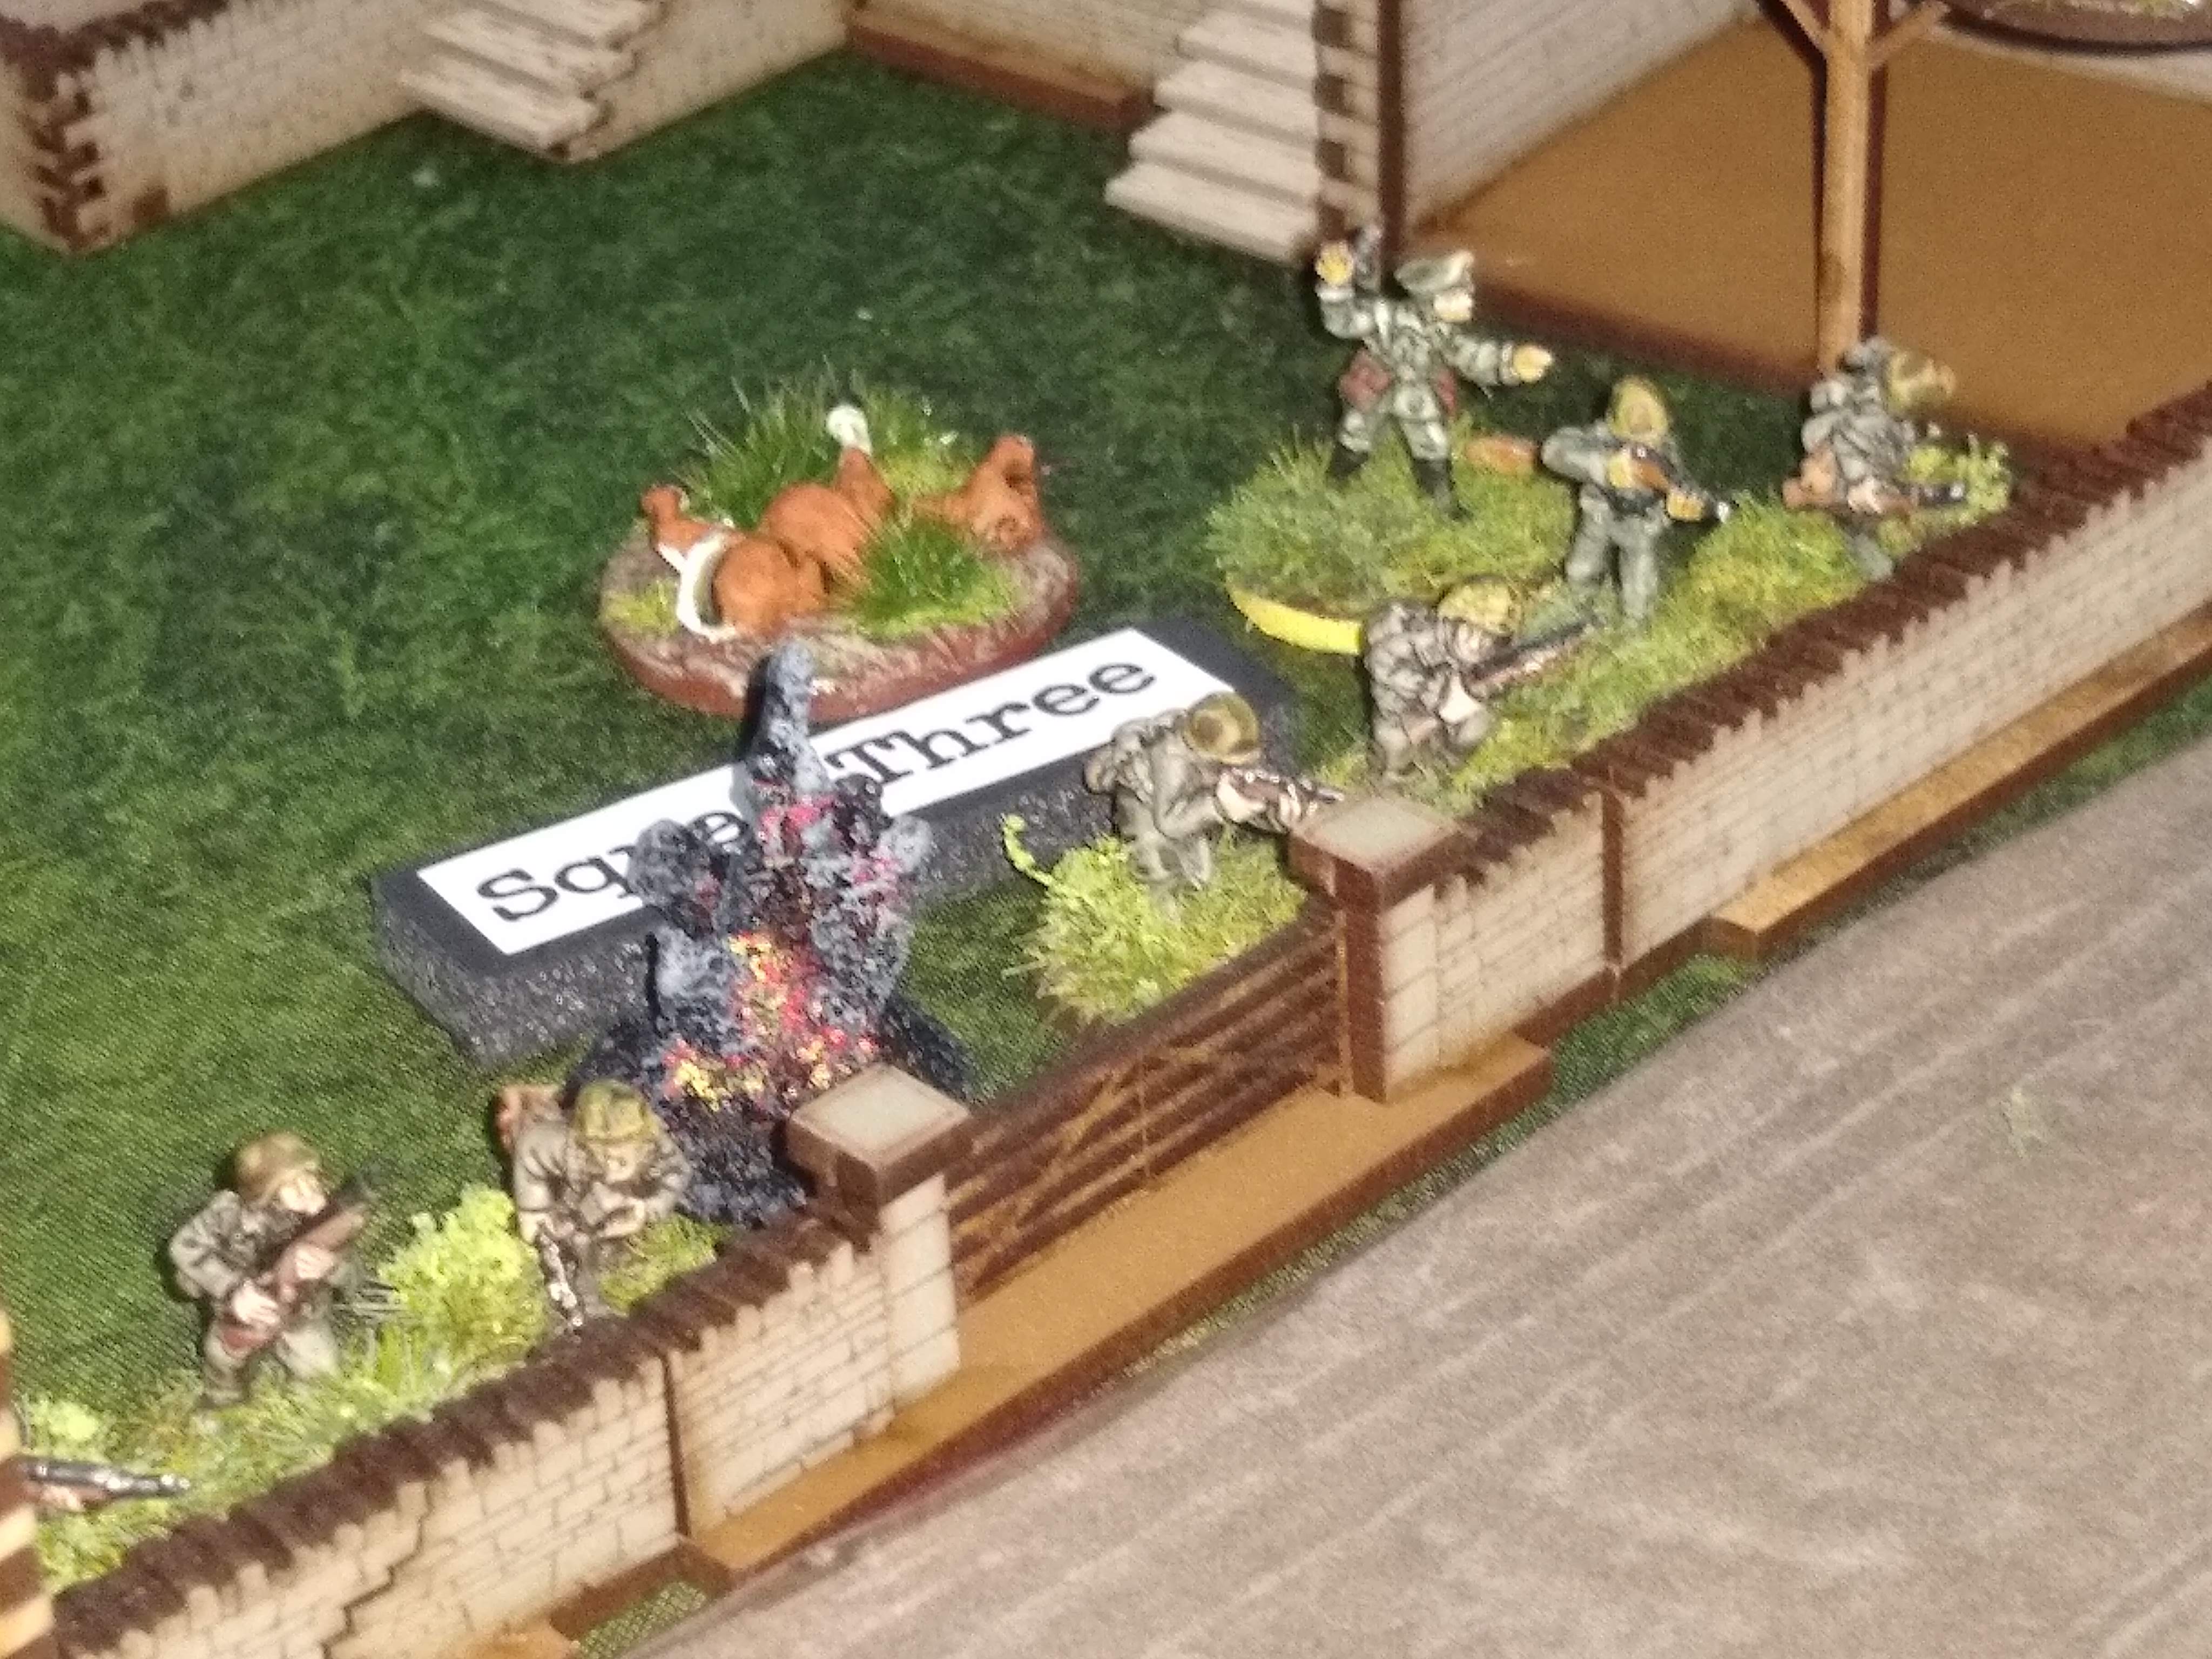
(G - 4,4,3,3,2) These command dice mean the whole platoon is able to deploy into the various buildings of the farm. Squad One, along with its Junior Leader and the Platoons Senior Leader is able to take up positions inside the Farmhouse. This gives them clear lines of sight overlooking the road and the fields to the front of this building. Squad Two take up a reserve position on the upper floor of the Granary at the back of the farmyard. They can offer some supporting fire from here and are close enough to take over if they are needed at the front of the farm. Finally, the Third Squad lines the Yard Wall at the front, with the MG42 positioned up in the Hayloft. This should give it an excellent flanking fire position right across the front of the farm.

(A - 6,6,5,4,2) The Americans will retain the phase and also gain their first CoC point. They then deploy the Third infantry squad (yes, I brought them out in the wrong order just to confuse you!) in the small woods, putting them within the command of the Platoon Sergent who arrived here earlier. I decide not to activate the Senior Leader (or bring on the Platoon leader just yet as I still have troops to deploy. 


(A - 6,5,4,3,1) The American gain another CoC point but crucially, a set of actions that enable them to deploy their final Rifle Squad on their right flank. The hope is they can work their way down the flank towards the Farmyard while being protected by their comrades. With these guys deployed the Platoon Lieutenant comes on and deploys to the Large woods to support Squad One that arrived here earlier. The final command dice is used to order the 60mm Mortar team to open fire on the Farmyard between the Farmhouse and the Hayloft. 
 

(G - 6,6,5,1,1) The Germans gain another CoC point and will retain the phase. After a brief consideration, I decided to add the two 1's together make a 2, so I can activate a Squad. Squad One in the Farmhouse target the US 3rd Squad on the edge of the large woods. The US Troops were taking cover behind a hedge around the woods but the Germans elevated position reduces the cover by one level, from 'Light' to 'in the open'. At first, it looks like their aim is off, but they manage to translate the measly two hits (out of 14 dice) on target into two kills. 

(G - 5,4,3,2,2) Gaining another CoC point the Germans take advantage of retaining the phase to continue targeting the US 3rd Squad. The Germans in the Farmhouse open fire again, this time killing three infantrymen and causing one point of shock. Thankfully the section corporal avoids injury but this squad is looking a bit ragged already. Then the German MG42 up in the Hayloft also target this team, causing another casualty and another point of shock and injuring the Corporal. He suffers a -1 command initiative for the rest of the Turn...something I forgot immediately! In future I need to use some coloured tokens to show when a leader is wounded, just to remind me. Finally, the Squad in the Granary decide to join in the firefight. Only the MG42 can see the Americans but at long range they are less effective, dealing no damage. 

Before the onslaught. Hiding behind a flimsy hedge isn't a good idea.  

(A- 6,6,5,4,1) The American retain the phase and gain another CoC Point. The Lieutenant removes a point of shock from the remains of Squad Three in the Large woods. Unfortunately, my notes are terrible at this point and I honestly can't read my own handwriting so don't know what he did next! The 60mm Mortar Team attack the Germans in the FarmYard killing one infantryman. 


(A- 4,4,3,3,2) A much more useful command role gives the Americans a chance to hit back at the Germans. The Sherman moves fast down the road and fires its 76mm sending a HE round into the farmhouse. The gun only has 5 firepower but it reduces cover by one layer, making ant hits much more effective. True to form the impact kills one infantryman and deals another point of shock to the squad holding the Farmhouse.   


Then the Platoon Sergent orders Squad Two - in the small woods - to move up to the wall overlooking the fields. They can add their fire to that being directed at the Farmhouse and hopefully start making a difference. They fire but only add a point of shock to the Germans inside. Now the Lieutenant uses a command initiative to remove a point of shock from Squad Three in the Large woods. Then he orders them to move out of the woods and take cover behind the field wall. Hardcover is better than no cover! They move diagonally to put a small copse of trees in the field between them and the Germans in the yard, reducing their exposure to incoming fire. Finally, Squad One moved out of the woods and crosses another farm wall. They see a possible route down the German flank where they will be less exposed to incoming fire. 


(G-6,5,5,4,2) Another two CoC points for the Germans, but that is as far as the good fortune extends this phase. Squad One in the Farmhouse fire on the ragged remains of the US Third Squad behind the wall, but with no effect. Then The Germans in the Yard turn their guns on the US Squad One moving down the flank, again with no effect at all. 

(A-6,5,4,3,3) The Americans get another CoC Point giving them a full COC dice to play with. Then the Sherman moves again and opens fire on the Farmhouse again. More dust and brick ricochet around the inside of the building causing anther point of shock on the troops inside. The Squad 2 in the small woods opens fire again on the Farmhouse putting more pressure on the beleaguered defenders. 
(G-6,5,5,2,1) Another two CoC points for the Germans. The Farmhouse defenders now target the US Squad Two in the small woods causing two casualties. Then the Panzershrek team finally gets a chance to tackle the Sherman. With a clear line of sight, and at the effective range they send a  rocket hurtling towards the armoured vehicle. The frontal armour prevails and the round ricochets into the air, but the crew are rattled by the close call. 

(A-6,5,3,3,3) The Americans gain another CoC point and are left with a very useful set of threes enabling them to activate three junior leaders. Squad 2 lays down some covering fire on the Farmhouse, reducing the effectiveness of the Germans fire from inside. Squad three fires on the Farmhouse but with just an infantryman and the BAR team they had no effect...next time I need to reverse that formula and use them to lay down covering fire (lesson learned!). Then the Sherman moves forward a few inches and fires another HE into the Farmhouse resulting in two more kills and two shock. The German leader is wounded and cannot use one of his command initiatives until the next turn. 

(G-5,4,2,1,1) Another COC point for the Germans; they are racking these up! Then I activate the Panzerschrek Team to fire on the Sherman. This time the Rocket causes 4 hits versus two saves (13hit dice vs 5 Armour dice) so with a net 2 hit the Sherman is n trouble. I roll on the damage chart and find that the Bow Gunner has been killed and his weapon put out of action!


Then for good measure, I bring the SECOND Panzerfaust Team into play. I roll for movement and he reaches the farm wall then opens fire. There is a penalty for firing having moved, and another because this time the Sherman is partially obscured. All of this is for nought though because I roll a double one on the aim roll!

The last action this phase sees the Senior Leader in the Farmhouse remove one point of shock from the Squad in there and continue to fire on the American Squad Three by the wall (in from=nt of the Large Woods). One more kill finishes off the final rifleman in the Rifle Team leaving the BAR alone. The Leader passes the casualty check but I still have to roll on the Bad Things Happen table resulting in the Americans losing 1 point of Morale.  

Before it loses the Rifle Team it was already whittled down to a handful of men.

(A-5,5,4,3,3) With two more COC points, the Americans have a full CoC dice to play with. This phase the Sherman continues to put HE rounds into the Farmhouse (resulting in another kill and a point of shock). I had planned on getting the tanks Bow MG to open up this turn...but the gunner's war is over now and that option has passed. The Platoon Sergent in the Small Woods orders Squad Two to open fire. The BAR Team lays down covering fire on the farmhouse (a 4" frontage covers the building), while the Rifle Team tries to take out the Panzershreck Team. They only manage to kill one of the two-man team. This Panzerschreck team has fired its three rockets and was retreating to resupply anyway so the impact on the German side is minimal at this point. Finally, I order the BAR team from Squad Three to fire on the Farm causing one point of shock. Afterwards, I realised I ought to have used that command dice to move Squad One (working down the flank at the back of the table) but hindsight is a wonderful thing (as is concentration!). 

(G-6,6,3,3,1) The Germans retain the phase and start by activating the second Panzershreck Team. The rocket streaks off towards the Sherman and scores a clean hit (Net 2 hits) causing 2 shock and killing the driver! The Tank is still going, but only just. Next, the Squad in the Farmyard are beginning to appreciate the risk they are in from the US troops moving down their flank. The MG in the Hayloft is unable to see the Americans but the rest of the Squad open fire killing one man and dealing 2 points of shock. The MG takes potshot at the Americans on the other flank (in the small woods) but has no effect. Lastly, I decide its time the Squad in the Granary move forward to relive the farmhouse. They move at the double and get most of the way across the yard. 

(G-6,4,4,3,2) The Senior Leader (Unterfedwebel) in the Farmhouse rallies a point of shock from Squad One and order the men to fire once again on the US 3rd Squad, but they have no effect. 
(A) Before the Germans can continue the Americans use one of their command dice to interrupt the phase, ordering the Sherman to fire on the Farmhouse again. The HE round kills two more infantrymen (the leader avoids injury) and deals another shock breaking the Squad. They have to flee 1d6+6" which takes them downstairs and to the back door but no further. The Germans roll on the Bad Things Happen table and lose another point of morale. 
Shaken by this turn of events the German squad in the yard continues its race to relive the farmhouse. They push through the broken unit in the building and take up their positions just in time. They were fortunate that the 1st Squad wasn't able to exit the building because they would have been interpenetrated by the fleeing troops and would have picked up the excess shock of their fleeing comrades. Lastly, the 3rd Squad in the Farmyard continues to fire on the US troops working around their flank but once again with zero impact. The only success comes from the MG42 in the Hayloft who continues to target the US troops in the small woods, killing two men and inflicting another point of shock. 

(A-6,5,2,2,1) Once again the Americans gain another CoC point (we like these!). The Mortar fires again in the Germans in the exposed Farmyard, inflicting another point of shock. Squad Three lay down some covering fire to limit the effectiveness of the fire coming from the Farmhouse. Then Squad one, which has been inching towards the German flank moves around the wall and rushes the defenders of the Farmyard. Their move brings them comfortably within 4" of the enemy and the two sides clash in the first Melee of the game. I don't allow the MG42 team in the hayloft to join in on the German side because they were at least a 4" move from being able to join in so I decide they are excluded.* The resulting melee sees the Germans rolling 13 dice and the Americans 15 dice but the latter wins the fight. The Germans lose 5 men - wiping out the Rifle Squad and ending with another -1 to the German Morale. The Leader miraculously escapes injury but runs away as fast as he can. 

* I may have made a mistake here so I'd appreciate any feedback more experienced players can give me. I decided that the MG team in the Hayloft were over a 4" move from joining the rifle team and therefore couldn't support the Melee...however I had (up to this point) been sharing shock between the two teams because they were within 4" LoS of each other. Correct me if you think I did this wrong, I had to make a judgement call on the spot and now, in the cold light of day, I'm second-guessing my decision. 

(G-5,5,5,1,2) Just when he Germans could do with some good command dice they roll three fives and gain 3 CoC points. They order the remaining Panzershreck team to fire on the Sherman again, and once again the rocket skids off the frontal armour.  The MG42 in the Hayloft tries to fire down on the newly victorious Americans below but only deals 1 point of shock, despite having open sights...clearly, he's rattled by the loss of his whole unit! 

(A-6,5,2,1,1) Another CoC point banked for use later. Squad two in the small woods opens up on the Hayloft and deals out more shock, breaking the MG team. This results in -2 to the german morale and the MG team flees almost to the edge of the table. The Third Squad (well the BAR team that remains) over by the Large Woods lays down covering fire on the Farmhouse. Then the Mortar Team drops a bomb on the fleeing german MG team killing the men outright. The Germans lose 2 more morale and drop down to just 3 meaning their command dice reduce to three. 

(G-4,4,1) The Germans are not out of the fight yet and order the final Panzershreck team to fire their last rocket at the Sherman...flame belches out of the turret as the tank earns its nickname, The Ronson. The poor crew didn't stand a chance and the Americans now loose 2 Morale. 


The Unterfeldwebel orders the newly arrived MG42 from Squad 2 to move to a side window where it has an overlooking position of the Americans that just won the melee in the yard. They deal 2 shock and one kill but the American Corporal survives unscathed. 

(A-6,4,3,2,1) Sensing the time is right to advance the Platoon Sergent joins Squad Two, crossing the wall and exiting the Small woods where they have been until now. They move as quickly as they can because they know they are exposed in the field, however, they are getting covering fire from the BAR team from Squad Three by the Large Woods. As they move they fire at half effect and still manage to inflict 1 shock and another kill on the German defenders of the Farmhouse. Last to go is the lucky Corporal from Squad One. He knows his men are exposed but decides they have little choice but to try to take out the MG that is targeting them. They kill one crewman and deal another point of shock so not an entirely bad plan. 

(G-2,1,1) The MG in the farm continues to fire down on the plucky Corporals squad in the road, killing another man and dealing another point of shock. This squad is now pinned but still some way from breaking. Meanwhile, the Rifle team from the farmhouse target the Americans currently crossing the cornfield. But their fire is being suppressed by covering fire again and they manage no hits on the Americans. 

(A-6,6,5,3,2) The Americans retain the phase and gain another CoC point. Squad 2 moves towards the Farmhouse employing the Marching Fire rule to inflict another kill on the Squad inside. The move takes them the wall of the cornfield and they prepare to attack the next phase. Meanwhile, the BAR team by the large woods decide to stop covering fire but target the troops inside the Farm, killing another German. 


(A-6,5,3,2,1) Another CoC point, but in all likelihood, this means nothing now. The Mortar team tries to inflict more damage on the farmhouse but this is ineffectual. The BAR Team by the Large woods fires again, and again, kills another German, vital for what is about to come... Squad Two cross the wall and are now within 4" of the door to the farm and they rush into close combat. Even defending favourable ground the Germans are outmatched. They lose 8 men to the Americans three. The German rifle team is wiped out and their Unterfeldwebel is killed, the combined results on the Bad things Happen table is another -3 morale reducing them to Zero. The game is over. 


Post Game Analysis

Well, I have to say that was an exciting game to play. It finally felt like some of the tactical nuances of these rules were coming into play for the first time. Now that I have a better grip of the basics I was able to think a bit more about tactics. I still made a few blunders, but each game has been a definite step forwards and I feel like I'm getting closer to a full understanding of the rules. I'm sure I still forgot a few things (and please point them out to me if you see an error I made) but the next game will be better, and the game after that etc. 

I know this is a long (and long-winded) BatRep but I hope it gives a better feel for how the game played out. I'm not sure I'd go into this level of detail every time - it's taken a lot of work to decipher the FIVE PAGES of scribbled notes I made! 

Sunday 4 October 2020

Do wargames need an umpire?

The latest video from The Quarantined Wargamer went out on Friday and in it, I talk about whether we need an umpire when we wargame? My group nearly always have an umpire to coordinate and oversee our games when we play in the shed-o-war. There are routinely up to four players per side and it can get a bit 'noisy' (Imagine 'Presidential Debate' noisy, but a bit more civilised!). Having an umpire to adjudicate rules interpretations and to shepherd us through large and complex games makes those large and complex game possible. 


As always I'd love to know what you think. Please join the conversation either here or on my YouTube Channel and as usual I'd ask that if you enjoyed the video please hit the Like button and consider subscribing to my channel. Next week I will be discussing the apparently controversial subject of Undercoat!