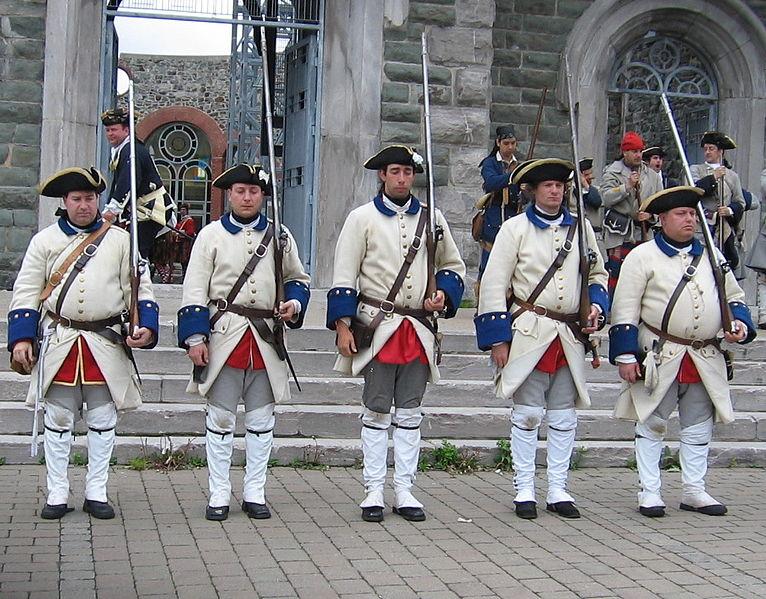
Over the weekend Posties Rejects got together to play a fictitious battle set during Napoleons retreat after his defeat at Leipzig. As is often the case Postie had set up the game before we arrived and we were treated to an unusual setup with the french defending what at first seemed like a weak position. The Angry Lurker has already posted some pictures of the game from his perspective and they are well worth checking out.
Setting the Scene - The Battle of Fulda, 26th Oct 1813
After his defeat at Leipzig, Napoleon retreated towards Frankfurt. Casualties at Leipzig had been severe with 68,000 men killed, wounded or taken prisoner and 300 artillery pieces lost. The French have implemented a plan to stop the Allies slowing down the withdrawal by taking various units from their own divisions to create a rearguard Corps with instructions to hold up any enemy troops that are following the main army. The allies have not been slow in recognising that an attach on the French line of march could be an easy victory. Detachments from the various armies have been combined into a Corps to pursue and attack the French while the rest of the army attacks various French strongholds and garrisons in the surrounding area. Some Corps are trying to out manoeuvre Napoleon by cutting off his line of retreat.
The French have learnt that the fast approaching Prussians are about only half and hour away so have taken up a defensive line blocking their advance at the town of Fulda. The French must stop the Prussian advance to win the game. The Prussians must defeat this blocking force so they can fall on the rest of the retreating French army just a few miles away. Artillery ammunition is low after the heavy fighting of the last few weeks.
Order of Battle
The French
c/o recently promoted General Ricardo Corps Commander
1st Infantry Division (French) c/o Richard
1st Brigade: 21st (2 battalions) & D'illyne(1 battalion) (all line class) & 24th legere (1 battalion) elite class
2nd Brigade: 4 battalions of the 5th (Italian) line class & 2 medium batteries of artillery (one was second class/Italian).
2nd Infantry Division (Polish) c/o Francis
3rd Brigade: 33rd line regiment (3 battalions)
4th legere elite class (1 battalion) (french)
Light Cavalry
4th Brigade: 1 battalion each from the 1st, 2nd, 4th and 8th line regiments (polish),
1 medium and 1 light battery of artillery.
3rd Cavalry Division c/o John
5th Brigade: 1st and 5th Hussars both line class (french) Heavy Cavalry
6th Brigade: 15th Lancers/1st Chasseurs a Cheval both line class (polish)
4th Cavalry Division Reserve c/o Richard but divided with John early on......
7th Brigade: 15th and 23rd Dragoons both line class (french)
8th Brigade: 3rd and 10th Cuirassiers both line class (french)
The Allies
c/o recently promoted General Smithy Corps Commander
1st Brigade: 3 battalions of the 1st west Prussian line regiment/ West Prussian Grenadiers (1 battalion)/ 1 battalion each of Westphalian and Elbe Landwehr (2) conscript class/ a battalion of the1st schutzen elite class (half strength)/Elbe conscript Landwehr cavalry (Prussian), 1 light battery of artillery
2nd Brigade: 3 battalions of the 1st Silesian line regiment/ 1 battalion Silesian Grenadiers elite class/ 2 battalions of Silesian Landwehr conscripts (Prussian)/ a battalion of the1st schutzen elite class (half strength)/ Silesian conscript Landwehr cavalry (Prussian), 1 light battery of artillery
1st Russian Division c/o Lee
3rd Brigade: 2 battalions each of the Polotek and Elets regiments line class (Russian)
4th Brigade: Smalonel Light Dragoons line class (Russian)/ Life Cuirassiers elite class (Swedish), 1 battery of heavy artillery and 1 battery of the royal horse artillery heavy rockets (British)
5th Brigade: 5th Brandenburg Dragoons line class/ 1st Kurmork conscript Landwehr cavalry (Prussian)
6th Brigade: 7th West Prussian Hussars line class/ 1st Westphalian conscript Landwehr cavalry (Prussian)
7th Brigade: 1st Kaiser Franz Hussars line class/ 4th Vecsey Hussars line class (Austrian)
8th Brigade: 1st Silesian Cuirassiers line class/ 4th Magdeburg Cuirassiers line class (Prussian)
1 battery of heavy Prussian artillery.
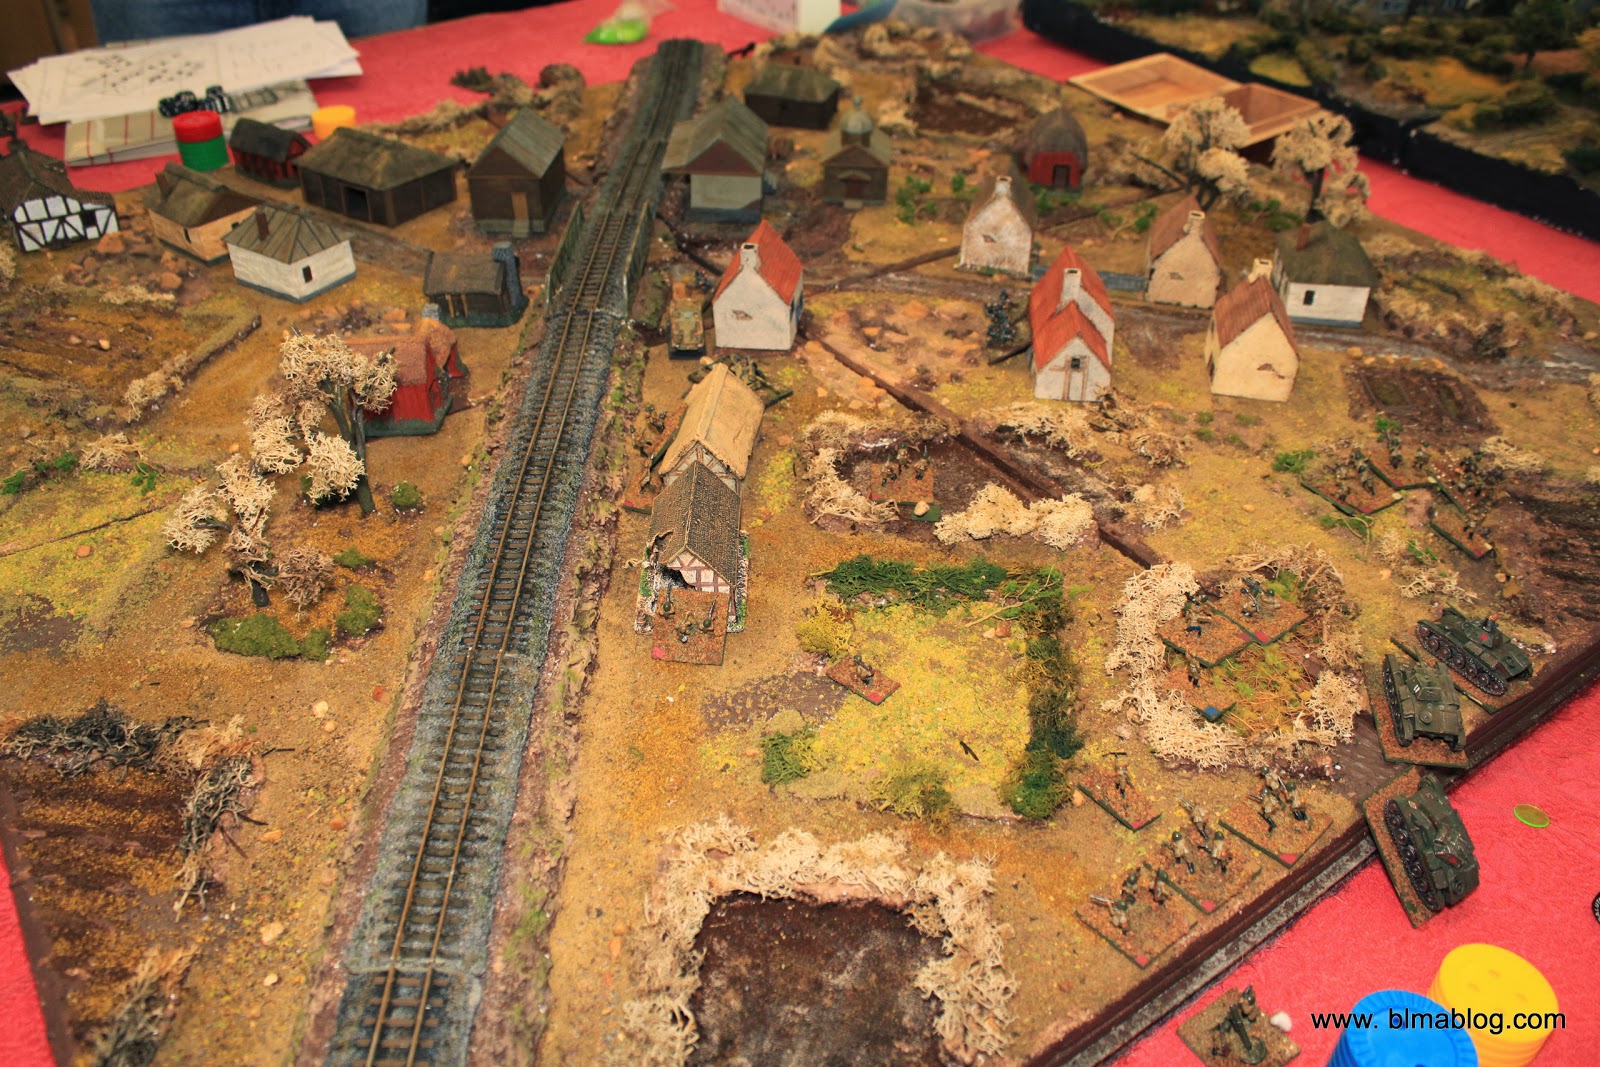
The Action
 |
| The initial setup - The French are deployed in an L shape along the far (narrow) end of the table and along the road towards the Bridge. The Main Prussian forces are on the left of the picture while my Russians are marching towards the bridge at the bottom of the picture. |
 |
| The Prussian commanders Surjit and Smiffy review their troops while French Cavalry player John listens intently to the forces he will have to face. |
 |
| My Russians with |
 |
| The Prussians Corp and the Russians begin their advance towards the French positions |
 |
| The Russian line infantry begin their advance across the bridge under 'cover from a Heavy Battery and the British Rocket Battery. Meanwhile the |
 |
| While the Prussian commanders begin to bicker amongst themselves, Johns French Cavalry begins to launch a series of devastating charges which drive the Prussians back. |
 |
| In the centre Richards infantry also launch an affective charge driving the Prussian infantry back into the woods. |
 |
| Meanwhile the Russian infantry try to force their way across the bridge but their artillery support couldn't hit a Barn Door at point blank range. My dice curse strikes again and during the whole game the only thing my Rockets managed to hit was one of my own brigades!!!! Needless to say, I swore profusely. |
 |
| Fran, the Angry Lurker, put up a stiff defence of the bridge with his Elite Legere Battalion. |
 |
| The Prussian infantry begins an assault on the French positions, and although the French withdrew off the hill it never felt as if they were driven from their positions. |
 |
| About halfway through the game. The French Cavalry have driven back the Prussians at the top left of the picture, destroying some Battalions and routing several others. The Prussian Assault on the hill (right) is proceeding slowly while the Russians (out of shot at the bottom) are still struggling to cross the bridge. |
 |
| The Prussian commanders opened a can of whoopass when they tried to attack Johns cavalry, and have paid the price. The Prussian flank has been forced back until the attackers are on the defencive. The only hope is that the Russians can get across the bridge and unbalance the French defencive position. |
 |
| The Russian infantry spent most of the game on the Bridge, unable to move the French Elite Legere Battalion blocking their path. By now the Heavy Artillery battery is out of ammunition and the Rocket Battery is out of whizz-bangs. The Russian infantry have been the only casualties of this infernal British invention during the whole game. |
 |
| The view from the other end of the Battlefield. The Prussians should have been driving the French back by now. Instead they are the ones on the defencive. |
 |
| The French line of defence (on the left in this picture) remains well ordered and strong while the Prussians are all over the place. Several Battalions have been routed and many more have been utterly destroyed. |
 |
| Fresh French Cavalry is now coming into position where they can support the earlier success of their comrades and John is almost literally rubbing his hands together with glee. |
 |
| At last a possible break. The Legere Battalion have to retreat from the foot of the bridge. Now if the Allies can just win the initiative and move first..... Nope. Almost immediately the Legere are back again and now there is no more artillery support for the Russian infantry. |
 |
| The end. The Prussians have taken a pounding from the French cavalry and have failed to break through the French defencive line. Meanwhile the Russians have failed to cross the bridge, keeping a whole Allied Division effectively out of the battle. |
Analysis
When the initial setup was revealed to us we (the Allied players) thought we had the French in a terrible position. But the French quite literally grasped victory from the jaws of defeat. The French Cavalry under John were well handled - with considerable élan I might add - and just seemed unbeatable on the Prussian flank. Its hard to see how the Prussians could have prevented this, although it has to be said that if the two Prussian players had worked as a team that might have helped a little! Meanwhile my dice curse just amplified my normal martial ineptitude and I spent all of the game blasting away with my artillery to no effect. Those bloody British rockets were a nightmare and the only damaged they caused during the whole game was against my own troops!!
When the initial setup was revealed to us we (the Allied players) thought we had the French in a terrible position. But the French quite literally grasped victory from the jaws of defeat. The French Cavalry under John were well handled - with considerable élan I might add - and just seemed unbeatable on the Prussian flank. Its hard to see how the Prussians could have prevented this, although it has to be said that if the two Prussian players had worked as a team that might have helped a little! Meanwhile my dice curse just amplified my normal martial ineptitude and I spent all of the game blasting away with my artillery to no effect. Those bloody British rockets were a nightmare and the only damaged they caused during the whole game was against my own troops!!