Showing posts with label War of 1812. Show all posts

Saturday, 22 January 2022

The Battle of Siwokino - August 1812 - A What-if battle set on the Road to Moscow

Last weekend the Rejects gathered in the Shed-o-War for our first in-person game of 2022. Stuart ran a what-if game set during Napoleon's invasion of Russia in 1812. He used historically available forces for a fictional battle in a geographically possible location (whatever that means!). The result was a really fun and interesting game that forced both sides to think hard about their tactics and produced surprises for both sides. All-in-all a thoroughly enjoyable game and a great start to the year. 

Orders of Battle
As usual, I'm having trouble reading Stuart's handwritten Orders of Battle. The 20th and 21st centuries have passed him by and the concept of typewritten OOB's is an anathema to the poor fellow (as are digital communications and computers). So the following orders are shortened summaries of the forces available. 

French C/O 2nd Corps -Marshal Oudinot (Duke of Reggis)
Infantry Division c/o Verdier
  1st Battalion - 37th Line, 124th Line, Light Gun Battery
  2nd Battalion - 4th Swiss Line, 3rd Provisional Croatian Line, Light Gun Battery
Combined Cavalry Division c/o Doumere
  3rd Battalion - 7th & 20th Chasseurs a cheval, 8th Chevau-lager Lancers
  4th Battalion - 23rd & 24th Chasseurs a cheval, Horse Artillery
  5th Battalion - 7th Curassiers (Elite)

Russians C/O 1st Corps LG Wittgenstein
5th Infantry Division c/o Berg
  1st Battalion - Sievski, Kalugski Line
  2nd Battalion - Perski, Mogilevski Line, Light Gun Battery
  3rd Battalion - 23rd, 24th Jagers Line, Light Gun Battery
  Heavy Gun Battery in Redoubt
1st Cavalry Division c/o Kazoffskoi
  4th Battalion - Riaski Dragoons, Yamburg Dragoons
  5th Battalion - Grodmo Hussars
  6th Battalion - Plantoff Cossacks, Rodianoff Cossacks
  7th Battalion - Grekoff Cossacks, Selivan Cossacks


The Action
The following pictures are not a blow by blow account of the action, rather they give a feel for the overall direction of the battle. It's always hard to play the game, take pictures and accurate notes at the same time and this game took a lot of concentration as a player (it always does for me!).
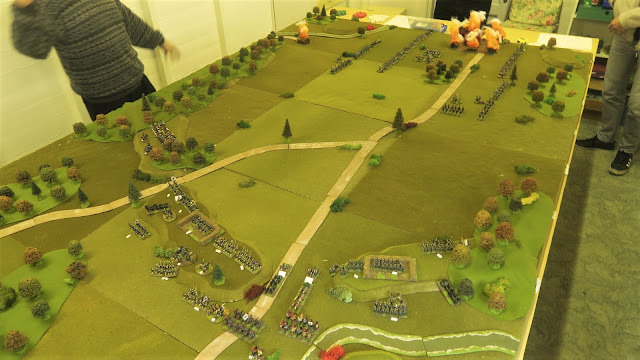
The Initial setup. French columns are marching towards a ridgeline and two Russian redoubts. They have to take the redoubts to win and the Russians, unsurprisingly, have to hold them. This picture is after the Russians have moved some units into hidden positions behind the hills. Their position has been noted by the umpire and then removed from view. 

The two redoubts that the Russians need to hold have infantry in them, but the quality of troops is poor and the Cossacks held in reserve are not the greatest cavalry on the table! 

View down the table as the French prepare to start their march.

The French march past a Russian village burned by the Russians themselves in a scorched earth policy to deny the French any resources on Russian soil. 

The players from L to R: Richard, Surjit, Stuart, Ray, Mark...and me behind the camera of course.

Surjit begins moving his columns forward... I wonder if he'll remember to change their formation from March Column to Attack Column... hmm

Ray seems to be aiming his Division at the left-hand Russian redoubt while the bulk of the French forces seems to be aiming right of centre. Surjit is trying to temp the Russian cavalry off the hill on the left of the line. 

What the Russians lack in quality they ake up for in patience. 

Looking out across the lines at the advancing French.

I'm in charge of the centre while our Commander in Chief controls the left including all the hidden troops. 

Surjits cavalry charges towards the hill, forcing Richard to countercharge. However, Richard has attached his commanders (extra dice in melee) and has the advantage of charging downhill (defending favourable ground bonus). 

Meanwhile, I moved my artillery slightly forward of the infantry line. Rays Cavalry is just about in range for a charge and he smashes through the first one battery and then in a follow-through charge into the Horse Artillery.  

Both Artillery batteries are swept away but now Rays cavalry are disorganised and facing two Cossack regiments. 

Meanwhile, the French charge against the Russian left flank has not gone to plan. Richards dice rolling, combined with the advantages he ensured he had, gained a win and send the remnants of the French fleeing backwards. 

Then my Cossacks smash into the winded French and send them packing (they failed a subsequent morale roll and they are removed from the table. 

Now the French infantry gets close to the Russian lines. Surjit is shocked to realise that the green marker behind his units means he is still in march column (despite playing these rules before). 

While the French spend a turn changing into Attack Column the two sides exchange ineffective fire.

Finally, the French columns reach the Russian line... strangely ignoring their target, the redoubt. The French know they will sweep the Russians off the hill and seems to assume they will then be able to take the redoubt at their leisure. At no point do they seem to have wondered if anything might be behind the hills!

True to the expectation they sweep my Russian line troops off the hill. But Richard had anticipated this and moved the hidden cavalry into position, ready to launch a counterattack. 

Lets just say the look on Surjit's face when he saw the hidden units being put on the table was priceless. 

A Russian line unit charges the disordered french, Richards Hussars chargees into their flank, and one of my hidden Cossack units hits them from the right. Get off our hill your Frenchies!!

Meanwhile, on the right of the line, it is clear that Ray is aiming at Marks redoubt. This is a weak position, but hopefully, the overall French attack will run out of steam before this blow lands.

Its our ground and we want it back!! The combined Russian attack flings the french back off the hill. The French infantry is still in the fight but so seriously mauled they are now a sent force. 

There followed a bit of 'debate' about what to do next but the French commander Ray wisely threw in the towel at that point. Victory to the Russians. 


Analysis
Well, as a player on the Russian side you would expect me to say how our plan worked perfectly and the French, full of overconfidence, walked right into our trap. Not once did I hear them speculate if anything was behind the hills and they seemed to completely ignore the redoubts that were their objectives. The Russian forces looked numerous but were weak, and most of our cavalry were Cossacks so pretty much only good for counterstriking and ambush attacks. Richard was an excellent commander, and Mark an I were glad to follow his lead, especially as it game as a win to start the year off with. 

Tuesday, 15 January 2019

Battle of Little Creek 1814

The weekend before last I got my first game of the year in the shed-o-war. Just two of us could make it so Surjit and I went 'mano o mano' in a Napoleonic game with a difference. We would be fighting a battle set in north america during the war of 1812. This battle takes place in July of that year somewhere in upper Canada and sees two columns, one British and one American, approaching each other. As usual we pulled a slip of paper out of a metaphorical hat to decide sides and it was decided that I would be the Americans and Surjit would play the British. 

Setup
The war of 1812 had a long prehistory that lead almost inevitably to conflict. To the Americans the war was an act of defiance against a hostile Royal Navy that infringed on US territorial waters. To the British it was an attempt to counter American breaking of the naval blockade that was choking neutral trade to France. By 1812 both fleets were in open conflict with the Royal Navy's smaller frigates getting the worst of it.

Commitment to the war in Europe meant Britain adopted a defensive strategy, limiting operations to the Canadian border and western frontier. Several American attempts to invade Canada were repulsed but there were significant victories on both sides and in 1814 the Royal Navy burned Washington (including the White House). The war was unpopular on both sides and by August 1814 peace negotiations were under way.

Our battle is set in 1814 with a well trained American army facing a column of British Line troops and Canadian Militia.

Order of Battle

British (Surjit)
1st Brigade c/o Hercules Scott
  1st Royal Scots (Line Class)
  8th Kings  (Line Class)
  41st (Line Class)
  89th  (Line Class)
  Light Gun
  Rocket Battery

2nd Brigade c/o Lt Col Pearson
  Glengary Ligth Infantry
  Incorporated Militia of Upper Canada
  Lincoln Militia
  2nd York Militia
  19th Light Dragoons
  Indian Allies
  Light Gun


Americans (Lee)
1st Brigade c/o B-Gen Winfield Scott
  9th Line
  11th Line
  22nd Line
  25th Line
  Light Gun

2nd Brigade c/o B-Gen Ripley
  1st Line
  21st Line
  23rd Line
  Light Gun

3rd Brigade c/o B-Gen Porter
  New York State Militia
  5th Pennsylvania Militia
  US Light Dragoons
  New York Stat Militia Light Dragoons


The Action
Initial Setup - The Americans with three Brigades are in the foreground and have not fully crossed the river. The outnumbered British are perhaps in a better position in that they have one brigade 'deployed'. 

Brigades at deployment

Initial moves. I wanted to establish a forward line to allow space for my rear Brigade to get across the bridge. I expected the British infantry to also push forward but there's plenty of room, right...? Hang on a minute...whats that lone Light Dragoon unit doing. Hopy crap its charging!!!

The 19th Light Dragoons gauge the distance perfectly. With probably less than an inch to spare they made the distance and crashed into one of my line units. I's underestimated the gap between us! The Dragoons are a small unit and all I have to do is roll ok in melee...

About turn two - I'm moving to form a line roughly contingent with the hill. My Militia Brigade is swinging wide to the right and my second Line Brigade are starting to march across the bridge.  There's just the small matter of that cavalry vs infantry Melee to resolve...

My line unit rolls appallingly bad and falls back through a friendly unit disrupting it. Suddenly my front line is in utter disarray and all because I got a fraction of an inch too close to the enemy! 

From bad to worse... The British dragoons now charge my second disrupted line unit. Not only do they defeat them they nick one of my flags! That whole first Brigade is teetering on the brink of having to fall back. The only bright side, I have moved my Militia Cavalry round and am ready to return the favour on the exposed British line. 

...a line that looks impressive but is made up of militia units. 

The British fire their rocket battery and hit absolutely nothing...but every unit in my army has t take a moral test or be disrupted on first seeing this new scary weapon.... four units are forced to halt and try to reorganise including my militia infantry on the hill. Then the cheeky bugger charges my gun on the hill with his skirmishers... and my militia can't now counter charge and can only look on. This game is getting very frustrating. 

Oh for Pete's sake! The 1st Brigade have to make a Brigade Check, fail and have to fall back one full move. This does mean I'm away from those blasted Dragoons but now my regiments are all mixed up and in each others way. 

The British meanwhile are approaching in an orderly fashion. They divert a couple of units to face my Militia cavalry on their flank but despite sending them reeling back there are more British units to steady the position and blunt my assault. 

I start to redeploy as best I can. Some units can't move if they want to reorganise but my 'plan' is already in tatters. 

I loose the gun on the hill to the British Skirmishers but I'm finally able to bring my infantry units forward in something resembling an ordered line. I decide to gamble on a general charge (I'm sure I have lost the battle at this point, so what the heck!). Its only a partial success and the British respond with a counterattack. Overall its a bit of a standoff, with neither side landing a decisive blow, but I think that was the last chance for the Americans to regain control of the battle. 

Over on the flank my Militia have reorganised but are no longer facing the flank of an enemy. And those damned skirmishers of the British are harassing my flank relentlessly. 

Combined fire and melee have forced my Militia Brigade to fall back. Straddling the road my Line units have some sort of order but every one had taken casualties and all bar two are disordered limiting my choices for next turn... but its getting dark and Postie calls the game to a close.

Victory for the British was in little doubt. and the points say it all. Three points for the Americans and 17 points for the British. 


Analysis
I'd like to say that the delay getting this batrep posted is only in small part because I got such a thrashing. It's been a very busy week, both at work and at the hobby desk, and I just haven't had time to write this up until today (thank crunchie for my Tuesdays off work!).

So I've started my gaming year with a loss. Not good. Not good at all. I thought Surjit was taking a bit of a risk with the Dragoon charge but he judged the distance well and of course his dice rolling was better than mine. I was on the back foot almost from the first round of action and never recovered after that. Well done Surj, a deserved victory. I must do better next time!!