Wednesday 30 January 2013

The Long Soak

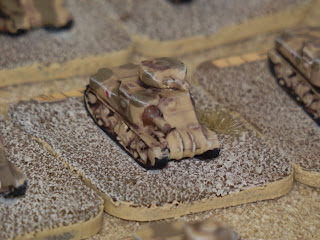
I saw this excellent Blog post yesterday (on Wargaming with Barks) about a neglected box of fantasy football goblins that he left soaking in Dettol for two years! Admittedly this was unintentional but the results looked pretty good after a little scrub and wash with some turpentine. I recently had a go at stripping old paint from some 6mm Italian Tanks and also used Dettol as my stripper of choice, and the results were OK if not spectacular. I probably could have soaked the models a little longer than I did, but I don't think I have the patience to plan my painting projects two years in advance! 

I now have another batch of models soaking in a tub of liquid oven cleaner. I tried it on some models last week and it worked OK, but no better than the Dettol (although without the smell). With this latest batch I'll soak them for at least a couple of days as I'm working on something else at the moment. I'm not sure if this cheap pound store oven cleaner is the best at cleaning models (I don't know if it contains the Sodium Hydroxide active ingredient) but I'll give it another go before buying something else to try out. The major advantage of this product is that it doesn't stink the house out, and therefore makes it wife friendly!

Another useful pound store acquisition was a set of 2 small watertight snap lock Tupperware boxes. These are ideal for soaking my 6mm models in as I know no smells or chemicals will spill from them. I can just toss in the models, top up with the stripping liquid of my choice and let them soak the long soak safe in the knowledge that no noxious smells will seep out. As my workspace is in the family room such considerations are important if I want to stay on the good side of She Who Must Be Obeyed.

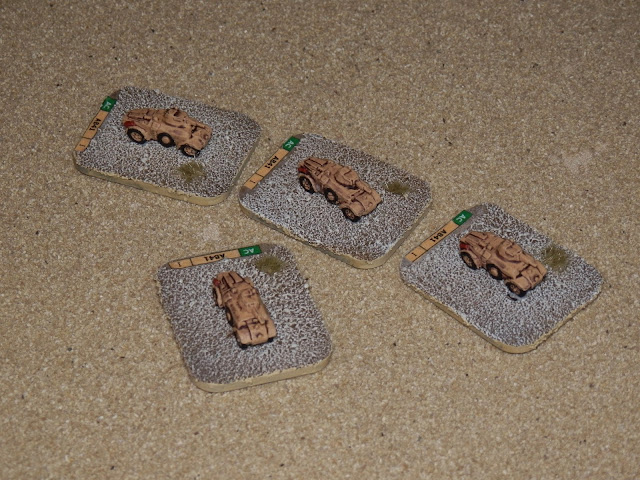
While these 'marinate' I'm painting up some other 6mm British Tanks and Armoured Cars to round off my Heavy Armoured Squadron. Then I really need to switch my focus back to the Germans and some panzer IV F1's I recently bought from Skytrex. Its good to be busy! 

Tuesday 29 January 2013

Vigilant, Fastidious & Diligent

I've been getting a lot of Spam lately (Spam as in junk mail not Spam® as in the canned precooked meat product). I've always received a certain amount of spam comments on BLMA but until recently this was a handful each week and easily eradicated. All part of the rich tapestry of the Internet, filtered by Blogger and easily eradicated without it ever reaching the eyes of my readers. But just before Christmas the volume of Spam received on BLMA jumped and has now reached annoying levels. 

Spam Comments are an everyday occurrence for most bloggers and (in my experience) are largely from that ubiquitous Internet user 'Mr Anonymous'. Some are comedy gold having clearly been written by a computer and then translated from Chinese or Russian into a bizarre version of English that has to be read to be believed. But no matter how funny some of these are they all have a sting in the tail, a link that isn't what it appears.

Most of the Spam I have had recently seems to be associated with Internet Gambling sites rather than porn, but very few of the spam comments are honest in their statements. None say "Visit my roulette website here..." and the only real intention of this unsolicited mail is to improved the page ranking of their website by scattering the Internet with back-links. Blogger automatically applies the "nofollow" tag to all comments, so back-links receive no Page Rank boost, but of course that doesn't stop the spam-bot from dumping in your comments folder in the first place. 

A wealth of words! 

My Spam is still largely being filtered and deleted before it reaches the public pages of BLMA but the volume of Spam has increased enormously over the last two months. I now regularly receive a couple of dozen Spam Comments per day and although for the most part it is still being caught by the filters built into Blogger its taking longer every day to eradicate. Despite this I'm not about to activate further security measures just yet. My views on Captchas are well known and I would only resort to these if large amounts of spam were getting past the filter's to the front pages. 

I'll remain "vigilant, fastidious & diligent" and will of course continue hitting the delete button as long as the spam-bots pursue their pointless business of clogging up the Internet with cr*p. But just in case I accidentally delete a genuine comment (thankfully this has only happened a couple of times) please bare with me and re-send your thoughts in. I still value genuine feedback and the vast majority of the conversations that take place on BLMA are conducted by living, breathing gamers with something worthwhile to contribute.

Monday 28 January 2013

Heavy Armoured Squadron 1942

Over the weekend I was able to focus on the next part of my 1942 North Africa project and painted the core of a British Heavy Armoured Squadron. This consists of three Troops of Grant Tanks and Two of Sherman's. 

British Heavy Armoured Squadron

I have been looking forward to painting these as they include one of my favourite tanks, the M3 Lee/Grant Tank. 

The M3 wasn't a great tank having been rushed through from design to first production models in under a year. But its hull would later go on to form the basis of the M4 Sherman and the lessons learnt on the M3 would shape American tank design for years to come. But for the British crews these were considered wonderful tanks, easy to maintain, roomy, reliable and packing the much needed 75mm duel purpose gun in its side sponson. This meant that for the first time British Armoured Squadrons could use HE rounds and gave them some degree of parity with the German Mark IV's.

There is an excellent example of a 'Desert' Grant at the Imperial War Museum in London. This tank was Field Marshal Montgomery's command tank and the main 75mm gun in the hull is fake.

'Monty' in the IWM London
To support these five troops I have two squadrons of Crusader II's and some AEC I Armoured Cars. I'll start work on these in the next few days. 

Friday 25 January 2013

Home Made Tanks

Continuing the occasional series of pictures of Toy Soldiers.


Three home made tanks dating from the 1940's. The camouflaged tank looks like a hybrid between a WWI design but with a WWII turret. The maker has put a roller in the base so it moves around easily. The centre tank is made of wood with a more modern design and is dated to 1942. The smaller tank on the right is a classic example of wartime thrift and entrepreneurial spirit as the brother and sister that made this made others as well and sold them to a local toy shop!

These models and many more can be viewed at Bletchley Park and are part of a huge collection of wartime memorabilia.

Wednesday 23 January 2013

Which Wargaming Mat?

It's not often I call directly on the readership of BLMA for help but this is one of those few occasions. It must be abundantly clear by now I recently started working on a 6mm WWII North African Desert project. I'm making good progress with the painting (I love this scale!) but one thing I'm missing at this stage is a suitable wargaming surface. I don't have a dedicated wargames table but instead make use of the dinning table with a grass wargames mat thrown over it. Now of course I'm looking around for a Desert themed wargaming mat...but finding one is proving harder than I thought.

Here are some of the ones I'm looking at but if anyone can point me towards an alternative that would be great. Incidentally I want a 6'x4' mat and would rather buy a mat as I don't really have the facilities (or the skill) to make one.

Woodland Scenics Readygrass Desert - This has a vinyl backing with a painted sandy covering on the top. It is thin, flexible and light but judging from the sample I bought it sheds its covering easily. I don't want to invest in a mat only for it to be as bald as me after just a few games. 
TerrainMat Desert - A strong vinyl backing and supposedly tough surface covering, this range comes in a wide variety of surface options. The Desert range comes in three colours. The downside is it seems very expensive and some reviewers have expressed doubts about its durability.
Javis - Thus far I have only been able to find the 24"x48" mat online and I'm not sure it comes in larger sizes. Also the 'rocks' appear too big for my 6mm figures and look likely to shed from the mat.
Mat-O-War - Billed as indestructible and coming in a range of colours including desert beige this looks like a good option. Despite being heralded for a return to stock by Antenocitis Workshop back in September they haven't materialised. 
So does anyone have any feedback about these option, or can you suggest a suitable alternative. Money is a factor obviously but I'm not averse to paying out for a good quality mat that will last a few years. Right now I'd just like to have a proper choice and I can worry about the cost later! 

Tuesday 22 January 2013

Italian Compagnia Carri (Tank) Company

As well as preparing a load of wargaming bases I have also been busy painting some Italian self propelled guns and Armoured cars as part of my Compagnia Carri (Tank) Company. In fact these two platoons have finished off this platoon for the time being. I may add more units to this company at a later stage but for now I'm considering this project finished.

First up is a platoon of Semovente 75/18 Self Propelled Guns. These mounted a 75mm mountain gun on the chassis of a M14/41 tank (from 1941 onwards, prior to this they used the M13/40 chassis). Weighing in at a little over 14 tonnes and with a crew compliment of just 3 (commander/gunner, driver, loader/radio operator) the S75/18 was mechanically underpowered. The gun was a relatively modern weapon but at just 18 calibres its low muzzle velocity severely limited its range. They were best suited to a defensive role where they proved particularly effective against the US built M3 Grant and M4 Sherman tanks used by the British Army.

Self Propelled S75/18 Platoon
The Autoblinda 41 (AB41) armoured car was armed with a 20 mm Breda 35 autocannon and a coaxial 8 mm machine gun in a turret, and another hull mounted rear-facing 8mm machine gun. Weighing in at 7.5 tonnes the AB41 had a crew of 4 (1 x forward driver, 1 x rear driver, 1 x gunner and 1 x commander) and had a top speed of 48 mph. It was considered one of the best armoured cars of its era. 

Autoblinda  41 (AB41) Armoured Car Platoon
Both these platoons are part of the Ariete Armoured Division which was formed in 1939 and fought in the North African Campaign until being destroyed during the Second Battle of El Alamein. Despite the Italian armies shambolic and disastrous start to the North Africa campaign Divisions such as Ariete soon became battle hardened and were relied upon heavily by the German Afrikacorp. 

Compagnia Carri (Tank) Company

I noticed after completing these two platoons that the bases looked different to those I was producing just a few months ago. I'm sticking to the same painting formulae but the change has come about because the composition of my basing sand has changed. The initial batch consisted of fine and medium grained talus blended to provide texture to the bases. My most recent blend clearly has more fine grained material in it, resulting in a slightly different texture and this in turn has effected the dry brushed highlighting on the bases. I actually prefer the latest batch of bases and am already considering how I can make the older bases blend in with the newer ones. I must be mad, this project has only been going three months and I'm already considering re basing some of the figures! 

Sunday 20 January 2013

All your bases

The snowy weather has meant that I have gone from having a busy weekend lined up to having a lazy Sunday afternoon. So I thought I'd take advantage of the free time and get some painting done of course. But I realised that I was missing one critical element from my models...finished bases. 

I totted up how many vehicle bases I needed and was a little shocked to find the figure was close to fifty! Fortunately I had plenty of bases in my supplies cupboard and decided to bite the bullet and make a large batch ready for all my tanks as I complete them over the next few weeks. 

This is a bit of a chore, but a necessary step and will save a lot of time later down the line. 

Friday 18 January 2013

A new Ice Age cometh!

Britain is bracing itself for severe weather after what has been something of a 'phoney winter' of mild temperatures and rain. Parts of the country are already experiencing 'blizzard' conditions and the snow is marching steadily eastwards. If the weather forecasters (and panic mongers) are to be believed this is the beginning of an icy Armageddon which will cause untold travel chaos, widespread disruption, power failures, "cats and dogs living together" and other portents of doom.

We are expecting a maximum of two or three inches of snow where I live. 

Its at times like these that I think most of the rest of Europe are laughing at us (well, more than usual). This is no more than a flurry to them and they seem to function perfectly well with two or three feet of snow. Of course the real problem isn't the snow, its our reaction to it, and our inability to adjust to changing conditions, particularly on the roads. In England we consistently over dramatise the weather and overreact to the predictions but still somehow fail to adapt adequately and appropriately to the conditions on the ground.

Its been snowing in my location east of London for a couple of hours now and we have less than half an inch of snow, although it is getting heavier. I have just sent my staff home early and I'll be going home soon myself. I don't actually consider the conditions here to be that bad and I personally am quite comfortable driving in snow, but there seem to be a lot of utter morons out there that don't adjust their driving speed, regardless of the conditions. Frankly its them, not the weather, that worry me.

Winter motoring can be distilled down to some very simple advice.

  • Take sensible but proportionate precautions and think about your journey. 
  • Listen to local radio for weather and travel reports. 
  • Ensure you have enough antifreeze in your radiator and de-icer in the windscreen washer. 
  • Drive slower and take your time.
  • Use gentler manoeuvres when on snow.
  • Increase your stopping distances and break gently. 
  • Be a little more patient with your fellow road users... 

...and that's it. Simples.

I'll be taking my work laptop home so I can continue there, but I'll also probably get a little painting done as well. Then when the kids get home I'll go and play in the garden and enjoy the snow for the brief time it lasts. In the meantime our European neighbours will be looking across the Channel at their eccentric British cousins and quietly chuckling to themselves.

North Africa 1942 - Army Lists

Thus far my foray into 6mm wargaming has been a little bit haphazard. I've painted several platoons and the core of a number of companies but without a clear idea of what I am aiming for. So over the weekend I sat down with a copy of the North Africa source-book and worked out several Company lists that I am aiming to build. 

Much of what I need has already been painted but there are several platoons that are missing and still need to be built. I have some old models that I am in the process of cleaning up ready for repainting and I have ordered a few more (mostly Grant Tanks from Skytrex) to finish off my two British Companies.

When this lot is painted I will have four viable armies (2 Axis and 2 British) that work out about 3200 points per side. I can then think about fleshing out these units with Divisional Support platoons, AA Units and some specialist engineer teams and later still with additional support companies.

The platoons marked below with a ** have yet to be painted. I have the models already and will be working through these over the coming weeks. The platoons marked with a °° are currently on order and will be added to the to-do list as soon as they arrive. 

Panzerkompanie (21.) - Confident Veteran - German Armoured Company
Company HQ - 2x Panzer IV F1   200pts
Panzer Platoon - 4x Panzer IV F1   400pts
Panzer Platoon - 5x Panzer III J (early)   450pts
Heavy Anti-aircraft Gun Platoon - 2x 8.8cm FlaK36   240pts **
Heavy Panzerspäh Platoon - 4x Sd Kfz 231 (8-rad)   170pts **
Air Support - Priority Air Support Ju 87D Stuka   175pts **
Company Points: 2035

Compagnia Carri - Elite - Italian Tank Company
Company HQ - 1x M14/41 60pts
Carri Platoon - 5x M14/41 300pts
Self-propelled 75/18 Platoon - 1x Carro Comando & 4x Semovente 75/18  320pts **
Armoured Car Platoon - 4x AB41 125pts **
Limited Air Support - Macchi C.200 Saetta 125pts
Company Points: 1230
Axis Total - 3265

Infantry Tank Company - Confident Trained  - 8th Army British
Infantry Tank Company HQ - 2x Matilda II 145pts
Infantry Tank Platoon - 3x Matilda II 215pts
Infantry Tank Platoon - 3x Valentine II 160pts
Rifle Platoon (8th Army) - 195pts
Field Battery, Royal Artillery (8th Army) - 4x OQF 25 pdr gun 215pts
Company Points: 1250


Heavy Armoured Squadron - Confident Trained  - 8th Army British
Heavy Armoured Squadron HQ - 3x Grant 280pts °°
Heavy Armoured Platoon - 3x Grant 280pts °°
Heavy Armoured Platoon - 3x Sherman II or III 340pts °°
Light Armoured Platoon - 3x Crusader II 155pts **
Armoured Car Platoon (8th Army) - 3x AEC I 150pts **
Company Points: 1980
British Total - 3230

As you can see I still have a long way to go but having a clear plan (and the models to back it up) will help me focus on getting it all painted quickly. I've no idea how much this lot would have cost to recreate in 15mm but I'm sure it would be a small fortune and probably well beyond most wargamers means.

Wednesday 16 January 2013

An Italian Striptease

Stripping miniatures down to naked metal can sometimes be a bit of a tease. Over the years I have found that removing acrylic paint from a miniature can either be easy or it can be an absolute pain in the posterior. I'm trying to strip old paint from some of 6mm Italian Tanks and normally I have found that a good long soak overnight in very soapy water softens the paint. A quick scrub with a brush and the paint usually lifts off easily... but this time it just isn't shifting.

*Removing paint from old miniatures can be difficult. There are lots of techniques for stripping acrylic paint from metal, but most require some patience and a little bit of elbow grease. The basic method is to soak your miniatures in one of the paint removing mediums listed below for 6-12 hours and then use an old toothbrush to remove the softened paint. This process may need to be repeated several times to get all the paint removed. I've used several products over the years so here are a few of the more popular examples for returning your lead miniatures to bare metal ready for repainting. Some of the products listed may not be available in every country so I have tried to give generic names or alternatives where possible.


Washing Detergent - Normal washing-up liquid can help soften acrylic paints although it takes 6-12 hours of soaking and some scrubbing with a toothbrush afterwards. 

Pinsol / Pine oil - Good on Acrylics and Enamels. Soak miniature for at least 6 hours, longer if possible & remove with a soft brush. May require several applications. Best not to use this on plastic models but can produce good results removing acrylics from metal after only 2-3 hrs.

Dettol - This is a method endorsed by the Angry Lurker and has the advantage that the waste liquid is biodegradable and safe for the environment. Only use the original 'brown' version of this antiseptic disinfectant; it'll stink the house out so this might be worth doing outside or in a well ventilated area. 

Castrol Super Clean - A non smelly product that is also bio-degradable and is safe to use on plastic models as well. This product contains Sodium Hydroxide and can produce excellent results after only 6 hrs. The main drawback is that this product comes in a gallon can which is probably more than anyone needs for this type of job.

Simply Green - A 2-Butoxethanol based product that can be used on Plastic or metal models. Best used as a soak rather than sprayed or brushed on. The product is Non Toxic, Biodegradable and non corrosive. Gives good paint removal after only a couple of hours but for best results soak for 12 hours.


Oven Cleaner - This is another product that uses Sodium Hydroxide as its main active ingredient. There are lots of different products available but the one that get mentioned often in various miniatures/painting forums is Easy-Off Oven Cleaner. Soaking produces the best results after 6hrs.

Brake Fluid - Can be bought in relatively small quantities from any garage. Brake Fluid gives best results after 24hrs soaking so this isn't a fast option. Safe to use on plastics but needs to be disposed of responsibly as it is harmful to the environment.

Dawn Power Dissolver - Recommended by the guys at From the Warp this product can produce results in a little as 20 minutes. Because it is a foam it can be sprayed on to the model and left to do its stuff, but be careful not to spray it onto anything you don't want stripped!

Nail Polish Remover / Acetone - Easy to acquire but smelly as hell. Use in a well ventilated area and soak your model for at least 6 hrs. Do not use on plastic miniatures unless you want them to turn into slag.


There are several other products that I have read about, but the application and results are (allegedly) broadly the same. Some of these such as Linseed Oil and regular DIY store paint stripper are fairly logical options. Others like Lighter Fluid sound distinctly dangerous and then there are the weird and wacky options such as Coca-Cola and Distilled Water.

Aside from the paint removing medium you will need some or all of the following tools to clean your models. Most people won't have a problem with any of the products listed but some may have a chemical allergic reaction so its always a good precaution is to wear some latex gloves. A ceramic or metal container to soak your miniatures in. An old toothbrush is also essential. Regardless of what method you use an good scrub with a toothbrush can help lift loose paint and get in those hard to reach spots. An absorbent cloth or paper towel to mop up spills... trust me this is essential. A small bit chamie leather to grip the model with while scrubbing. This is soft enough not to damage the casting and can be washed out between uses. The tool of last resort is the dental pick which lets you get in the deepest recesses and remove those stubborn bits of paint.

*I first published this article in December 2009 but thought it worth a second posting (with a few updates) considering the problems I have recently encountered cleaning old miniatures. I'll be using the Dettol method (its the 'Reject Way' apparently) and will report back here on the results. 

Monday 14 January 2013

The Battle of Snake Hill

Posties Rejects gathered on Sunday for an American Civil War game using the Fire and Fury rules. Ten of the Rejects were in attendance including our leader and umpire for this game, Postie. To accommodate nine players the games table was a massive 6ft by 12ft long with nine whole divisions of troops on the battlefield. The game that followed was challenging and tough on both sides but was ultimately much more decisive than it looked. As usual keep an eye out for other (better) reviews of this battle on Fran and Ray's blogs over the coming days.


The game started with both forces having encountered each other the day before. They had skirmished and then both sides had pulled back with the intention of re-joining battle the next morning. Both sides had to roll to see if any casualties had to be removed for the previous days skirmish and Ray (the Union Commander) rolled a massive six casualties, one from each of his regiments!

The terrain however was probably some of the most challenging we have encountered for some time. Across most of the centre line a series of ridges blocked line of sight to both sides. Worse still each ridge also had a face of impassable cliffs on one side effectively reducing the centre 6ft of the table to just three narrow choke points. It was towards this ridge line that the Confederate and Union forces were marching towards when the game commenced. 

The centre hill had a sheer cliff facing the Rebels while the two either side had cliffs facing the Union troops. Two crucial passes through these hills can be seen here. 


Most of the Union and confederate infantry faced this ridge or were to the left of it (from the Confederate point of view). On the right the troops were thinner spread but roughly equally matched. The extreme Confederate right was held by a small division of cavalry.

The Confederate right flank


Both the Confederate and Union forces moved to take and hold the hills in the centre of the battlefield but the cliff faces made manoeuvre and positioning quite difficult. One hill in particular was heavily contested throughout the whole game with the front line ebbing and flowing across its crest all day.

Those Union Zouaves were a pain in the posterior! It took the whole game to get the buggers off that hill and they definitely earned some accolades in this battle. 


The critical battles however centred on one narrow valley between this hill and the next. Because of the cliff edges this was the only passable route for infantry and was therefore fought over for the entire duration of the game. Initially the Union forces held the valley but multiple assaults by the Rebels forced the Union troops back and by the end of the game the confederates held the valley and the hill to its right. But the cost in terms of worn and spent units (earning victory points for the Union) was too high and had the battle continued the Rebs would have been pushed back again I'm sure.

The Valley of Death. This narrow pass saw the fiercest fighting in the game.


I'm sure there will be some dissenting voices from within the rejects but with these rules I think the Confederate forces have no choice but to attack vigorously and hope to knock out the Union forces in melee rather than in a fire-fight. The Union regiments are so large their massed firepower would quickly reduce Confederate effectiveness to nil and the only way to counter that is to get in close, quickly, and beat them in Melee. The odds still seem to be stacked against the Confederates but in some respects this is a historically accurate scenario that was repeated throughout the war.

The Rebels finally took the Pass but at a very heavy cost.


Meanwhile on the Confederate right flank little was happening. On the far right neither side felt strong enough to launch into hand to hand fighting and therefore remained in a stand-off throughout the game. However one area that could have seen more action was the centre left area where half of my Division held the second of the narrow passes in the cliff lined hills. From the opening turn I had decided to split my division and left a token force (plus my artillery) here. I felt confident in doing this as I was facing Surjit, a player who I know from previous games to be fairly cautious, and particularly artillery phobic. True to form he held back from a frontal assault and I held the pass with two understrength regiments to his four.

Two regiments and a battery of artillery hold back a whole division of Union blue bellies. 


Unfortunately he had to leave early and handed over command to Richard who was much more aggressive player and immediately moved more regiments into the unoccupied ground before me. Within two turns I was retreating back through the pass and preparing to defend this choke point with another unbloodied unit which I had moved into position. Fortunately the game ended at this point and my weakened defence of the pass was never tested, but the whole episode just showed how a situation can change dramatically with a change in command.


In this game the battle ebbed and flowed, as it always seems to do with these rules. Although the confederates were winning ground on their left and were steadily pushing the Union back this was a false hope. The Rebels may have taken much of the battlefield but they were unable to hold it. The end result was an unqualified victory for the Union, 20 points to 13, although it felt a lot closer than that from my view on the rebel side of the table.

Union Victory


Once again I found myself on the loosing side, but you know what, I didn't mind at all. For a start my dreadful luck with the dice seems to have burned itself out after the last game. I had some good luck on the dice and one of my regiments outdid itself winning two melee pretty much on the dice rolling along despite the modifiers stacked against it at the time. 

The other reason I enjoyed this game was the atmosphere. All the rejects were able to make the game and the banter was passing across the table thick and fast throughout the day. I'm not sure what Posties neighbours think happens in his shed but I suspect the roar of a dozen wargamers cheering the result of a melee dice roll must carry a long long way!

Friday 11 January 2013

25-pdr Artillery Troop

I started putting this troop together before Christmas but the holiday season brought things to a shuddering halt for a couple of weeks. But with the kids back at school, year end out of the way and my job settling down to it's normal level of insane hyperactivity I have finally be able to pick up my brushes and resume the project.

The 25-pdr Field Gun was introduced just prior to WWII but due to its versatility, rate of fire and accuracy it remained a primary artillery piece well into the 1960's (and beyond in some commonwealth countries). These examples are towed by Morris Commercial C8 Field Artillery Tractor's, more commonly known as 'Quads'.

I was able to scrounge together all the pieces for this gun troop from the models I bought before Christmas without having to buy anything new. Some items need to be repainted while others were just bare metal. One of the 25 pounders is slightly different from the others as it probably came from another model company but when painted up the difference isn't that noticeable. Also hopefully unnoticeable is one gun loader I managed to mount facing the wrong way! I also had to scratch build a map table for the Staff Team which was rather fun. 

I only finished the Troop this morning and managed to take this quick photo before leaving for work. All I need to do now is magnetise the bases ready for storage and decide what my next project will be. 

Wednesday 9 January 2013

Wargaming the Western Desert

One of my Christmas acquisitions was a book by Donald Featherstone Tank battles in miniature: A wargamers' guide to the Western Desert Campaign in 1940-1942 which was originally published in 1973. I have the 2010 paperback reprint edited by John Curry as part of the The History of Wargaming Project and I have to say that its probably the best book I have read on this theatre of the war.

The great Donald Featherstone had tried to join the RAF and the Royal Navy during the Second World War but both rejected him. In the great tradition of 'third time lucky' he was eventually able to enlist when he joined the Royal Armoured Corps, serving in North Africa, Sicily and Italy. The result is that this book has a very natural feel to it and many sections are clearly written from personal experience.

The book contains a clear and concise summary of the actual campaign at each stage of the war. This is probably the clearest description I have read so far in fact. Each phase of the campaign is clearly delineated and at the end of each section the vehicles and tanks used by both sides are listed along with approximate numbers. This will be of great importance when building an army list or picking a particular period or battle to recreate. Having detailed the action of the campaign the author then goes on to discuss the tactics and their evolution throughout the war.

Following on from this is a section describing the terrain encountered and it was here that I realised what a really good writer Donald Featherstone is. Don's descriptions are evocative, vivid and clearly convey the desolate and barren land across which men fought and died. This was as harsh and as unforgiving a landscape as anyone could wish to fight for. But it was also 'ideal' country for manoeuvre warfare and as such was unlike any other theatre in the Second World War.

Further chapters describe the technical specifications for the vehicles, tanks, guns and aircraft used throughout the campaign. There are also sections on communications, visibility and navigation, how top fire tank and anti-tank guns, 'brewing-up', air operations, the Long Range Desert Group, minefields and supply. Much of this can be found in other books but this volume collects together a wide range of facts that not only give a really good picture of the Western Desert war but will also be invaluable to anyone planning on wargaming the period. 

This is an truly excellent book that is just as useful now as it was when first published in 1973. As someone just starting to wargame this campaign I count myself very lucky to have found this book and I can see it being referenced constantly over the coming months.

Paperback: 184 pages
Publisher:   lulu.com (12 July 2010)
Language:  English
ISBN-10:    1445790645
ISBN-13:    978-1445790640
RRP:          £12.95

Monday 7 January 2013

Wartime Toy

The Imperial War Museum Duxford is a vast site with hundreds of thousands of exhibits and space for events of all shapes and sizes. On Sunday the Wife and I took our youngest along to take part in some of the Christmas holiday children's activities in the AirSpace Hanger. One of the craft events was a chance to make a popular Second World War toy consisting of John Bull and Uncle Sam punching Hitler! The young Padawan enjoyed it a lot, as can be seen in this little video.


This was a rather clever toy really because it turned the scariest man in Europe into a figure of ridicule. And this modern facsimile is clearly just as amusing to kids today as it was seventy years ago.

Saturday 5 January 2013

Toy Soldiers - Pipers of the Scots Guards

Continuing the occasional series of pictures of Toy Soldiers.

Pipers of the Scots Guards by William Britons Ltd c1912

Tuesday 1 January 2013

First Game of 2013

A few years ago we went on a family holiday to Yorkshire. We had a six hour drive and after a while my youngest daughter (then aged 5) got bored and invented a great Car Game called 'Tomato Ketchup'. It's a silly game that the whole family (except the driver) can take part in and it works best with four or more players.

Nominate a player to become the Seeker and they then close their eyes and listen very carefully over the sound of the car and road. Another random player then says "Tomato Ketchup" in a silly voice and the Seeker must decide which of the other players said it. If they are right the player that was 'caught' becomes the Seeker and has to close their eye's and then someone else says "Tomato Ketchup". Simple, silly, funny, utterly pointless and us mad lot play it every time we have a long drive!

Last Night we went to Family for New Years Eve and on the drive home - primarily to keep me awake as I was the driver - we played Tomato Ketchup. We also played the 2nd Edition rules called "Brown Sauce". So there you have it, my first game of 2013! And before you ask, none of us were drunk, we're just silly in the head.