Wednesday, 29 February 2012

An Apology and an Opportunity

Yesterday I realised that my Blogroll wasn't working properly and that some of the Blog's I thought I was following weren't appearing in my reading list. If you have had the faith to become a follower of BLMA then its the least I can do to return the favour*. My preferred method for linking to a Blog has usually been by clicking the Follow link in the header bar (there's one at the top of this page). But it now looks as if this link doesn't always work and even if it says I am now following a site, this isn't always the case.

So I need to apologise - If you have followed BLMA and I haven't returned the compliment then its probably down to this apparently broken link button. Assuming you still want me as a Follower, drop me a line in the comments below and I'll make sure I follow through and link to your Blog. Which leads on to the second problem I have noticed...

Several fellow Blogger's have mentioned problems with the Blogroll gadget. I suspect the problem is largely due to the number of existing Blog's exceeding the gadgets ability to list them all. Whatever the issue my Blogroll wasn't working properly and wouldn't allow me to make any changes or add new sites to the list. In the end I did what other users have done and deleted the gadget entirely. I've now reinstalled it and am rebuilding it from the ground up. As I have over 400 Blog's in my following list it will take a while to get this back up to scratch. Please bare with me in the interim, I'm working hard to correct the problem.

[*Of course I reserve the right not to follow a Blog if it isn't Wargames or Roleplaying related].

Tuesday, 28 February 2012

Compact Camera Flash Diffuser

Flash Diffusers are vital for softening harsh shadows during flash photography but there are few examples available to buy that can be used with compact digital cameras. Here's my simple home made flash diffuser that can easily be adapted to fit almost any camera, and all it will cost you is a tube of crisps!

I've written before about the benefits of using a flash diffuser when photographing miniatures. Simply put, a flash diffuser spreads the light from the flash of a camera so that the light does not come from one concentrated source. The nett result is that the light is 'softened', hard shadows are reduced and colours are slightly warmer. Diffuser's also block some of the light from the flash thereby reducing the range of the flashgun or built in flash head. This is a boon to the miniatures photographer as it means that built in flash can be used for macro photography at much closer ranges than non diffused flash. With a little bit of experimentation it won't take you long to work out the effective range of your softened flash and begin to get much better pictures as a result.

My Pringle lid Flash Diffuser in use
I bought myself a great diffuser for use with my SLR and carry it with me whenever I take that kit out. But carrying a full SLR kitbag around a convention can be heavy and cumbersome, and recently I have found it much easier to use my compact Olympus SZ-30MR instead. Small, light and with a wide range of features it is ideal for show photography in every respect bar one - the flash is too harsh for macro Photography. There are few commercial flash diffuser's on the market for compact cameras so I had to fall back on a bit of creative ingenuity and DIY to make one.
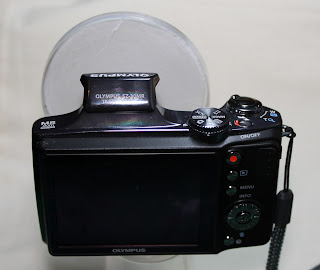

As already stated the single purpose of a diffuser is to soften the flash by creating a larger light source (the surface of the diffuser being several times the surface of the flash). So all that I needed was an opaque surface through which the light could travel, held slightly in front of the flash head. I experimented with various options eventually settling on what I call The Pringle's Solution. I love those round plastic lids from Pringle crisp tins. I use them to mix paint or glue in, they get used as coasters for my coffee cup and now as the basis of a simple and cheap flash diffuser.

Hold the lid over the extended lens of your camera and on the reverse side of the lid use a pencil to draw a circle that matches the lens diameter. Make sure the hole you create is on the edge of the lid so that the majority of the opaque plastic sits in front of the flash. Use a sharp blade to cut the hole out so that it is just a fraction smaller than the lens it will fit over. Some small amount of trimming may be needed to get the fit right - Too loose and the diffuser will fall off. Don't cut through the edge of the lid as this plastic rim give the finished item its rigidity. Next stick tissue paper to the inside of the lid and allow to dry.

That's it, your home-made flash diffuser is now complete and ready to be used! Here's a pictures I took at the weekend on the diffuser's first proper test run. There are still some shadows but the outlines are softer and the color's of the models are richer and properly exposed.

Picture taken at Cavalier 2012 using my DIY diffuser


Warning: You will get lots of odd looks when you use this contraption, but you'll also get lots of good photo's and your diffuser will fit easily in a pocket until needed.

Sunday, 26 February 2012

Cavalier 2012 - Photo's

I got back a little earlier than expected from Cavalier so I had tome to work through my pictures in double quick time to get them posted here. Its was a good show with plenty of excellent stand-out display games that caught the eye. The Rejects were in attendance and did our collective best to alleviate the recession with our spending. We also had a chance to talk to lots of the traders and those clubs running games. We are planning on running a game (our first display game) later in the year at broadside and as newbies to the art of running a display we have lots to learn.


I have posted my pictures as a slide show below but first I have to mention a couple of the outstanding display games being run at the show. For me the best game was The Alamo by Loughton Strike Force. The sheer number of figures on the table was a sight to behold, as were the masses of casualty markers as the battle progressed. It was a visual feast and it certainly hit the spot.


Another beautifully prepared game with some excellently painted miniatures was Defendiing the Bridge at Obourg (1914) by Gravesend Gamers Guild. This WWI battle table was full of character and detailed terrain. But it was the quality of the painted miniatures that made this game stand out. 


Here's the slideshow with the full collection of pictures.

Saturday, 25 February 2012

Rejects on Tour - Cavalier 2012

The Laughing Cavalier (1624) by Frans Hals
Tomorrow myself and some of the Rejects will be going to Cavalier 2012 in Tunbridge. Cavalier is traditionally the first show of the year for the group and as a newish member last year was my first time at this event. I really enjoyed it (pictures from Cavalier 2011 here) and am looking forward to kicking off the season with this years event.

Both One Lover Ray and the Angry Lurker have already posted about this trip but this is my opportunity to say, see you there! Keep an eye out for us, come say hello and please don't feel intimidated by our collective tonnage!

As usual I'll be bringing my camera along and no doubt will be shooting pictures like a man possessed throughout the day, so expect to see them posted here early next week.