For the Water Feature bonus round, I have gone for a Sherman DD (Duplex Drive) tank wading ashore on a Normandy beach. IN the end, more work went into the base than the tank but this time I'm really pleased with the end result.

The DD's were a British invention (only us Brits are mad enough to attempt to make a tank float!) and were part of a series of specially adapted vehicles collectively known as Hobart's Funnies. The concept of the swimming tank actually dates back to 1918 when the first designs were being considered. Development continued in the inter-war period with initial designs using huge detachable floatation tanks. However, this made the tank very unwieldy and far too wide for any landing craft to carry them. The concept of the floatation screen - increasing the displacement of the tank until it floated - was first considered in 1940 and was initially tested on the Tetrarch Light Tank and later on Valentines. By 1943 the first tests with Sherman were taking place.


The Vehicle gets its unique name not from the floatation screen but from the drive system that allowed propellers to be fitted to the tank, thereby allowing it to 'drive' through the water like a motorboat. The Sherman could drop its screen very quickly once on land and be ready to fight immediately (importantly, with the first waves of infantry) and must have been a real shock to the German defenders on D-Day.


I employed a product I have not used before, Vellejo Textured Water Effects. In the pot it looks like PVA glue, although it's consistency is more like jelly and can be applied with a brush or a spatula. However, when it dries it is perfectly clear, making it ideal for modelling drips of water, ripples and even waves. A tiny dab of colour paint can make the 'water' turn opaque, such as on the crests of the waves and the frothy edge of the water on the beach. I also used the texture water to add drips and rivulets of water running off the tank that has just emerged from the sea. For the larger drips, I cut and attached tiny strips of clear plastic to the model then applied the water effect over the top. Using this product requires a lot of patience as the effects are best built up in thin layers.
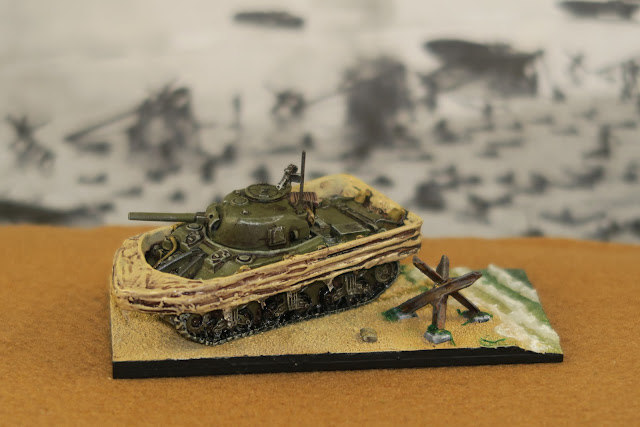
Incidentally, the seaweed along the shore and tangled on the beach obstacle is made from a cotton thread that I died the correct colour (the wife had every colour in her sewing box, except green!). Cut into little sections and frayed up a little I think it looks pretty good as seaweed. I had wanted to add some casualties and weapons to the beach but in the end, I decided that was a little too dark. Besides I couldn't find anything suitable so a few items of discarded stowage finished off the scene.

Incidentally, the seaweed along the shore and tangled on the beach obstacle is made from a cotton thread that I died the correct colour (the wife had every colour in her sewing box, except green!). Cut into little sections and frayed up a little I think it looks pretty good as seaweed. I had wanted to add some casualties and weapons to the beach but in the end, I decided that was a little too dark. Besides I couldn't find anything suitable so a few items of discarded stowage finished off the scene.
What a perfectly devised and executed piece Lee.
ReplyDeleteThank you
DeleteWow. Looks impressive. Very nicely painted. Love the water effect on the tank.
ReplyDeleteI'll be using this textured water product more in future
DeleteDamn fine work Lee!
ReplyDeleteThanks Fran
DeleteAbsolutly GREAT !
ReplyDeleteWe smell the sea and hear the flying bullets!
:=)
Thank you
DeleteAwesome
ReplyDeleteCheers!
DeleteSplendid!
ReplyDeleteThank you
Delete