Thursday, 13 February 2020

Spanish Cavalry in the Army of Hannibal

Having completed my Classical Indian army I thought I'd revisit one of my existing 6mm collections. I've been giving some thought to enhancing the cavalry forces that formed part of Hannibal's army in the 2nd Punic War. It soon became clear that there was a gap in my army list that needed to be filled in the shape of some Spanish Cavalry. Various estimates suggest that after Hannibal descended the Alps into Italy he had about 6000 cavalry in his army, approximately 2000 of which were Spanish. These troops, along with about 8000 infantry, would have been recruited from areas directly under the control of the Barcids in their territories in the Iberian Peninsular. 


Despite being sometimes described as Heavy Cavalry they were typically fairly lightly armoured, similar to the infantry. The standard 'uniform' for the Spanish was a white tunic sometimes trimmed with red cloth. Most infantry wore sinew caps but these were gradually replaced by bronze Montefortino (conical helmets with cheek plates and neck guards) either taken from defeated Romans or forged by their own blacksmiths. All troops, foot and mounted, were armed with javelins or spears and the curved Falcata sword. Small round shields called caetra completed their equipment.

Polybius does describe some Spanish Cavalry being used as shock troops. These wore scale cuirasses and carried the larger oval Scutum shield and a single long thrusting spear. 


I have also read about extra men being carried on the horse, who would then dismount and fight on foot. I'm not sure if this sounds like a viable tactic as surely the newly deposited foot troops would be outnumbered by any infantry they engaged and would have run the risk of being trampled by their own cavalry. I'll have to read a bit more about this, although at the moment there are no rules that I am aware of in To the Strongest that would replicate this tactic.

Incidentally, my main reference source for this article is as always the excellent Armies of the Macedonian and Punic Wars by Duncan Head. I bought this some time ago and it cost a pretty penny but has been an invaluable reference source ever since. I constantly find myself diving into its pages for detailed information and is always a good place to start before widening the search for information.

Monday, 10 February 2020

Battle of Almeida 1810

Postie ran a Peninsular War game yesterday but for various reasons, it was a bit of a bust. The UK was battered by Storm Ciara yesterday and several Rejects wisely decided not to travel in the 80mph winds. I, on the other hand, decided nothing was keeping me from a game, not even the flying debris and driving rain of an extratropical cyclone! The Shed-o-War was rocking and shuddering in the gusts, and there were a few leaks in the roof, but at least it stayed on and we were able to complete our game, albeit to an unsatisfactory conclusion. 

With just three players rather than the planned six this was already shaping up to be a busy game with lots of figures to move and multiple decision to make. Unfortunately for myself and Ray playing the British/Portuguese army, the game was effectively decided in the first 30 minutes of play.

Setup
Stuart based this game on an actual siege, however historically Wellesley decided not to attempt to relieve the town of Almeida, hoping that they could hold out long enough to keep the French tied down while he reorganised his forces. The siege, however, came to a very dramatic ending when a mortar shell hit the town's powder store. The resulting explosion flattened nearly every building, killing hundreds and precipitating the surrender of the garrison.

In this what-if scenario, the British are trying to break the siege however, with hindsight, it was clear that in this case, Wellesly was probably right not to attack. The longer the game went on the weaker our army became and Surjits forces were all the time marching to concentrate on our assault. Certainly, had we been allowed to set up our forces I think we would have deployed very differently. As it was our opening disposition forced ceratin actions on us that, compounded with brilliant dice rolls from Sujit, meant we were fighting a losing battle almost from the start.

Orders of Battle
Rather than struggle with Posties handwriting (he's so old-school he doesn't even own a mobile phone, let alone a computer), I decided to just post the pictures I took of his Orders of Battle sheets. Good luck reading them!


The Action
British forces (under myself and Ray) advance towards the besieged town of Almeida

View from the other direction across the French siegeworks.

The British advance looks strong, and we have a lot of good units in the centre. 

From above it looks very ordered (not for long). The French though have a lot of elite Legere units, with another division marching as fast as they can towards the British left flank. 

The French reinforcements, troops for the other side of the town, brought around to bolster the French defence. They are at least 7 or eight turns from the fight so it's essential the British hit their objectives quickly. 

Our Cavalry on the right flank are forced to counter the French Cavalry which means running right into the path of French guns. They make contact with the French Cavalry already reduced in number...

Surjits dice rolls are phenomenal and combined with superior numbers they wipe out or rout all the British Cavalry!! Frankly, that's game over. Our flank is completely exposed. 

Portuguese infantry brigades hastily form square but the rapid advance we needed for our plan is being thrown into disarray. 

My elite troops in the centre advance and wheel slightly to respond to a rapid French advance...I'm hoping to take some pressure off the Portuguese as French Cavalry slams into the flank of our army. 

Surjit looks calm as he presses his attack. 

The British continue to advance but are now looking to the French relife division bearing down on our left flank. 

The centre looks impressive, but it masks the crumbling flank. 

French columns bear down as they press the attack. 

British reserve cavalry starts to come ontop the flank but its too late to stop the crumbling of our Portuguese infantry. 
 
A view down the table shows an impressive vista. Pity, it wasn't also showing a British army on the edge of victory! 

Now the infantry Melee's begin...and we come off worse yet again! Today is not going our way. 

The thin red line

Troops everywhere. 

The British plan has fallen apart. We can't possibly achieve any of our objectives and the French Relife division is about to start pressing our left flank.

Surjit with his well deserved victory. He kept his cool (mostly) and managed an army that was designed for three players. 

Analysis
I could waffle on an on here, but I think Ray and I felt like we were beaten by the scenario and the deployment as much by Surjits cool head. It was an unmitigated disaster for the Britsh and probably confirmed that Wellesly was right after all not to attempt to break the siege. 

Friday, 7 February 2020

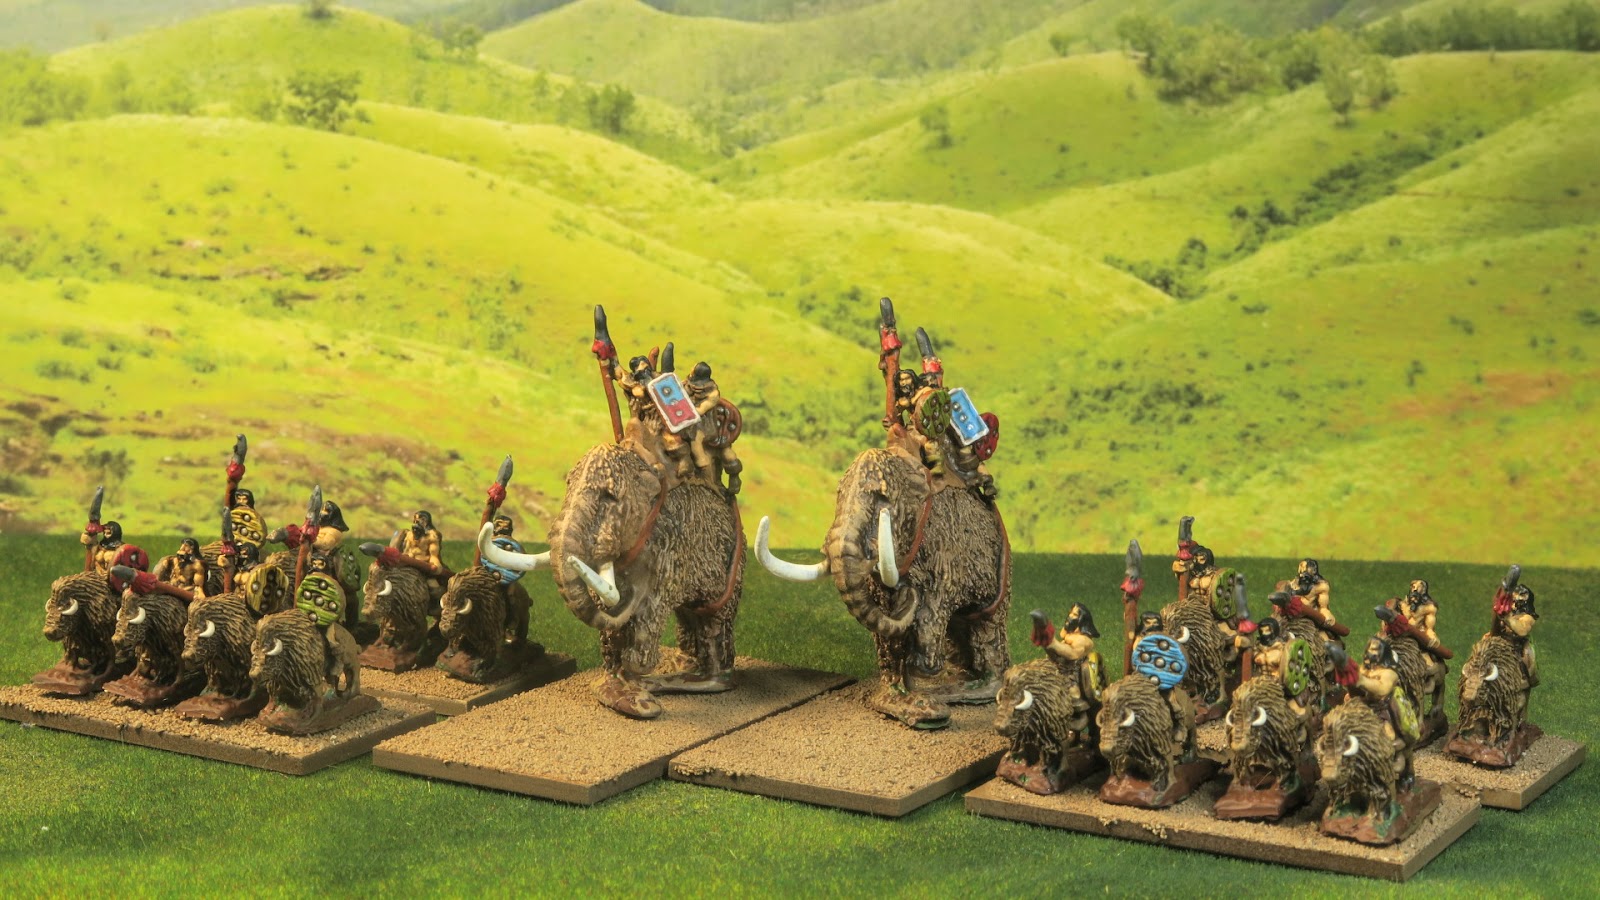
Mammoth & Bison Riders

A slight change of tack from me today as I submit my contribution to a charity project for James MacCraggs (aka The Mad Tin Hatter). Last year James and his wife suffered a terrible loss and Jamea wrote very movingly of how he would like to raise money for charity (detailed here and here). 


Back in November Posties Rejects went to the Warfare show in Reading and on the way down there we discussed a joint contribution to this worthy cause. So when we got access to the trade hall we went straight to the Kallistra stand and each picked a couple of units to paint up. Ray has already painted his contribution and now it's my turn. Having just painted a load of 6mm Elephants I thought I should do something completely different.... 10mm Mammoths! 


I've not really painted 10mm before so this was interesting to see the difference between it and my normal scale. It was certainly fun to paint and I was able to use washes on these whereas I usually employ ink washes on my 6mm stuff. Interesting! 


Along with the Mammoths are more Barbarians this time riding Bison! Most impressive and very tough looking. 


James asked that submisssions not be based up so he will do this stage, but for the sake of presentation I have tacked these models to some plain bases. They will snap off easily when they are moved to their final home. 


Points wise, these are relatively simple. 2 Mammoth and six riders should get me 12 points and the 16 Bison riders will net another 32 points, so 44 points all in. One more step towards my target, and a modest contribution to a very worthy cause. 

Monday, 3 February 2020

Classical Indian Elephants

I have been looking forward to painting these for a long time. The massed elephants of Poros' army is such an evocative image, I couldn't resist buying this army. Everything I have painted up to now has effectively been painted to justify painting these beasts of war.


The Elephant could perform a number of useful military functions (clearing obstacles, fording rivers and battering down the walls of strongpoints) but it was its prowess and the phycological impact of these massive animals that saw them favoured as beasts of war. In Ancient India the army was divided into four types; Infantry, Cavalry, Chariots and Elephants. As I mentioned in my post about the Chariots these had once been the prestige weapon of war but had started to be replaced by the Elephant as the dominant wing of most armies. Magadha (mid-4th century BCE - 321 BCE) had about 3,000 elephants while the Mauryan and Gupta empires with figures of anything up to 9,000 animals in its command. King Poros, at the Battle of Hydaspes (326 BCE) faced Alexander with a mere 200 Elephants but this still sounds like a terrifying sight. It's possible that facing these animals, and knowing that larger armies lay ahead, was partly responsible for the army eventually refusing to continue with Alexanders invasion of India.


The Arthashastra of Kautilya (c. 4th century BCE), gives a lot of information on different kinds of elephants, their training, and their conduct in war. Their main use in battle was their ability to crush enemy foot soldiers, scare away horses, and trample chariots. The psychological impact of these creatures cannot be underestimated, however, their practical success has been hotly debated for centuries. Wounded or dying elephants could as easily trample their own troops as enemies. And an elephant running amok is as uncontrollable as it is unpredictable. Royal elephants were specially trained and prized for control but if the beast decided to run away it's riders - including any commanders - would be carried away with them, come what may. Despite these risks, the Elephant was still a prized weapon of war and at the Hydaspes, King Poros fought bravely from the back of his mount, even after the defeat of his army was inevitable.


Elephants could be provided with armour but by the 4th Century BC they were often covered in massive rugs called hatthatthara which would provide quite effective protection from arrows. As Poros would find, these were less effective against 18 foot Sarisa pikes and well-disciplined troops. From about this period the Mauryan kingdoms used three riders, all archers, with two shooting.


With the Elephants finished I have completed everything I had planned for this army, so I guess a picture of the whole lot is in order? Here's my Army of Poros at the Hydaspes. They don't currently have anyone to fight as I haven't started collecting the figures I need for the corresponding Macedonian army... maybe something to consider for Challenge XI ?!?


It seems a shame to put these away in a drawer so I think I'll buy myself a small display case and get these fella's out where I can enjoy them.