Last weekend I had my second game of the year over at Reject HQ, Posties Shed-O-War, and the result was very close and very enjoyable. Stuart decided to recreate a historical battle from the Anglo Zulu War and chose one that would bring out a significant portion of his vast Zulu War collection of figures. Once again the young Padawan joined us for the game and this time she found herself alone commanding the British while myself and Surjit commanded the Zulu's against her.
The Setup
After the disaster at Hlobane, Colonel Evelyn Wood prepared to resist an attack by the entire Zulu impi of over 20,000. Many of the Zulu regiments were veterans of Isandlewana and Hlobane and were armed with rifles taken from British dead. The defences at Khambula however were strong with laagered waggons, parapets and trenches on high ground overlooking clear lines of fire.
Order of Battle
British (2,100 Men) - No4 Column C/O Col Wood (Emily)
90th Foot 9 - 8 Companies
1/13th Foot - 7 Companies
No 11 Battery 7th Brigade Royal Artillery 6x7pdrs
Mounted Infantry - 1 Squadron
Frontier Light Horse - 2 Troops
Raafs Transvaal Rangers - 1 Troop
Bakers Horse - 2 Troops
Kaffrarion Rifles - 1 Troop
Weatherleys Border Horse - 1 Troop
Mounted Basutos - 1 Troop
Natal Native Horse - 1 Troop
Royal Engineers - 1 Section
Dutch Burghers - 1 troop (left battlefield before start of battle)
Woods Irregulars - 1 Company
Rocket Teams - 2 Batteries
Zulu's (23,000 Warriors) - C/O Chief Kangqengelele (BigLee), 2ic Chief Kamahole (Surjit)
Right Horn
inGobamkhosi - 4000 Warriors
uVe - 2000 Warriors
Centre Right
uDhloko - 2500 Veteran Warriors
uDududu - 1500 Warriors
iSangqu - 1500 Veteran Warriors
uMbube - 500 Warriors
uThulwana -1500 Veteran Warriors
iNdluyengwe - 1000 Warriors
iNdlandlo - 1000 Veteran Warriors
Centre Left
uNakhenke - 2000 Warriors
uMbonambi - 2000 Warriros
Left Horn
Khandempemve - 2500 Warriors
Amakwenke - 1000 Warriors
The Action
 |
| Khambula - A strong British position ready to resist a massive force of Zulu's |
 |
| The Encircling Zulu army had a lot of exposed ground to cover and their commander (me!) expected to take a lot of casualties on the way in. |
 |
| The Padawan and Surjit are the image of Nonchalance...but this will be a tough fight for both sides. |
 |
| Some of the British and Boer Cavalry. These units were a constant annoyance to the advancing Zulu'd on the Right Horn. The iNgobamkhosi in particular were harassed relentlessly throughout the battle. |
 |
| British Artillery was also very effective. Once again the Padawan's preternatural dice skills served her well. She was rolling well above average all day and the guns did a lot of damage to the slow moving Right Horn. The iNgobamkhosi and uVe regiments can be seen starting to move onto the table... they didn't move much further with Surjit creeping them forward before stopping them almost entirely once they were if effective range of the British guns. |
 |
| Equally effective were the British Rocket teams firing on the Zulu Left Horn. Rocket after rocket rained down with unerring accuracy causing significant casualties to the kHandempemve Regiment. |
 |
| The Padawan seems unmoved by the Zulu advance. |
 |
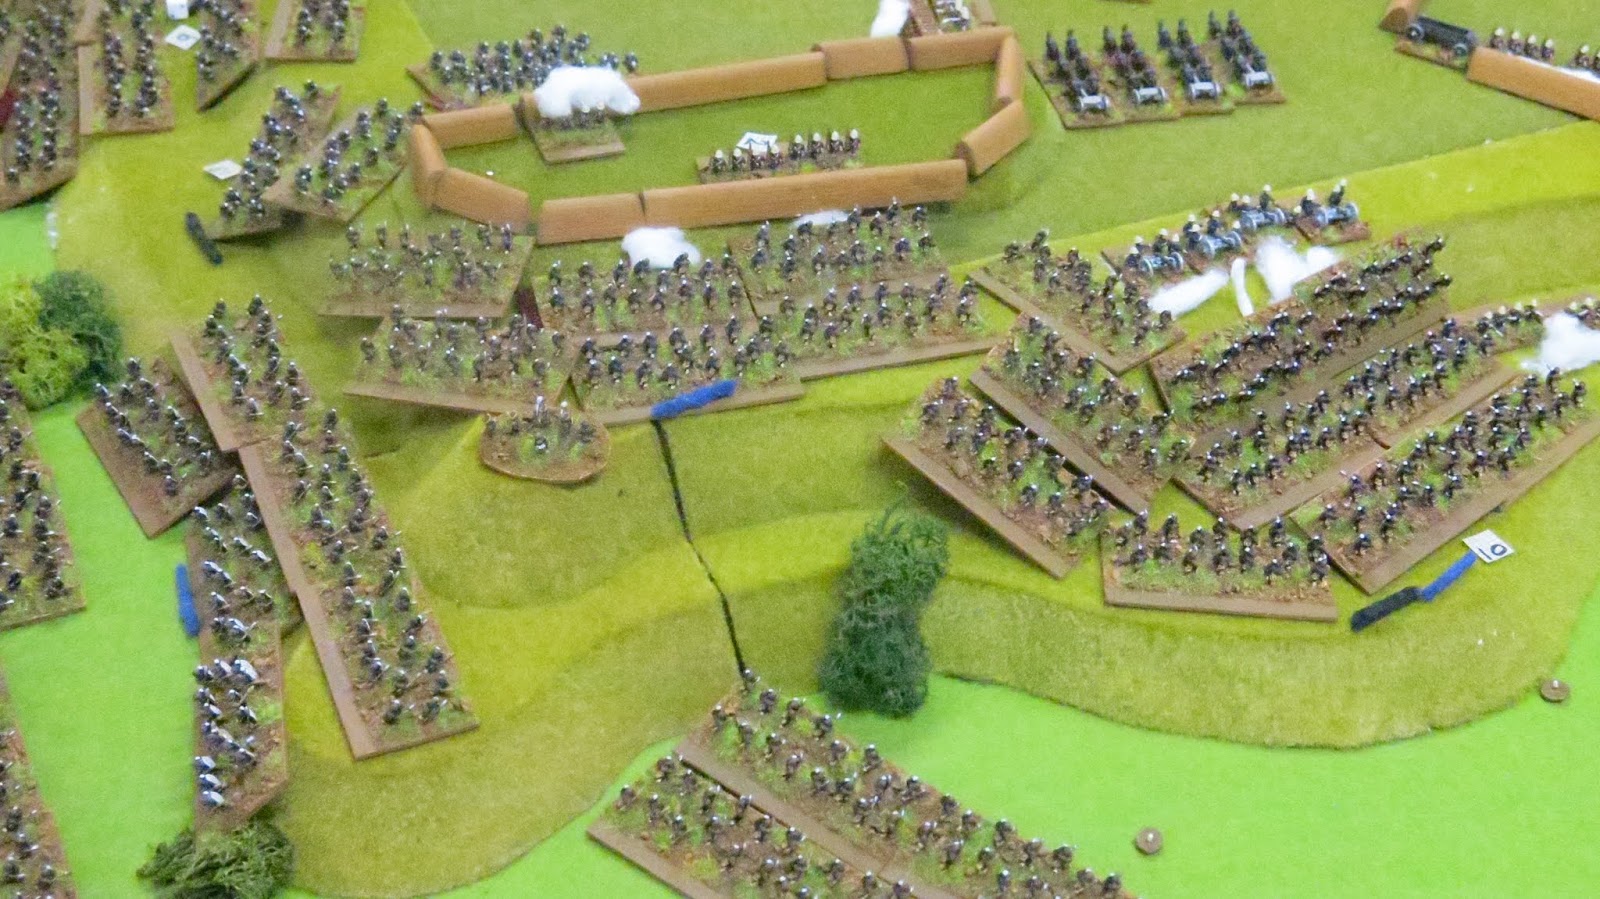
| The Zulu centre and left Horn move in. There must have been a slight miscommunication because I was under the impression my sub commander was going to move his left horn around the rocky dead ground to hit the British camp from behind. Instead he aimed for the front of the fortified hill forcing my regiments to slide to the right throughout the advance. |
 |
| The encircling Zulus seen from the British position. Scary! I felt the British missed an opportunity here as the Padawan didn't move any of her infantry to face the front and instead concentrated all her firepower on the two horns. As a result my regiments in the centre advanced right up to the bottom of the hill without a single casualty. |
 |
| As the Zulu's got closer they opened fire however poor marksmanship reduced the effectiveness of this fire. Some casualties were scored and this weakened the British positions before the main charge. |
 |
| All the British positions are firing now and Zulu casualties are mounting. At last the Padawan starts to move some of her unoccupied infantry to support the threatened front. |
 |
| The Padawan; Cool, calm, collected (and calculating!). Once the Zulu's started closing in her defence of the hill was textbook and well handled for the most part. |
 |
| The First Zulu charge rushes up the hill and into the weakly defended redoubt. The melee looks one sided but charging uphill, against well armed British troops in fortified positions will not be easy. |
 |
| As predicted the first assault fails and two Zulu regiments are forced to fall back. The British however have lost a lot of defenders and now my Veteran regiments are ready to surge uphill in a second wave attack. |
 |
| Hopelessly outnumbered by Veteran Zulu's the remaining British in the first redoubt don't stand a chance. Meanwhile another of my Veteran units charges the British guns which had been moved forward rather than pulled back (the only significant mistake the British made the whole game). |
 |
| Gunfire and bloodied spear tips! |
 |
| The first redoubt is overrun by my Veterans and the British guns are captured as their crews flee a massacre. With their blood up (and the melee so one sided) my regiments get to follow on and are able to surge into the rear of the Barricade defenders. |
 |
| With the front half of the hill overrun, and Sujit's troops mopping up survivors, my uDhloko regiment charge into the defenders of Wood's main redoubt. They smash the first line of defenders and surge into a second line that the Padawan has quickly and skillfully thrown together. With most of the Zulu regiments spent everyone knows this melee will be crucial. Victory for the Zulu's will clinch another great victory over the white invaders. But if the British win this melee they will be able to turn all their remaining firepower on the already spent Zulu regiments. |
 |
| Surjits troops are also in a final decisive melee which could see them sweep the British defenders from the rest of the hill. |
 |
| Disaster! Both Zulu assaults fail badly and both regiments rout back off the hill and are effectively out of the game. The British have managed to keep hold of the main redoubt while inflicting massive, unsustainable losses on the Zulu Impi. The British have won! |
 |
| Cool as a cucumber, the British commander asks her batman to prepare afternoon tea and turning to the retreating Zulu army utters those famous words "Get off my Lawn!". |
Analysis
Well after that battle I am tempted to hang up my dice bag for good! And as for the Padawan, I'll have to stop calling her that from now on. This so called trainee wargamer saw off two members of the Rejects, with hardly a wrong move made. Her dice rolling can only be described as phenomenal. The British guns should hit their targets roughly 50% of the time but her average through the game had to be well into the 70% range, and then she started rolling for damage...oh my.
A very well deserved win for the British in an exciting and thoroughly enjoyable game that closely mirrored historical events (the Battle of Khambula was a turning point for the British).
Most impressive Zulu attack, what a spectacular and great looking game!
ReplyDeleteThe Apprentice has done well
ReplyDeleteGood God, two veteran Rejects soundly thrashed by a 13 year old girlie!!! You should be utterly ashamed of yourselves!!!!
ReplyDelete