
According to ancient sources, the battle of Asculum began when both sides found themselves facing each other across a fast flowing river. The Roman commander offered Pyrrhus an opportunity to cross the river unmolested or vice versa so they could have a true match of strength and honour. Estimates of the number of troops involved vary but the best figures are probably about 40,000 infantry each. Pyrrhus has superiority in cavalry and also had 19 elephants. Confident of victory against the Romans Pyrrhus allowed the Romans to cross the river. However, this first day of battle found fighting across the bad ground on his flanks restricting his ability to use his cavalry and elephants to full effect.

Estimates of casualties vary but most sources seem to agree that the Romans lost approximately six thousand men and the Greeks three and a half thousand, however, Pyrrhus was unable to seek new reinforcements whereas the Romans seem to have a limitless supply of manpower and no sooner had one army been destroyed they could raise another. This is exactly the same sort of lesson that Hannibal would learn in the later Punic wars where he would destroy one Roman army after another only to find a new one raised to face him. Pyrrhus would famously say of Asculum, "if we are victorious in one more battle with the Romans, we shall be utterly ruined." (or words to that effect, the quote varies from source to source!).
The Game Setup
My game is set on Day 2 of the battle after Pyrrhus had captured the unfavourable rough ground. The two army lists I have prepared give the Romans a slight advantage in points, however, the open ground does play to the Greek strengths in cavalry and elephants. Contemporary sources suggest that the Romans adopted a static line whereas the Greeks strove to break the flanks.
For this solo game, I once again used dice to determine how aggressive the opposing side (in this case the Romans) would be and their deployment. I also used the Strategum cards from the rules but picked for the Romans as some of these require secrecy and that's a little hard to achieve when playing solo! I picked "Cry havoc and lose the Pigs of War!" for the Romans as it replicates the use of novel weapons - like the anti-elephant wagons. For the Greeks, I picked randomly and got "Tonight we dine in hell" which effectively gives one pre-designated unit a free rally from disorder. I gave this to a unit I knew would be in the thick of the battle.
Order of Battle
Roman Army
1st Command - Publios Decius Mus - General (Mounted, Detached, Senior, Brilliant)
Allied Light Cavalry (Light Cavalry, Javelin)
2x Equites Latini (Cavalry, Javelin)
Equites Extraordinarii (Cavalry, Javelin, Veteran)
2nd Command - Publius Generalus Madeupus - General (Mounted, Detached)
6x Hastati/Principes (Legionaries, Special)
6x Triarii (Hoplites, Veteran, Small)
2x Italian Allied Infantry (Javelinmen)
3rd Command - Publius Sulpicius Saverrio - General (Mounted, Detached)
Allied Light Cavalry (Light Cavalry, Javelin)
2x Equites Romani (Cavalry, Javelin)
Greek/Epirot Army
1st Command - Pyrrhus of Epirus - General (Mounted, Detached, Senior, Heroic, Great Leader)
Thessalian Cavalry (Cavalry, Veteran)
2xTarantine Light Cavalry (Light Cavalry, Javelin, Veteran)
Elephants (Indian Elephants, Deep, Escorted)
Psioli Slingers (Light Infantry, Sling)
Greek Archers (Light Infantry, Bow)
2nd Command - General (Mounted, Detached)
2x Epeirot Phalangitae (Pikemen, Deep)
2x Macedonian Phalangitae (Pikemen, Deep, Veteran)
Greek Hoplitoi (Hoplites, Deep, Raw)
Agrakas Hoplitoi (Hoplites, Deep, Veteran)
3rd Command - 2i/c General (Mounted, Detached)
2x Greek Allied Cavalry (Cavalry, Javelin)
Greek Light Cavalry (Light Cavalry, Javelin)
Elephants (Indian Elephants, Deep, Escorted)
Greek Archers (Light Infantry, Bow)
Psioli Slingers (Light Infantry, Sling)
The Action
 |
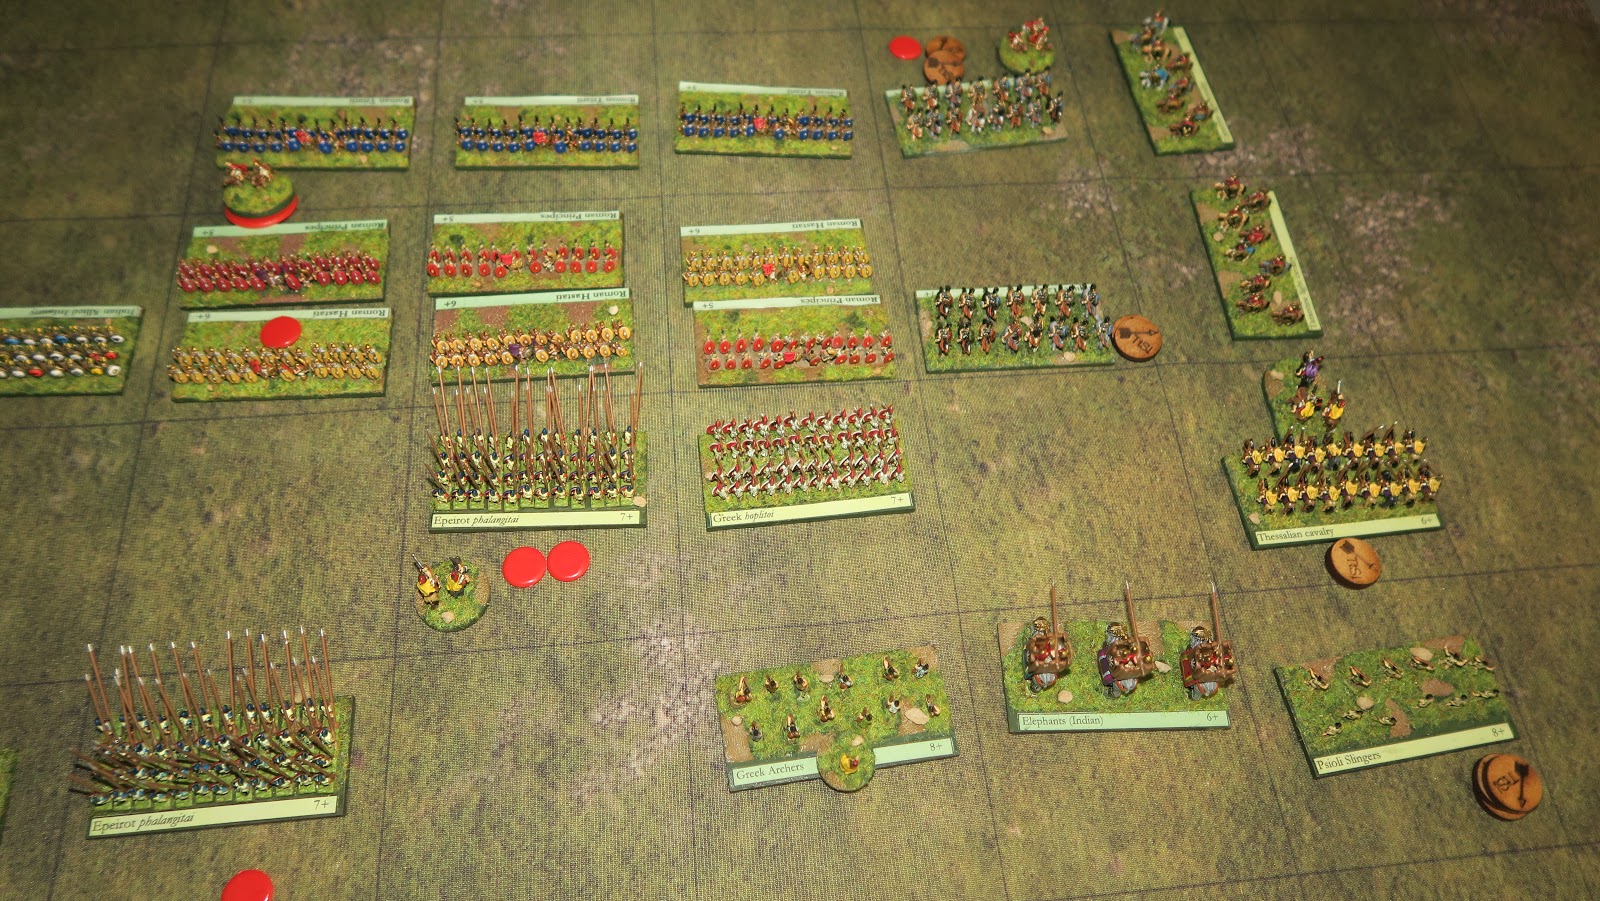
| Initial deployment with the Greeks closest and the Romans across the open ground. |
 |
| The Phalangitae look prickly and dangerous but the improved rules for the handling of Roman maniples mean this battle won't be a cakewalk for the Greeks |
 |
| Turn 1 - The Greeks advance quickly. This is the first time I have used the Group Move rules to move multiple units and their general. You can also combine this with the March Move rule to go faster, so long as the units don't start, pass through or end in charge or missile range of the enemy (the rules are more detailed than this, but that's it in a nutshell) |
 |
| The Romans also think group movement is a good idea and promptly roll a one! The Generals ability to re-roll activation dice doesn't apply to Group moves to this command can't move at all. |
 |
| Turn 2 - Meanwhile, on the other flank, Pyrrhus leads the Thessalian Cavalry and smashes into the Romans Elite cavalry unit. The Romans are disordered, attempt to rally but fail. They are now very vulnerable if the Greeks can attack again next turn. |
 |
| Meanwhile, the Phalangitae are bearing down on the Romans and they have lots of sharp pointy reasons why they feel confident of victory. |
 |
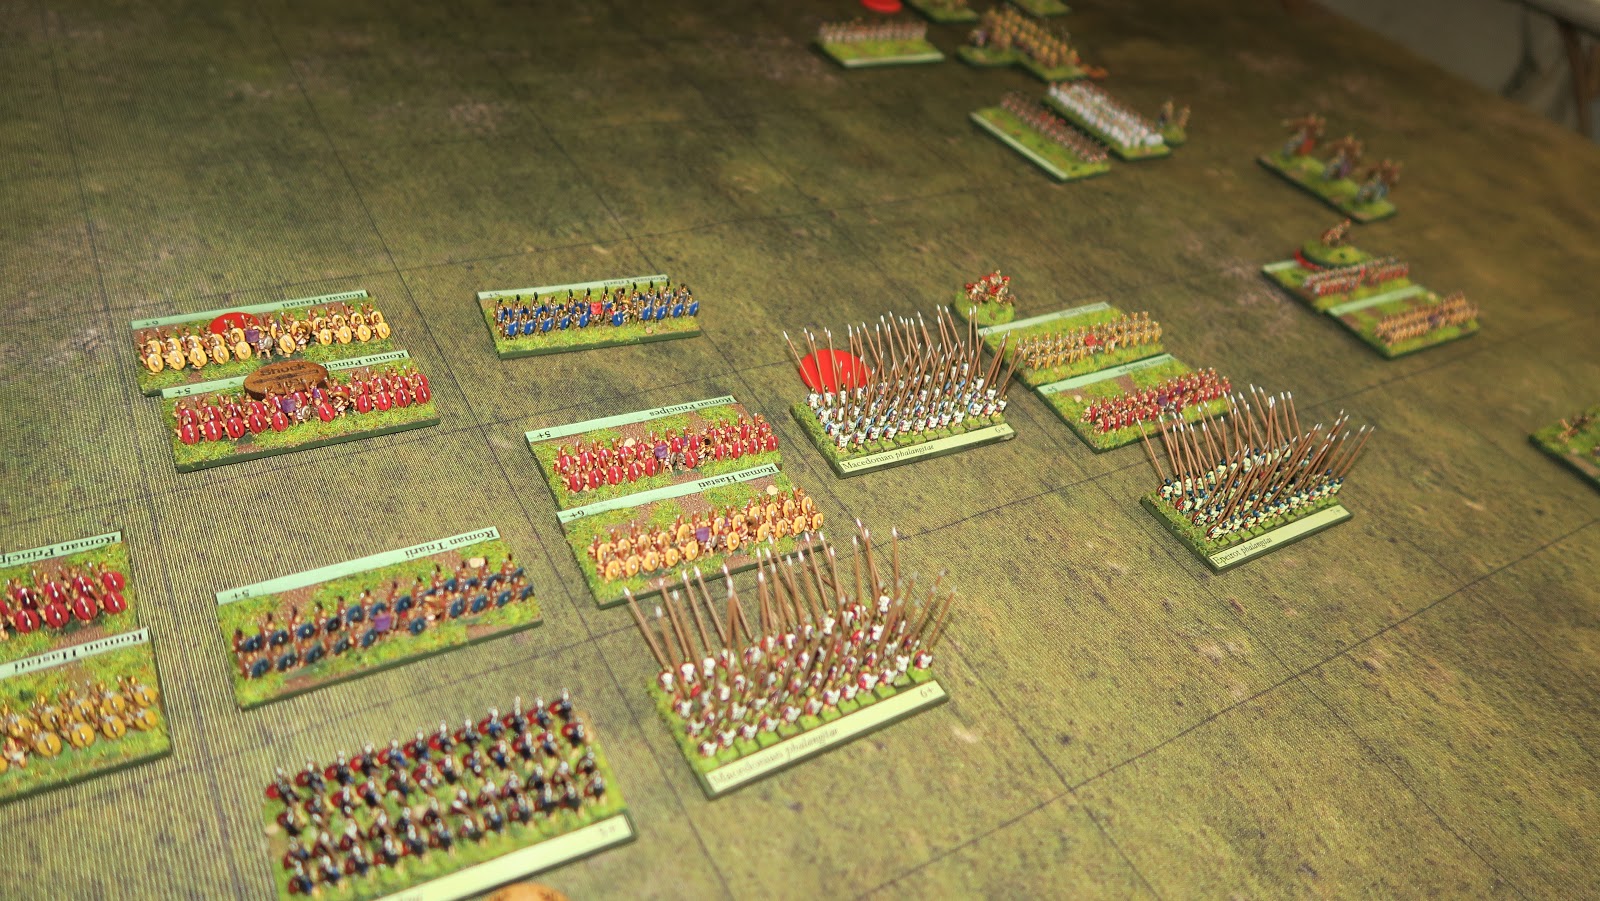
| Turn 3 - Crunch! The infantry meets across the whole of the front line. A lot of javelins are thrown (to little effect) but now its a battle of Phalangitae verses Maniple. The line exchange system of the Romans makes then a surprisingly tough nut to crack. |
 |
| Pyrrhus and his cavalry start to work their way around the flank of the Roman Cavalry. The Elephants are kept in reserve for later. |
 |
| One of the Italian Allied Infantry units is destroyed by the Macedonian Pikes and worse still the general for the command is injured! The Greeks curse their luck, one more pip on the dice and they would have bagged themselves a Consul. |
 |
| The Hastati/Principes are tough and their Pilums as shock weapons are very effective. The Greeks are starting to take casualties and become disordered while the Romans maintain a disciplined formation despite the weakening of their centre. The Greeks decide to fall back next turn to try an rally their line. This will also draw the Romans forward making Pyrrhus' flank attack easier...its hoped. |
 |
| Turn 4 - Disaster for the Greeks as the 3rd command's two Allied Cavalry are destroyed. Aside from two light units of infantry, the only thing stopping the Romans here are the Elephants that had been kept in reserve. Meanwhile in the centre an activation roll of a 1. The commands general rushes to the scene allowing a re-roll and promptly rolls another one!! This leaves the Greek centre very vulnerable. |
 |
| Back on the other flank Pyrrhus' command is faring better, now slowly enveloping the Roman flank. The elephants here move into position. |
 |
| Turn 5 - The Roman position on the right flank really looks precarious as no matter which way the remaining Italian cavalry turn they can be flanked and outnumbered. Meanwhile though the Manipular Legions in the centre are starting to push back the Greek Phalangitae. |
 |
| The Greek left flank reorders itself and prepares to meet the Roman cavalry. They must hold this flank to give their infantry in the centre time to hold the Roman maniples which in turn will give Pyrrhus time to flank their entire line. Everything still hangs in the balance for both sides. |
 |
| Turn 6 - Pyrrhus and his cavalry are now surrounding the Roman flank. The remnants of the Roman cavalry command here have been wiped out and the General only survives because he is Senior meaning he isn't lost when his command is destroyed. Things have become so desperate the Roman commander has had to call some of his Triarri from the centre to try and hold the Greeks back. |
 |
| Turn 7 - At last, the Phalangitae have broken through the Maniples and the Romans look very close to breaking. They are down to just one victory medal remaining so any loss will end the battle in Greek victory. Pyrrhus' army is similarly mauled but with seven medals remaining their position is more secure. |
 |
| Meanwhile, on the other flank, a charge by the Elephants was initially held back by the use of the Anti-Elephant wagons (the "lose the pigs of war" startegum) but one Italian Cavalry unit has been destroyed and the chance to outflank the Greeks looks like it has passed. |
 |
| Turn 8 - More casualties and the complete loss of their flank mean the Romans are at breaking point... then the Phalangitae defeat another Italian Allied infantry unit and a shudder ripples through the Roman lines which begin to crumble. Trumpets sound the retreat and the Romans fall back....Pyrrhus and his Greeks have won the battle. |
Analysis
Wow, that was a tough and gruelling fight for the Greeks. The end result gave the Romans 9 victory medals but the Greeks won a resounding victory with 16 medals. That being said Pyrrhus' army has been severely mauled by the encounter. A Pyrrhic victory as it should be.
With each Solo game, I'm getting better at the rules, bringing in new elements that I haven't used before. In particular, there are several new rules that will probably make there way into v2 of this rulebook (available as a downloadable supplement from the Big Red Bat shop for free) that I have used for the first time. One of the big takeaways for me from this game is the need to update my homegrown quick reference sheet. The rules are deceptively simple yet quite complex and (being a bear of little brain) I can't remember half of them! My QRF helps me to at least get through a game without too many errors.
Awesome, most impressive and beautiful units, stunning mass effect!
ReplyDeleteThanks. After all the effort of painting them (and the blood... those pikes are sharp) I feel like I really need to use them.
DeleteGreat looking game Lee. Can't wait to have a go at Reject HQ
ReplyDeleteI'm definitely gonna have to run a game, although at this scale we are looking at just two players. Or we could use posties figures and run a much bigger game. We'd have to find a way to mark out a grid to the table, maybe using pins on the baseboards, or stickers? Hmmmm... ideas ideas
DeleteThis looks ace. I keep meaning to try the rules out, and you're providing additional inspiration.
ReplyDeleteGreat looking game, and interesting refight. The pike phalanx looks awesome. How do you do the pikes at this scale?
ReplyDeleteBaccus make these figures without the pikes 'open handed'. I used dressmakers pins for the pikes and super glued them in position. But be warned, the process is long...and painful! The pikes look awesome but when I have these out I always have to be ready to re-glue loose ones back in position.
DeleteOuch! Despite the pain the pike do look very, very good. I can imagine that once you have them look like this, you can't go back :-) .
DeleteWow, what a beautiful looking game - bravo to you Lee!
ReplyDelete