Recently I have been playing a series of solo playtest games in an effort to learn the Chain of Command rules. I've finally reached a stage where I think I can play a whole game through without any major mistakes (crossed fingers) and decided to photograph and document the whole game as a proper Battle Report. I played it slowly over the course of a couple of days - one of the advantages of having a dedicated game room - and by its conclusion, I felt I had achieved my aim. I don't think I made any major mistakes but I'll discuss this a bit more at the end of the report.
The setup
Before the game started I rolled for force Moral and the Americans did well, starting three points higher than the Germans. I imagine the Yanks are on the advance and feel good about their prospects. The patrol phase saw the Americans secure jump off points across the river while the Germans ended up being relegated to either the table edges or a couple of farm buildings. Because my table it is so small I decided to reduce the movement in the patrol phase to 9 inches. I found in my previous test games that there is barely any patrol movement because within one turn everyone was within 12 inches of each other. Because the Americans had the higher force morale they got to move first and so I moved to secure the church as quickly as possible. I expect that elevate position will dominate the battlefield giving the Americans a significant edge in the coming skirmish. They're going to need it because the Germans still have superiority of firepower with each of their squads containing the formidable MG42.

This game I opted for a basic rifle platoon for both sides. However, I introduced some support weapons on both sides. At the moment I'm a bit limited in what's available (more models are on the way!) In the end I picked an SD kfz 251 armed with an MG42 and commanded by a junior leader for the Germans. The Americans got an M3 half-track, with a Junior leader and a 50. HMG. It doesn't strictly follow the army lists and support options in the rulebook but it's all I've got to play with at the moment.

Turn one, Phase One
The Americans roll first because they have the higher Force Morale. They deploy one squad into the church to secure the building. All the troops are on the ground level at this point but as soon at they can move again I will send the BAR team up the bell tower. I also deployed the M3 half-track because I'm sure it's HMG will come in handy later.

The Germans deploy one rifle squad into the small wood next to the farm overlooking the bridge. Another Squad enters the main farmhouse on the ground floor. In the next phase, the MG42 team will move upstairs to give it a better firing position.

Turn One, Phase two
The Americans pick up a couple of chain of command points but I can't really do much else other than activating the squad in the church and send the BAR team up the tower to give them a good position. I also deploy the platoon sergeant into the church as I felt it would be handy to have a senior leader in that position.

Germans can't do a lot in their phase either, picking up a couple of chain of command points. All they managed to do is get their MG42 in the farmhouse up to the first floor. As you can see at first I put the figures out the front of the building because I can't put them inside.

I bought these buildings for use with What a Tanker and didn't need internal floors and space for infantry. I've already started looking online for some 4Ground buildings that have internal floors etc. In the end, for this game, I moved the figures behind the building and blue tacked the upstairs teams to the roof!
Phase Three
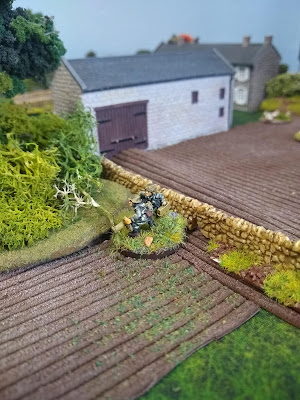
The Americans gain an extra chain of command point bringing them up to four. I can then activate a senior leader and a section. The second US rifle squad deploys just across the bridge with the BAR team in an abandoned earthwork and the rifle team across the road behind some bocage. They immediately open fire on the Germans across the field on the edge of the forest. This is only counted as light cover for the Germans and they take two points of shock and one kill.

I then used the Platoon Sergent (Sgt Shemus O'Reilly, a tough New Yorker) in the church to activates his section, ordering the BAR team to open fire on the same German position. Six Riflemen shoot through loopholes in the glass of the church against the same target. The elevated position of both these group teams means the German cover is reduced by one level, leaving them effectively in the open. Two riflemen are killed and two more shock is applied to the section. The Obergefreiter commanding the section, however, manages to avoid injury.

The German rifle platoon section in the farmhouse (looking down the road) can see this firefight but doesn't have an angle on the church to reply. However, they can see the US rifle team in the wheatfield by the bridge. The MG42 is now in an elevated position and can clearly see the rifle team hiding behind the bocage, effectively in the open. He opens fire causing two points of shock. The rifleman also in the farmhouse open fire at the BAR team but they are less lucky with their shooting.

The German section in the forest decides to pull out of visibility range rather than making themselves a sitting duck. They fire at half effect causing one point of shock on the US rifle team before pulling back to the other side of the forest, out of visibility where they can lick their wounds and regroup.

The final command dice is a 4 but I decided not to bring the senior leader out just yet as there a still a squad and a vehicle to be deployed.
Turn 1, Phase 4
The Americans pick up another CoC Point and the Junior leader in charge of the Second Squad rally's a point of shock and orders his men to move behind the churchyard wall next to the graveyard. At least here they will gain some protection from the fire directed from the Farmhouse. They move then fire at half effect causing one point of shock on the German team in the farmhouse.
 The Junior leader in charge of M3 on the road orders his vehicle forward over the rise of the bridge to give him a clear line of sight. The vehicle HMG than fires at half effect at the Farmhouse, causing one casualty and two points of shock. The German Obergefreiter in charge avoids injury and orders his men to hold their nerve! I actually forgot that the HMG would reduce cover by one level, but I remembered later when it fired again. I was also going to use the BAR team in the church tower to lay down some covering fire but I didn't realise this can only be ordered by the leader. Another rule learnt through experience!
 Now the Germans get to roll command dice and they get a double six meaning they retain the phase. They also gain another chain of command point. The remaining command dice are two ones, which I add together to use deploying their last rifle squad. Decide they need to try and outflank the fire coming from the church. They creep as close as they can get through the wheat field preparing to rush the last distance. As soon as they realise they've been spotted (by the BAR team in the tower) they deploy on the table and open fire (at half effect) killing one of the riflemen up in the tower.
Having retained the phase the Germans roll their command dice again, gaining another CoC point. This time their dice give them some options. The senior leader is deployed to the farmhouse and immediately rallies one point of shock from the beleaguered section defending it. He also orders the section to open fire on the US rifle team down the road (in the cornfield, next to the graveyard). They manage to kill one rifleman and cause 2 points of shock.
It was at this point in the game I realised I had made one significant mistake. I was planning on using the Panzerschreck team at this point when I realised I had made an error putting it inside the building! Panzerschrecks have a significant back-blast which would certainly injure the operator and anyone else in an enclosed space. So rather than firing the team at this time, I made him move around the back of the farmhouse taking advantage of all the cover it could. I was able to get the team out the farmhouse and round behind the barn, being careful not to make an easy target for the BAR team in the church tower.

Squad 3 lurking in the wood decided to take advantage of the Americans change of position and move back to the front of the wood where they can fire again. They execute the move perfectly but their fire is less effective causing no casualties or shock on the enemy.

The German Squad One, over in the wheatfield, rapidly crosses the ground and gets behind a wall. They are too close to the church for the BAR team in the tower to target them and maybe they can rush the yanks in the Church?

Turn one, Phase 5


The Americans roll their command dice again and get a 54321... they now have a full chain of command dice. They activate the BAR team from Squad 2 (down by the bridge) and the Halftrack HMG, opening fire on the enemy in the woods. The BAR team kills one infantryman but then the Vehicle HMG opens fire... and decimates the German squad in the woods killing four infantrymen (destroying the rifle team) and wounding their Obergefreiter. Two rolls on the bad things happen table, result in a total of -3 on the Germans force morale. Ouch! The remaining MG Team and the leader are now pinned.

With the firefight for the Farm looking like it is under control the US commanded deploys his final Rifle Squad inside the church (sneaking in via a back door hidden from enemy view). If the Germans assault the church they're in for a nasty shock. Meanwhile, the US Lieutenant deploys to support Squad Two in the wheat field next to the graveyard. He immediately rallies one point of shock and orders the riflemen to open fire on the farmhouse dealing one shock to the German section inside.

The Germans now roll command dice getting two sixes (they retain the phase) and two fives (two Chain of Command points, giving them a full chain of command dice). The one means they can activate a team so I move the Panzerschreck around the back of the wood. Hopefully, another move will give is a clear shot at the M3. Because they retained the phase the Germans get to roll their Command dice again, retaining the phase a second time.

The Germans roll command dice once again retain the phase with two sixes in the mix.. They also gain another Chain of command point. The final two ones I combine in order to allow me to bring on the Sdkfz 251 which immediately open fire with its MG42 on the infantryman in Squad 2 (the guys next to the Graveyard). Fortunately, the wall they are sheltering behind is well made and they only take one casualty.

For the third time, the Germans roll command dice this time getting a more even spread of options. Sensing an opportunity they turn all their firepower against the US Squad 2. The Junior leader in the half-track orders the vehicle forward and opens fire on the rifle team causing another point of shock and one kill. Finally, the Unterfeldwebel (the Senior leader) in the farm rallies a point of shock and orders the unit there to open fire on the same target. Killing two more US rifleman and finally pinning the Unit.

Turn 1, Phase 6
 The BAR team from the 2nd squad has been shielded from the shock the rifle team have been suffering because they are more than 4 inches from them. It now opens fire on the last remaining men from the Germans in the woods, killing the MG operator and wounding the leader again. Another roll on the bad things happen table and the Germans lose two more force morale points. With the unit destroyed the leader runs bleeding in a hasty retreat. Now the fifty cal on the M3 opens up on the farm causing another casualty and 2 points of shock. The Squad inside is looking very shaky now.
The BAR team in the church tower can't get an angle on the Germans below, but out of the corner of his eye, he sees a figure running in the open over by the farmyard... it's the wounded leader from the squad in the forest staggering away bleeding from his wounds. The rifleman takes careful aim and shoots, hitting the officer in the head killing him outright. Thankfully none of the other infantryman nearby saw him slump to the ground, so the Germans only lose one point of force morale as a result of this kill. However that does mean the section has been wiped out, so another roll on the bad things happen table and they lose another point, dropping down to just one point.
The Germans respond with the Unterfeldwebel activating the team in the farmhouse and get the MG42 to open up on the US rifle squad out in the cornfield. The elevated position negates some of the benefits of the wall they are hiding behind, meaning they are treated as in light cover. All is notwithstanding the Germans only managed to inflict one point of shock.

However, Platoon Sergent O'Reilly hears the Germans moving into position outside and decides not to wait for the inevitable attack. He flings open the door and he leads his squad out in a surprise charge catching the Germans completely off guard. The resulting melee is short and decisive in the Americans favour. The German squad loses several men and its leader is wondered, immediately breaking and routing almost to the table edge. Two more rolls on the bad things happen table and the German force morale falls well below 1.

The game is over in the Americans have won decisively.
Analysis
Well, that was a much more enjoyable game now that I have some grasp of the rules. I made a few small errors, such as the placement of the Panzerschreck and once or twice forgetting to check leader casualties, but on the whole, I don't think I had any major mistakes. Please let me know in the comments below if you think I've missed something.
I'm going to spend a bit of time making some terrain and markers for the game before playing again. My main task for the next few days is to write a better Index for the rulebook! It really needs to be twice the size it's currently is to enable players to find things quickly. That criticism aside I think these are a cracking set of rules. I'm looking forward to running a game for The Rejects at some point in the (post COVID) future. However I think I need to play a few more games at home first to really get the rules embedded in my grey matter!
Lee I have a complete index of the CoC rules, that you can have. How can I get it to you? I am at mgluteus@aol.com
ReplyDeleteOooo..that could save me a LOT of time, thank you. I was looking at the book this morning trying to estimate the time it would take to redo the index. Despite thinking "this is a big job" I also know I really need it!
DeleteI'll email you.
You should have it as well as a couple of other "goodies"
DeleteWhat a great game!
ReplyDeleteFor another newbie, it might help if you wrote out the phase die rolls. I know enough now to work out more or less what you rolled from what you said, but actually typing out 665521 or whatever would help others I think.
Good point. I did include the dice rolls in my notes for this game but decided not to put them in the post, that was probably a mistake. When I write up another game I'll include the die rolls as well.
DeleteLooks a great game Lee, can't wait to have a go myself!!!
ReplyDeleteIts definitely going to have to be in the shed-o-war. There's a lot to remember for the newbie and having an umpire to smooth play along would be an advantage, especially in the first few games.
Delete