Wednesday 30 September 2020

4Ground North-West European Farm Complex

I often skim through the offerings on eBay but a true bargain is sadly a rarity. That's not to say there aren't some wonderful things to find on this auction site, but it's rare when you feel like you've really bagged a proper bargain. Last week must have just been my lucky day because I came across a listing selling an unopened 4ground North-West European Farm Complex. 

This set includes 5 buildings, a lean-to outbuilding and a set of walls to enclose the farmyard. I was lucky enough to get this for just a little over half price, all I needed to add was the time to building the kits inside. As it was I made very short work of the buildings getting the whole lot assembled over two evenings. Of course, these can all be used individually or rearranged in any order so they will prove a very versatile collection of buildings. They have already proved their value in a solo Chain of Command game that I have recently played. A full BatRep with photo's featuring the Farm will be posted soon!


Sunday 27 September 2020

Last Orders

This week The Quarantined Wargamer considers what our last orders should be. When the inevitable happens, will our collections be gifted to friends and family? Will it be sold, and the proceeds donated to a club or charity? Or will it end up in the bin? The answer to that question is in our hands.


This is something I suspect many of us give no thought to whatsoever, but maybe we should. I'd love to know what you think so please leave your thoughts in the comments below, or over on my YouTube Channel. As always I'd ask if you enjoyed the video please consider hitting the 'Like' button and subscribing to my channel. 

Until next week... keep rolling high! 

Wednesday 23 September 2020

Covering Fire Markers (and other things)

I seem to have had a burst of productivity in the last week and got quite a lot of little projects completed in a relatively short period. I'm really enjoying getting into the Chain of Command rules and have been working on various projects to expand my options in the Normandy / NW Europe Theatre of WWII. I will be buying some new troops - possibly to work on in the next Analogue Hobbies painting Challenge which starts in December - but for the time being, I decided I needed some extra terrain.  

Last weeks Chain of Command game (Sgt O'Reillys Charge) made me realise that I needed to get some covering fire markers to show when an area of cover is being targeted. I did find some commercial markers (by Likto) but they were already expensive before applying international postage so I decided to make my own instead. In all likelihood, there may only be one or two areas being targeted in this way in the average game but I made enough to allow for covering fire from three whole squads (each covering 9" of terrain). That should be ample, but to be honest, they were so easy to make I could knock up more quite quickly if needed. 

My base material was the humble lolly stick, cut into roughly 2" lengths. I then sanded the ends and corners to make them smooth. Using a Dremmel I drilled a series of shallow bullet holes in each piece and then base coated in Flat Earth (983). The ground was then dry brushed with Reflective Green (890) and Olive Green (967). I then went back and dabbed in some black to emphasise the bullet sholes using a fine nibbed art pen. The last step was a little flat earth around the bullet holes. When all of this was dry the usual Gloss then Matt varnishes were applied. The whole thing took about half an hour to make and paint and another hour for the varnishing. 

The next big job following the game was to work on expanding the existing Index from the rulebook. The rules are brilliant and necessarily detailed but the index for finding them isn't as good. I had a mare of a time trying to find the rules on covering fire for instance. I knew I'd read them but couldn't locate them in the book when I needed to check the wording. Thankfully I never had to do the index because Dick Bryant (of Kingston Irregulars) came to my rescue, offering to share an index he had. It's saved me several hours of work and has made navigating the rulebook a whole lot easier! 

With a considerable amount of time saved, I decided to make some progress on a few terrain items that I wanted to finish. First I bought a cheap MDF ruined building online which needed painting and assembling. It turned out the reason it was so cheap was that the laser cutting wasn't as precise as it could have been and required some on-the-job alterations to fit together. Considering it never came with any build instructions I don't think I did a bad job. I added some extra detail with rubble and weeds building up in the corners of the ruin and the end result is a very useful bit of terrain for CoC games. Slightly less challenging was painting a new set of field walls to match the ones I have already and rebasing some very cheap trees I found on eBay. The latter aren't brilliant quality (they were a bit top-heavy for a start), but at just a couple of quid for eight trees, I couldn't ignore them. I rebased the trees on some metal washers and after adding some turf and tufts they look a little better... and crucially they stand up now! 

The next project is already underway, with the arrival of some vehicles from Skytrex. I haven't bought stuff from this company in years and I'd forgotten how nice their models are. I'm currently prepping a Panzer III M and an Sdkfz 222 Armoured Car for the Germans, and an M20 Utility Vehicle and an M5 Light Tank for the Americans. I'm taking my time with these so expect to see them 'revealed' over the next few weeks. 

Sunday 20 September 2020

Is Historical Wargaming in Decline? - A Response

So a few weeks ago LittleWarsTV put out a video, asking Is Historical Wargaming Dying? Since then it seems to have generated quite a bit of feedback and discussion. Far be it for me to avoid the thorny issues of the day, so here's The Quarantined Wargamer response video. 


As I say in the video I'm not an industry insider, so this is entirely my own opinion based on the evidence of my eyes (back when trade shows were still happening!) and from conversations, I have read or been part of over the last few weeks. 

As always please join the conversation here, or on my YouTube Channel, I'd love to know what you think. 

Wednesday 16 September 2020

Sgt O'Reillys Charge - A Chain of Command BatRep

Recently I have been playing a series of solo playtest games in an effort to learn the Chain of Command rules. I've finally reached a stage where I think I can play a whole game through without any major mistakes (crossed fingers) and decided to photograph and document the whole game as a proper Battle Report. I played it slowly over the course of a couple of days - one of the advantages of having a dedicated game room - and by its conclusion, I felt I had achieved my aim. I don't think I made any major mistakes but I'll discuss this a bit more at the end of the report. 

The setup

Before the game started I rolled for force Moral and the Americans did well, starting three points higher than the Germans. I imagine the Yanks are on the advance and feel good about their prospects. The patrol phase saw the Americans secure jump off points across the river while the Germans ended up being relegated to either the table edges or a couple of farm buildings. Because my table it is so small I decided to reduce the movement in the patrol phase to 9 inches. I found in my previous test games that there is barely any patrol movement because within one turn everyone was within 12 inches of each other. Because the Americans had the higher force morale they got to move first and so I moved to secure the church as quickly as possible. I expect that elevate position will dominate the battlefield giving the Americans a significant edge in the coming skirmish. They're going to need it because the Germans still have superiority of firepower with each of their squads containing the formidable MG42.


This game I opted for a basic rifle platoon for both sides. However, I introduced some support weapons on both sides. At the moment I'm a bit limited in what's available (more models are on the way!) In the end I picked an SD kfz 251 armed with an MG42 and commanded by a junior leader for the Germans. The Americans got an M3 half-track, with a Junior leader and a 50. HMG. It doesn't strictly follow the army lists and support options in the rulebook but it's all I've got to play with at the moment. 


Turn one, Phase One
The Americans roll first because they have the higher Force Morale. They deploy one squad into the church to secure the building. All the troops are on the ground level at this point but as soon at they can move again I will send the BAR team up the bell tower. I also deployed the M3 half-track because I'm sure it's HMG will come in handy later.


The Germans deploy one rifle squad into the small wood next to the farm overlooking the bridge. Another Squad enters the main farmhouse on the ground floor. In the next phase, the MG42 team will move upstairs to give it a better firing position.


Turn One, Phase two
The Americans pick up a couple of chain of command points but I can't really do much else other than activating the squad in the church and send the BAR team up the tower to give them a good position. I also deploy the platoon sergeant into the church as I felt it would be handy to have a senior leader in that position.


Germans can't do a lot in their phase either, picking up a couple of chain of command points. All they managed to do is get their MG42 in the farmhouse up to the first floor. As you can see at first I put the figures out the front of the building because I can't put them inside. 


I bought these buildings for use with What a Tanker and didn't need internal floors and space for infantry. I've already started looking online for some 4Ground buildings that have internal floors etc. In the end, for this game, I moved the figures behind the building and blue tacked the upstairs teams to the roof!

Phase Three
The Americans gain an extra chain of command point bringing them up to four. I can then activate a senior leader and a section. The second US rifle squad deploys just across the bridge with the BAR team in an abandoned earthwork and the rifle team across the road behind some bocage. They immediately open fire on the Germans across the field on the edge of the forest. This is only counted as light cover for the Germans and they take two points of shock and one kill.


I then used the Platoon Sergent (Sgt Shemus O'Reilly, a tough New Yorker) in the church to activates his section, ordering the BAR team to open fire on the same German position. Six Riflemen shoot through loopholes in the glass of the church against the same target. The elevated position of both these group teams means the German cover is reduced by one level, leaving them effectively in the open. Two riflemen are killed and two more shock is applied to the section. The Obergefreiter commanding the section, however, manages to avoid injury.


The German rifle platoon section in the farmhouse (looking down the road) can see this firefight but doesn't have an angle on the church to reply. However, they can see the US rifle team in the wheatfield by the bridge. The MG42 is now in an elevated position and can clearly see the rifle team hiding behind the bocage, effectively in the open. He opens fire causing two points of shock. The rifleman also in the farmhouse open fire at the BAR team but they are less lucky with their shooting.


The German section in the forest decides to pull out of visibility range rather than making themselves a sitting duck. They fire at half effect causing one point of shock on the US rifle team before pulling back to the other side of the forest, out of visibility where they can lick their wounds and regroup.


The final command dice is a 4 but I decided not to bring the senior leader out just yet as there a still a squad and a vehicle to be deployed. 

Turn 1, Phase 4

The Americans pick up another CoC Point and the Junior leader in charge of the Second Squad rally's a point of shock and orders his men to move behind the churchyard wall next to the graveyard. At least here they will gain some protection from the fire directed from the Farmhouse. They move then fire at half effect causing one point of shock on the German team in the farmhouse. 

The Junior leader in charge of M3 on the road orders his vehicle forward over the rise of the bridge to give him a clear line of sight. The vehicle HMG than fires at half effect at the Farmhouse, causing one casualty and two points of shock. The German Obergefreiter in charge avoids injury and orders his men to hold their nerve! I actually forgot that the HMG would reduce cover by one level, but I remembered later when it fired again. I was also going to use the BAR team in the church tower to lay down some covering fire but I didn't realise this can only be ordered by the leader. Another rule learnt through experience! 

Now the Germans get to roll command dice and they get a double six meaning they retain the phase. They also gain another chain of command point. The remaining command dice are two ones, which I add together to use deploying their last rifle squad. Decide they need to try and outflank the fire coming from the church. They creep as close as they can get through the wheat field preparing to rush the last distance. As soon as they realise they've been spotted (by the BAR team in the tower) they deploy on the table and open fire (at half effect) killing one of the riflemen up in the tower. 

Having retained the phase the Germans roll their command dice again, gaining another CoC point. This time their dice give them some options. The senior leader is deployed to the farmhouse and immediately rallies one point of shock from the beleaguered section defending it. He also orders the section to open fire on the US rifle team down the road (in the cornfield, next to the graveyard). They manage to kill one rifleman and cause 2 points of shock.

It was at this point in the game I realised I had made one significant mistake. I was planning on using the Panzerschreck team at this point when I realised I had made an error putting it inside the building! Panzerschrecks have a significant back-blast which would certainly injure the operator and anyone else in an enclosed space. So rather than firing the team at this time, I made him move around the back of the farmhouse taking advantage of all the cover it could. I was able to get the team out the farmhouse and round behind the barn, being careful not to make an easy target for the BAR team in the church tower. 


Squad 3 lurking in the wood decided to take advantage of the Americans change of position and move back to the front of the wood where they can fire again. They execute the move perfectly but their fire is less effective causing no casualties or shock on the enemy.


The German Squad One, over in the wheatfield, rapidly crosses the ground and gets behind a wall. They are too close to the church for the BAR team in the tower to target them and maybe they can rush the yanks in the Church? 


Turn one, Phase 5
The Americans roll their command dice again and get a 54321... they now have a full chain of command dice. They activate the BAR team from Squad 2 (down by the bridge) and the Halftrack HMG, opening fire on the enemy in the woods. The BAR team kills one infantryman but then the Vehicle HMG opens fire... and decimates the German squad in the woods killing four infantrymen (destroying the rifle team) and wounding their Obergefreiter. Two rolls on the bad things happen table, result in a total of -3 on the Germans force morale. Ouch! The remaining MG Team and the leader are now pinned.


With the firefight for the Farm looking like it is under control the US commanded deploys his final Rifle Squad inside the church (sneaking in via a back door hidden from enemy view). If the Germans assault the church they're in for a nasty shock. Meanwhile, the US Lieutenant deploys to support Squad Two in the wheat field next to the graveyard. He immediately rallies one point of shock and orders the riflemen to open fire on the farmhouse dealing one shock to the German section inside. 


The Germans now roll command dice getting two sixes (they retain the phase) and two fives (two Chain of Command points, giving them a full chain of command dice). The one means they can activate a team so I move the Panzerschreck around the back of the wood. Hopefully, another move will give is a clear shot at the M3. Because they retained the phase the Germans get to roll their Command dice again, retaining the phase a second time.


The Germans roll command dice once again retain the phase with two sixes in the mix.. They also gain another Chain of command point. The final two ones I combine in order to allow me to bring on the Sdkfz 251 which immediately open fire with its MG42 on the infantryman in Squad 2 (the guys next to the Graveyard). Fortunately, the wall they are sheltering behind is well made and they only take one casualty. 


For the third time, the Germans roll command dice this time getting a more even spread of options. Sensing an opportunity they turn all their firepower against the US Squad 2. The Junior leader in the half-track orders the vehicle forward and opens fire on the rifle team causing another point of shock and one kill. Finally, the Unterfeldwebel (the Senior leader) in the farm rallies a point of shock and orders the unit there to open fire on the same target. Killing two more US rifleman and finally pinning the Unit. 


Turn 1, Phase 6
The BAR team from the 2nd squad has been shielded from the shock the rifle team have been suffering because they are more than 4 inches from them. It now opens fire on the last remaining men from the Germans in the woods, killing the MG operator and wounding the leader again. Another roll on the bad things happen table and the Germans lose two more force morale points. With the unit destroyed the leader runs bleeding in a hasty retreat. Now the fifty cal on the M3 opens up on the farm causing another casualty and 2 points of shock. The Squad inside is looking very shaky now.

The BAR team in the church tower can't get an angle on the Germans below, but out of the corner of his eye, he sees a figure running in the open over by the farmyard... it's the wounded leader from the squad in the forest staggering away bleeding from his wounds. The rifleman takes careful aim and shoots, hitting the officer in the head killing him outright. Thankfully none of the other infantryman nearby saw him slump to the ground, so the Germans only lose one point of force morale as a result of this kill. However that does mean the section has been wiped out, so another roll on the bad things happen table and they lose another point, dropping down to just one point.

The Germans respond with the Unterfeldwebel activating the team in the farmhouse and get the MG42 to open up on the US rifle squad out in the cornfield. The elevated position negates some of the benefits of the wall they are hiding behind, meaning they are treated as in light cover. All is notwithstanding the Germans only managed to inflict one point of shock. 

At this point, I was going to use the German Squad 2 in the field at the back of the Church to launch an assault (which was the idea when I actually deployed them). However, I now have two undamaged US rifle squads inside the church. Such close combat would be nothing short of suicide, so instead, I chose to move the section around the back of the church with the intention of lobbing some hand grenades through the windows. I get as far as the back door with a move but I can't get up to the windows. 

However, Platoon Sergent O'Reilly hears the Germans moving into position outside and decides not to wait for the inevitable attack. He flings open the door and he leads his squad out in a surprise charge catching the Germans completely off guard. The resulting melee is short and decisive in the Americans favour. The German squad loses several men and its leader is wondered, immediately breaking and routing almost to the table edge. Two more rolls on the bad things happen table and the German force morale falls well below 1. 


The game is over in the Americans have won decisively.


Analysis
Well, that was a much more enjoyable game now that I have some grasp of the rules. I made a few small errors, such as the placement of the Panzerschreck and once or twice forgetting to check leader casualties, but on the whole, I don't think I had any major mistakes. Please let me know in the comments below if you think I've missed something. 

I'm going to spend a bit of time making some terrain and markers for the game before playing again. My main task for the next few days is to write a better Index for the rulebook! It really needs to be twice the size it's currently is to enable players to find things quickly. That criticism aside I think these are a cracking set of rules. I'm looking forward to running a game for The Rejects at some point in the (post COVID) future. However I think I need to play a few more games at home first to really get the rules embedded in my grey matter!

Wednesday 9 September 2020

Bear Necessities

This week my painting has taken a brief turn away from WW2 and chain of command. Earlier in the year my mate Stuart (aka Postie) gave me a figure of a bear. It's a bit of an in-joke so I had better explain. Postie has often run some very large French Indian Wars games in the shed-o-war and in one notable game my leader figure woke up a very angry bear. The movement wild creatures in his rules are entirely random but I was unlucky and the bear ended up close enough to my troops to charge. The ensuing melee with my leader and his lieutenant was brief, bloody and decisively in the bear's favour. In short, my leader and two other characters were eviscerated. The incident has gone down in Rejects lore and is often referred to! 


The bear miniature was a very simple paint job and will no doubt feature in a future game or two here in the Operations Room. I was considering giving it a snowy base for use in my Frostgrave Game's, but in the end, I decided to give it a woodland base in hommage to the bear that it was inspired by. 

Talking of bears, I highly recommend watching The Revenant. This 2015 American epic Western action-adventure starred Leonardo DiCaprio and although it was set in the 1820's - some 60 years after the French Indian Wars - I felt it was very evocative of that whole frontier period. In the film, DiCaprio's character is attacked by a bear and whenever I see that scene, I always think of that fateful game in Posties shed. It makes me wince just thinking about it!

Sunday 6 September 2020

Encourage not Criticise

Like many wargamers, I subscribe to a number of forums and chat groups online. Now admittedly I’m not much of a chatter, more of a lurker, but its a useful way to keep abreast of current conversations and topics of interest. One thing I have noticed repeatedly over a number of years is the tendency for people to be ‘brutally honest’ in their assessment of other peoples painted mini’s. They tend to get even more ‘honest’ when they are anonymous, and when I say honest, what I really mean is they are being nasty, condescending, mocking and often foul-mouthed. In short, they claim to be members of our hobby community, but in effect, they behave like the worst kind of Troll. 

Friday's episode of The Quarantined Wargamer discusses the thorny issue of online bullying from the perspective of our hobby. 


I hope you found that interesting and thought-provoking. If you did please leave some comments here or over on my YouTube Channel. 

Wednesday 2 September 2020

First Playtest with Chain of Command

Last week I published a video on my YouTube Channel about learning new rules and I guess that means I have to put my money where my mouth is and learn a new set of rules! Actually, I can't really call Chain of Command a 'new' set of rules because they first hit the hobby scene in 2013, and I bought my copy over four months ago. Since then I have been converting some of my 15mm Flames of War figures for use with this ruleset while trying to learn the rules. As I explained in my video, I find it very hard to just sit down and read a rulebook, so I have been watching a lot of how-to videos, playtesting and otherwise 'dabbling' with the rules on my own. Now its time to play a proper game, bringing together the various elements I have been working on over the last few months. 

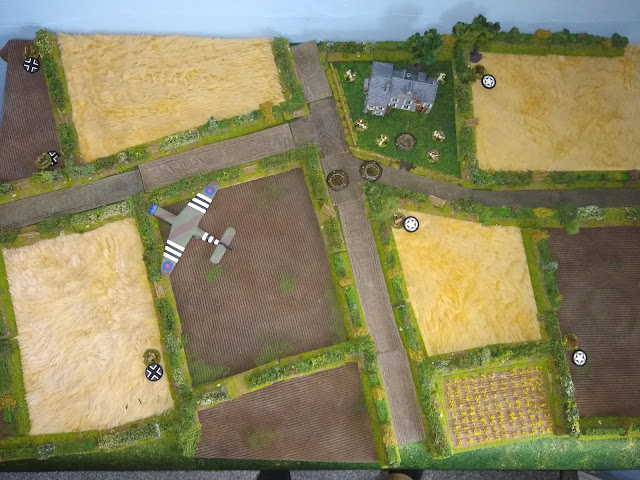
I started by setting up the table, making use of my recently completed ploughed fields and wheatfields, along with my collection of homemade Bocage hedgerows and gates. My table is a bit small for this game (just 4' by 2'6") although I have plans to make this a little bigger in the future. Despite this, it is still just about big enough to play a solo tester game on and start reviewing my understanding of the rules, figuring out what I don't know or don't understand. 


Space is a bit tight in the Operations room at the moment, what with it doubling as my work office two day a week and a studio for the YouTube Videos I have been doing as well as my painting and gaming space. Just moving stuff around is an intricate dance, shifting boxes from A to B and moving tripods and stands...the list goes on. I expect I'll be spending more time in my actual work office soon so I can get my operations room back into some sort of order and use it as intended, i.e. for gaming! In the meantime, I'm having to use some of my storage boxes as a temporary table for dice, tokens, figures and Morale Trackers. 


So I started on the playtest game and decided that because my table is a bit small I would use only three Patrol Markers per side in the Patrol Phase of the game. The Americans were able to secure an important field dominating the road junction while the Germans were pretty much relegated to the edge of the table. 


The Panzergrenadier HQ and one of the MG Squads deploy in a field next to a crashed Glider. The point of this 'game' was for me to test myself and find those bits of the rules that I was unclear on (a lot as it turned out!). One of the things I think I need to do is highlight some of the bases for leaders to make it easier for players to see. They are on slightly larger bases than the infantry, but its sometimes not very clear so I think a coloured band on the base edges will be helpful. Another thing I think I will do is make some Squad ID labels, again just to make it easier to remember which squad is which. This isn't required in the rules but I'm thinking of running this game system for the Rejects using Zoom and I think it would be helpful. 


The German HQ and its associated Squad have a large field to cross, but at this early stage of the game, the Americans haven't managed to occupy the farmhouse so there is no LOS on this area. This helped teach me an important lesson about the order in which units should be deployed and in the importance of securing a good fire position early in a game. 


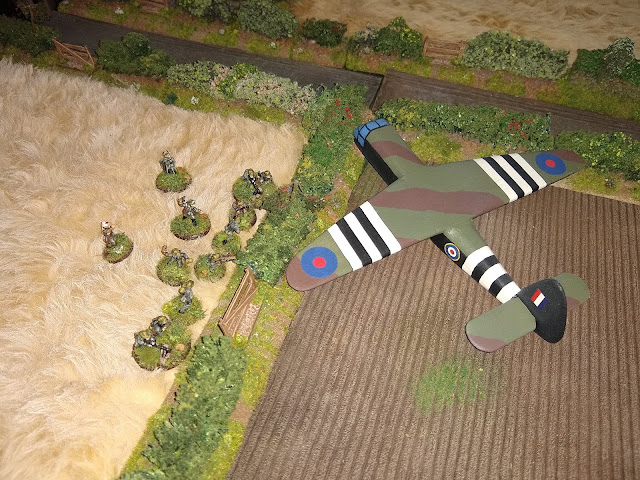
An American MG Squad can be seen behind the hedgerow next to the house. I should have moved these early in the game to capture the Farmhouse. 


As the game hots up there is a LOT of close quarter shooting taking place. However, with everyone in Hard Cover casualties are relatively low. Shock, however, starts to build as combat fatigue begins to become a factor. I know this is a rule the TfL have used before and I really like it. 


One mistake I made early on was forgetting the supporting teams in the same squad (ie within 4" of each other) can share Shock inflicted on a one exposed team. As I said, this is a test game and when I realised my mistake I redistributed the shock markers to both teams. 


I played this test game a little at a time over three days (the advantage of having a dedicated games room) so it was inevitable that I would stop and pose for a selfie at some point!


Because this isn't a proper game - it's more a training exercise for myself - I didn't take as many pictures as I would normally, and didn't fully finish the game. I did get a chance to play out my first Melee, with the Germans overextending themselves in an attempt to capture the farmhouse and then getting counter charged by overwhelming numbers of Americans and basically having their backsides handed to them. 

After that encounter, the Panzergrenadiers were in a dreadful position, bleeding troops and now overlooked by American MG's firing from the upper floors of the Farmhouse. Eventually, I reached a point where I decided I had learned enough from this test game and brought it to an end. However, I have decided to keep the layout largely the same and immediately play another test game with the sides swapped around. I'll start from the beginning again, carrying out the Patrol Phase and seeing if I can play with fewer mistakes next time. 

So what have I learned from this solo test game? First, no matter how much I try to read and absorb the rules, I really learn from playing with them. Second, I need to keep a list of rules or topics I am vague about, so I can focus my attention on those bits of the rulebook. Thirdly I have found navigating the rulebook a little confusing at times so I think I'll add some 'tabs' to key pages in the rulebook so I can jump to them quickly. The fourth thing I already alluded to, highlighting the leaders a bit more so I can see them easier on the games table. 

I expect I'll have to play quite a few more games like this to 'master' the rules. Certainly, I need a better grasp on them before I try to run a game of CoC for the Rejects. Looks like I have my work cut out for me over the next few weeks!