Tuesday 25 September 2018

Building a Zulu Kraal

Earlier this year Postie very generously gave me some model Zulu huts he had made for my (at that point) fledgling Zulu War project. All that was needed was for me to make the enclosure fence to make these into a Kraal suitable for wargaming purposes. The Zulus call their home an 'umuzi'. The word 'kraal' is the European term for the rural homestead of a Zulu family. The build is relatively simple although it does require deft fingers and a lot of patience. That being said it shouldn't be beyond the skill of most terrain builders.

A Zulu Umuzi, or Kraal.

First off it has to be said that building a model Kraal for wargaming purposes requires a little poetic licence. My version has enough space for just under 20 huts but the real thing could have hundreds within its walls. I've tried to use a few contemporary etchings to get the general features right but there seems to have been a lot of variation, presumably depending on the size and location. Essentially the Kraal is a large roughly circular enclosure of thorn bush fence. Usually there is an inner wall within which the cattle are kept. The kraal would normally be built on a slight slope with the entrance downhill, allowing a combination of rain and gravity to wash through the site and keep the cattle area clear. In royal Kraals there may be an additional inner wall separating the royal compound from the rest of the settlement. I opted for a simple layout with a cattle pen at its centre and room to arrange my model huts within its outer walls.

I started the build by cutting thin strips of wood (I used large lolly sticks) into rough curving shapes that combined would form the outer perimeter of the Kraal. I took some time to make sure the size was right and would adequately enclose my buildings so I ended up making an extra section to expand the dimensions of the Kraal. Then I cut cocktail sticks into 10-12mm lengths. To give a solid starting point I super glued the first upright post into position. Once set I then starting adding the other fence posts with PVA glue. I'd make 2cm of fence then do another section while the first dried and so on. Once the first lot of glue had dried I then brushed on a thin layer of PVA over both sides of the fence to really fix everything solid.

Next I cut a section of coarse sandpaper to the shape of the kraal and glued all the finished sections of fence around its edge. Once dried I then added sand to any exposed wood from the base of the wall which with another liberal coat of PVA which helped bind everything together. I also filled any gaps between the fence sections with additional sticks. At this point I decided the base was too wobbly so I cut some cardboard from a cereal packet and added that under the sandpaper, again using my trusty PVA. Now the model was reasonably solid and ready for painting.

A couple of coats of brown primer were needed to cover everything and once dried it was time to start painting. The fences were dry brushed with a light wood colour and highlighted with a pale sand colour. The ground was given a dry brush of terracotta to match the bases of the huts that Postie gave me. Once dry I gave the model my usual treatment of two coats of gloss varnish and then two of Matt varnish. The final stage was adding grass tufts and small bushes around the base of the walls.


I may make a larger version at a later date but for now this will suit my purposes nicely. 

Friday 21 September 2018

Shaving the Bear

I'm sure many readers will recognise this scenario, particularly if you make your own wargames terrain. You're working on a new project and you have a sudden moment of clarity when you see yourself from the outside and recognise the absolute absurdity of what your doing. I had one of those moments over the weekend and I'm still chuckling about it days later. I'm my case it all came about because the night before I was having trouble getting off to sleep and my mind just wouldn't shut down. There I was in the wee small hours, trying to get to sleep, when I had an idea; what if I shaved my teddy bear?

OK, don't call the men in white coats just yet, hear me out first. I've recently play tested The Men Who Would Be Kings with my 6mm Zulu war collection and rapidly came to the conclusion that I need more terrain for my Zulu's to hide in. One type of terrain that I need is something to represent long grass and/or Mealie fields (ie Maize, derived from the Afrikaans word milie) but I wasn't sure how to represent this on the games table. So the next day there I am sitting at my workbench with a set of hair trimmers shaving some test pieces of teddy bear fur. That's when the absolute absurdity of the moment struck me. My family already think I'm a little touched in the head, this just confirmed it for them! 

Having said that this is one of those crazy ideas that worked really well and when I get some more fur I will be making more. Of course if I can buy fur of the correct length then I can skip the shaving stage entirely - and save my dwindling reputation with my family at the same time!

Once shaved to the correct length I wanted these test pieces to be coloured dark green rather than the original golden brown of the fur. My first idea was to soak the pieces in a green ink wash but all this did was dye the backing cloth and not the fur itself. After several hours drying on my wife's cake rack (don't tell her!) I ended up dry brushing the fur with a dark green acrylic paint. This worked much better than the ink wash and dried in a fraction of the time. Lesson learned for next time. The green looks much more natural and the reduction in colour contrast means they will blend much more naturally into my existing wargames mat. Now that they are finished I'm not sure they look like Mealie but they certainly look like tall grass.

iNgobamakhosi Zulu's hiding in the long grass. 

I made these sections in 'wild' irregular shapes but when I get more fur I'll be making a much wider selection of shapes and sizes.

Addendum: I have now sourced some more fur fabric  from the Interweb so I'll definitely be making more of these. The stuff I have ordered is shorter pile so I  shouldn't have to shave it, which will save some time.  It's probably for the best. My kids are already looking at me like they are weighing up the options for my care!

Tuesday 18 September 2018

The Battle of Ntombe Drift

Following on from my post last week about adapting TMWWBK I have now had a chance to run a couple of play test games. What I decided to do was play a couple of variations of the Battle of Ntombe. This relatively small engagement was none the less significant because once again units of the British army were soundly beaten by "spear wielding savages" (as they were described in the press). The historical battle involved just one company of Infantry against approximately 500-800 Zulu's and was another classic example of poor leadership, poor field craft and a complete underestimation of the enemy. 

Setup/History
With the commencement of the Anglo-Zulu war in January 1879 the village of Lüneberg, situated in the disputed territories of Northern Zululand, felt very exposed to attack. Four companies of the 80th Regiment of foot were sent to reinforce the local garrison but by the end of February they needed resupply. 18 wagon of supplies were sent to the town and were escorted from the boarder by one company. However heavy rains had swollen the rivers and softened the ground resulting in serious delays. Eventually some wagons were able to cross the Ntombe Drift but six remained on the 'enemy' side of the river. Major Tucker dispatched Captain David Moriarty with about 100 men (just shy of a full company) to laagar the wagons on the far bank and wait for the waters to recede.

Add caption
The wagons were arranged in an inverted V shape but were not moved when the river subsided meaning there was a significant gape between the wagons and the river. In addition Captain Moriarty did not send out sufficient pickets so on the night of the 11th March the Zulu's were able to get very close before being spotted. The resulting 'battle' was more of a massacre than a battle with Moriarty being one of the first to fall. A group of forty survivors were able to escape under the command of Sergeant Anthony Clarke Booth (he won a VC for his bravery).

My initial game recreated the historical setting so I attempted to replicate the surprise nature of the night attack by putting the Zulu's within charge range of the camp at the start of the game. I have also made them Veteran units to compensate for the fact the British are behind cover. However I elected to put all of the British inside the laagar whereas in reality the command was divided with some men on the other side of the river under the command of 2ic Lieutenant Henry Harward. In the real battle they provided some covering fire from this position, before Lt Howard abandoned his men and rode away "to get help". Howard would later face a Court Martial for this action but amazingly he was acquitted and returned to duty! Sir Garnet Wolseley took a very dim view of Harward's apparent cowardice and refused to confirm the findings of the court. Instead he put out a statement that made it quite clear what he thought of Lt Howard:
"The more helpless a position in which an officer finds his men, the more it is his bounden duty to stay and share their fortune, whether for good or ill."
The Duke of Cambridge endorsed this comment and ordered it to be read out to every regiment in the army. Lt Howard may have escaped punishment for his actions but his career was over and he resigned his commission in May 1880.


Order of Battle
British
c/o Captain David Moriarty
1 company British Regular Infantry (80th Foot)

Zulu's
c/o Prince Mbilini waMswati
2 Regiments of Tribal Infantry - Veteran/Married


Action
Two Zulu regiments have used the cover of darkness to get within charge range of the British laargar. The British are able to man the defences but won't get to fire on the Zulu's before the attack lands its first blow. 

The Zulu's charge in and meet the British across the barricade. 

The Zulu units have a massive advantage of numbers. Each unit rolls 16 dice (they have no casualties at this time) verses a total of 12 dice (six on each side) for the British. However every British hit will count as a casualties but the Zulus only cause 1 casualty for every two hits, rounded down. This makes attacking defences very hard. 

The British score two hits on each Zulu regiment and the Zulu's also score two hits on each half of the British infantry...a Draw means the Zulu's must retreat half a move facing the enemy. 

Now the British get to fire and they cause several casualties against each Zulu unit and both fail a leadership test and are pinned! This is bad!!! Next turn the only thing the Zulu's can do it try to rally to remove the pinned markers and can't move away or attack. 

The British take full advantage of the lull and pour fire into both Zulu units, causing several casualties and adding a second pinned marker to one of the veteran units. Next turn they try to rally but fail miserably and withdraw a full move. Eventually they leave the table entirely. 

The remaining Zulu regiment is able to remove its pinned marker and tries to attack the British position again, but again its a draw and the Zulu's are forced to retreat. The British have taken a lot of casualties but the Zulu's are no longer in a position to be able to fight across the barricade. The British have won! 


Well I didn't expect that! Mind you it has to be said I gave the British full advantage of the barricade which made all the difference in the melee. Historically the Zulu's breached the barrier before many of the British infantry were able to react.

In the second game I tried to recreate historical setting but on a slightly larger scale. I increased the British to two companies inside the laagar and four regiments of Zulu's attacking them.

The setup for the second game assumed a daytime attack with the Zulu's starting further away but out of LoS. Two units of British are inside the laagar with a quarter section across the river under Lt Howard. 

The Zulu's attack in force but by the time they arrive at the barricades they have already taken some casualties. None the less they still have a huge advantage of numbers

The Zulu's force back the British but are immediately subjected to a volley of gunfire which stops them in their tracks. Three Zulu units are now pinned in plain view of the British rifles. 

Successful leadership rolls mean the Zulu's can move again but in the meantime they have been under constant close range fire and have taken a lot of casualties. However they are now fighting the British in the open and every hit in melee counts as a kill (instead of having to get two hits per kill at the barricades). 

Its still not enough and the next volley of British fire destroys the Zulu unit. Meanwhile all the other Zulu units have also either been reduced by gunfire or failed rally tests and left the battlefield. Another British Victory. 


Analysis
Well considering I was playing the rules for the first time, and playing them solo, both games went really well. I learned a lot, the most important lesson being that TMWWBK can work at 6mm. Moving the units and managing the casualty counters can be a bit fiddly but I'm sure I can find a solution to that. I'm happy with the slight modifications I made to the rules but I need to play some bigger games to be sure I have everything right. There will definitely be more AZW games using these rules so keep a lookout for future battle reports. 

Sunday 16 September 2018

Autumn Skirmish 2018

This morning I made the short hop across the river to Sidcup for the Autumn version of Skirmish. This is a small show but always a very enjoyable one and today didn't disappoint. As usual I spent more time chatting with friends than I did looking around, but I also took quite a 'few' photo's and came home with a nice haul of goodies. This definitely falls in the category of small 'local' show but  regularly manages to draw in gamer's and collectors from across Kent and London.

The show seemed fairly well attended although again the trader hall wasn't as busy as it has been in previous years. I'm hoping this isn't a downward trend because the show has plenty to offer. The Bring and Buy certainly seemed to be busy all day and I picked up some good bargains. By the end of the day I came home with a nice haul of goodies and a camera full of pictures which makes this a success in my book.

Postie and Ray looking for 
bargains at Col Bills

Maidstone Wargames - 28mm WWI - 22 August 1914

Platoon commander Rommel leads his men forward 

Skirmish Wargames - The ZaianWar 1914-1921 - The Battle of Sidi Kup

Skirmish Wargames - The ZaianWar 1914-1921 - The Battle of Sidi Kup

The Privateers of London - Attack on Sedd-el-Bahr 26th Feb 1914 - 20mm

The Privateers of London - Attack on Sedd-el-Bahr 26th Feb 1914 - 20mm

Milton Hundred Wargames Club - Blood on the Elbe -  15mm Team Yankee

Milton Hundred Wargames Club - Blood on the Elbe -  15mm Team Yankee

The Bring and Buy stand

Medway Wargames - A Song of Fire and Ice - A GoT Game 28mm

Medway Wargames - A Song of Fire and Ice - A GoT Game 28mm

Rainham Wargames Club - 

Rainham Wargames Club - 

Rainham Wargames Club - 

The Old Guard - 28mm Fantasy - Dragon Rampant

The Old Guard - 28mm Fantasy - Dragon Rampant


My show loot. Another T-Shirt from Art of War, a Blandford Guide for my growing collection, a copy of Richard Tory's Zulu war rules for a bargain price and some figures from Col Bills. 
All in all a good mornings work! I hope this show continues to run next year as its always a friendly event and a highlight of my calendar. 

Friday 14 September 2018

TMWWBK for 6mm Zulu War

So after a long hiatus following the last Winter Painting Challenge I have finally found some time to go back to my Zulu War project to think again about the rules I want to use. This time I have been giving some thought to adapting The Men Who Would Be Kings rules, written by Daniel Mersey and published by Osprey. This exercise has been very interesting, shows promise and has even resulted in firm plans for a full scale solo play test sometime next week.

This back to front approach - buying and painting the models before I have even settled on a rule system - is typical of me. Actually that's a little unfair as I did spend quite a lot of time thinking about rules and exploring several options prior to buying the figures, but I never really came to a satisfactory decision. In the end I just painted and based the figures in a configuration that I thought would be visually pleasing and practical, with my fingers crossed that I could make them fit a rule system further down the line. Again, typically of me, I got sidetracked with another project after the Challenge ended and its taken nine months for me to return to my search for a compatible rules system for the Anglo-Zulu War.

Before I go on to discuss my experiments with TMWWBK its worth mentioning my previous 'research' as I was able to read quite a few alternative rule-sets that are freely available on the internet. I'd definitely recommend hunting down a copy of All the Kings Men for larger figures, or Taking the Bull by the Horns which is designed specifically for 6mm. There are also some very interesting and useful rules and notes on colonial wargaming by the likes of Donald Featherstone and Jack Scrubby that can also be found online and are well worth reading. The other rule set I gave serious consideration to was the one that Postie uses as the basis of his Zulu War games, The 1879 Zulu War by Richard Tory. Its a great rule set and is packed full of excellent and detailed research. Its an old set and I don't know how readily available it is but its worth tracking down.

TtS! Zulu play test last year
The closest I came to deciding on a set of rules was when I play-tested some ideas for adapting To The Strongest (I wrote about this here). I never did get around to writing up and developing my ideas, but its still simmering on the boil in the back of my head somewhere! This week however I have been looking in another direction and a rule set that I bought, read and thoroughly enjoyed last year but never got around to seriously exploring as an option. The Men Who Would Be Kings is more commonly seen being played with individually based 15 or 28mm figures however I'm not the first person to give serious thought to adapting it to 6mm wargaming.

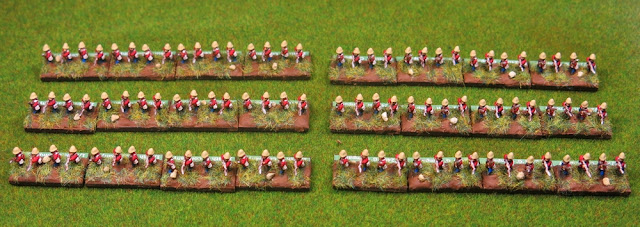
The first consideration for me was what to do about unit sizes. My Zulu's for instance are based on large square bases of 48 figures representing about 500 warriors, way above the normal 16 figure tribal units in the rules. Meanwhile my British units are 16 figures, again larger than the 12 stipulated in the rules and representing a company of about 120 men. Personally I think my ratios between British and Zulu units look right, aesthetically and historically. However this throws up a new problem as I'm in no hurry to break the hidden maths behind the rules by changing the number of 'hits' a unit can take. So my 'solution' to this quandary is simply this, despite using a 16 figure unit to represent Regular Infantry I'll still work on the principle that they can take 12 casualties before being removed.


This throws up another problem - this time with regard to firing - as normally you throw one dice per figure and now my unit sizes are out of sync with the rules. My 'brainwave' (if you can call it that) is to use dice markers showing how many men are remaining rather than using then to record casualties. So my Regular Infantry unit for instance will start off with 12 pips representing 12 figures and as casualties are taken the number is reduced. When the pips get to zero the unit is removed from play. Likewise my large Zulu units of 48 figures will still take 16 hits to remove from play, starting the game with dice counters showing 16 pips and counting down as they take casualties.

The final decision to be made was much simpler; what to do about ranges and movement rates. I want to play these games on my small table at home so its a fairly straightforward move to change inches to cm. So a Tribal Infantry unit normally moves 8" and will now move 8cm, and a Field Gun would normally have a range of 36" its now 36cm. This means I can get set up quite a large battlefield with plenty of figures in a relatively small space.


One additional consideration that I have just thought about (and will look at when I do the play test next week) relates to firing ranges. The rules say that the range is measured as the closest distance between two units (and fire arcs are 360° from all but close order units and artillery), which is fine when counting range in inches. However if I deploy one of my regular units in line the line will stretch 8cm long. In addition the way the rules define the fire arc of a unit means that the furthest unit could be as much as 6cm from the enemy. This diagram illustrates the problem:
One large Zulu Unit approaching the end of a British company deployed in open order (line). The rules treat the British as a single unit with a 360° fire arc and ranges are measured by the nearest point. 


My 'solution' - which is need to test in a game - is to treat this unit as if it were divided in two and check the ranges for each half using the normal rules. This could potentially see part of the unit at effective rage and the other half at long range but I think its a compromise that suits this scale. Having said that I need to play test this idea to see if it really makes a huge difference to the game. I don;t want to over-complicate things and deviate from the rules as they are now unless absolutely necessary.

Having now made a few decisions about adapting the rules it was time for me to put my changes to the test. Next week I'll try to do a simple play test game* to see if the changes I propose are actually practical. Hopefully by the end of next week I will post details of the scenario I decided to play, how the game worked and what changes I need to consider going forward.  (*I'm also going to try out the Mr Babbage solo play system suggested in the rulebook. If all goes well I'll be playing quite a few solo AZW games over the next few weeks)