How do you make a success of your New Year Resolutions? Wargamers, like other people, will be heading into New Year's Eve with goals for the coming year. But Resolutions are notoriously hard to keep and by the end of February, most have been abandoned. So how do I approach setting goals for my hobby and have I been successful with my resolutions for 2023?
Sunday 31 December 2023
Friday 29 December 2023
Bosworth Test Game: Test of Resolve
The Crown of England was up for grabs this week, and the outcome was dramatic and very exciting. I had a week off work for the Christmas break so I was determined to take a day out for a solo game of Test of Resolve, the Wars of the Roses ruleset. I have been building the armies of Henry Tudor and Richard III for Bosworth for a little over a year and while I have played a few small test games I have yet to fight the battle. I have a plan (and the figures) for the whole battle, but my table in the Operations Room is just 3ft by 5ft so I would have to select a portion of the map and play part of the battle only. As it was the two formations that were excluded in this setup didn't play a part in the actual battle so leaving them out didn't have an impact on this game. When I play this with a larger table there are rules for their inclusion, but that's a challenge for another day.

The order of battle for this game included Richard III, Brackenbury and Norfolk for the Yorkists and Henry Tudor, Oxford, De Chande and William Stanley for the Lancastrians. For the purposes of this game, the French under De Chande would not be free to move until Turn 2 while William Stanley could only move if a 'Show your Colours' card was revealed from Turn 2 onwards, and a test passed.
(Y) Richard III - 9 Battle Points
(Y) Brackenbury - 20 Battle Points
(Y) Norfolk - 24 Battle Points
(L) Henry Tudor - 6 Battle Points
(L) Oxford - 25 Battle Points
(L) De Chande - 14 Battle Points
(L) William Stanley - 15 Battle Points
These rules use a deck of special cards (the game deck) to drive the action. This consists of cards which determine which side is active and what actions they can take, such as Move & Melee, Fire or Ending the Turn. I decided to remove the Missile Supply cards from the deck for the first turn only, partly because I didn't like the idea that one side of the other could have to test for missiles before anything had happened, and party to speed along the first turn. These cards would be put in the discard pile ready to be reshuffled into a new game deck for turn two. Similarly a Yorkist "Event" Card and Lancastrian "Show Your Colours" card would also go into the discard pile for inclusion in the deck in turn two.

The game starts with the Yorkist Archers moving forward into long-range. The Melee troops remain stationary for now, waiting for this initial missile duel to conclude before advancing.

Oxford sends his missile troops forward to get into close range. He has two handgun units at either end of the line, but they need to be within 5" to have the range and these press further forward. Meanwhile, DeChande and his French troops remain in their starting positions and (offscreen to the right) William Stanley has yet to reveal his allegiance.

Norfolk and Brackenbury push their Billmen and Men at Arms forward behind the archers. This in turn prompts Oxford to do the same, although his men must cross a small stream which will limit their movement slightly. However, all of this is just posturing, the Archers have not finished their deadly exchanges yet. A handful of units have had their resolve reduced by missile fire but the most significant impact has come from Henry's Canon on a slight hill behind his line (offscreen to the left). Despite long odds (needing 11+ on a D12), they have hit one of Norfolk's Archer companies twice, severely weakening them.

Henry and his Mounted Knights move to position themselves on the right of Oxford's Line, but the marshy ground to their front limits room for manoeuvre.

De Chande leads his French and Scots across the stream and begins to advance on Norfolk's troops ahead of them. The Crossbowmen have a similar range to the archers but had started out of range of the enemy so this move brings them into the action if a Fire card comes out of the Game Deck.

Brackenbury has lost two Archer companies and the third had to fall back behind its haven company, so he decides to advance his Billmen. In response, Oxford moves his melee troops forward and on the next Movement card will begin withdrawing his archers behind their haven companies. Archers do get a chance to withdraw if approached by enemy melee troops but there is always a chance that they don't withdraw fast enough and Oxford wants to keep his line in good order.

Oxford successfully pulls back his Archers and then form-up as light melee troops behind their Haven companies. One more Move card, for either side, and the bloodshed will begin.

This overhead show shows the advancing French under DeChande and Oxford's Battle move forward ready for the desperate struggle to begin. William Stanley has yet to show his colours so at this point the Lancastrians are outnumbered. Even if Stanley does pick sides, the marsh will limit his movement on the right.

From turn two, the Yorkist Event card was included in the Play Deck, and it would shape the outcome of the battle. The Yorkist Event was "Mind the Gap". The King sees a gap open in the Lancastrian line and has to choose whether to act on it or not. If not, the card goes back into the deck for the next turn, but if it is acted upon the King needs to roll 8 or more on a D12.

Although both sides had not yet begun a general melee, I decided that Richard III would take the chance to end the battle decisively. Unsure of the allegiance of the Stanleys, and keen to assert his authority as the rightful king of England, Richard orders his knights to charge through the Lancastrian line. Richard was many things but he was not a coward and even his enemies acknowledged the bravery of the King following the battle of Bosworth.

Richard's command successfully rolls to act on the order (rolling a 12 on a d12!) and moves in a straight line, ignoring terrain, distance and intervening troops, to be placed in frontal contact with Henry's command. A round of melee is then immediately fought and the King's command gains several important bonuses in this initial round of combat. The charge gets a +1 for Shock (a charge bonus) and another +1 for a supporting company. Meanwhile, Henry suffered a -2 surprise modifier as the attack came out of the blue.
Modifiers alone do not win a Melee but then Richard rolled an 11 and Henry a three. After modifiers that was a difference of 10+ resulting in the loss of three Resolve Points on Henry's company. Despite this Henry passes his resolve test and remains in position.

Now I deviated from the rules slightly as I decided that the initial impact had been so great that I ought to conduct a second round of Melee immediately. No supporting units could join the fight quickly enough to give any advantage to Henry so rather than unnecessarily drag the game out I opted to fight on (I'll give more thought to this rule change before my next game). This time Henry would not have the Suprise Penalty and Richard would not get the Shock bonus...but it made little difference with the King winning again and Henry's company rolling a 1!
This prompted a commander's fate test and once again I rolled a 1 meaning Henry was cut down and his ill-fated attempt on the Crown on England was brought to an ignominious end on the field of Bosworth.
Long Live King Richard III!
What have I learned from this game and what will I do differently next time?
Well for a start I have learned that by manipulating the Play Deck it's possible to speed play along quite effectively. I decided to hold back the Missile Supply cards until turn two and this has two effects. It makes the initial deck slightly smaller, putting more emphasis on movement and firing. However, it also means that some Missile companies remain longer than they otherwise would and this stretches out the archery duel at the beginning of the battle. I'll have to give this some more thought going forward.
I'm also inclined to keep my change to melee in the game, ie if there are nearby supporting companies that would change the outcome of the second round of melee, then have that second round immediately to speed the game along. Again I'll have to give this some careful thought but given the size of the armies I am fielding, I think any small changes that increase the speed of the game could be a good thing.
I may also make a few small changes to the map for the battle to accommodate the size of the Battles. For instance, I think the Marsh is too big and effectively divides the battlefield in a way that I'm not sure the real marsh did on the historical battlefield.
So I have a few things to think about and some changes to consider following what was a very enjoyable and exciting little game.
Sunday 24 December 2023
Clarity verses Inspiration: The Pursuit of Precision in Wargame Rules
All wargame rules are a compromise between Clarity and Inspiration. Getting the balance right can be very difficult, and getting it wrong can lead to endless confusion.
Sunday 17 December 2023
Collaborative Painting: Rising to the Analogue Hobbies Painting Challenge
Painting in collaboration or competition with other wargamers is a fantastic way to boost your productivity. I'm taking part in this year's Analogue Hobbies Painting Challenge and every year that I have participated my painting output has gone up. Whole armies can be completed in just three months, with the gentle support and encouragement of other wargamers.
Sunday 10 December 2023
Breaking with convention: Miniature Basing for Different Rulesets
Do you go the extra mile to ensure your bases fit as many of the rule sets you are likely to play or base them for the game you first plan to play and just make it work? Do you adhere to the basing conventions for a set of rules or are you a convention breaker?
Sunday 3 December 2023
Napoleon: A travesty of a movie
Ridley Scott's Napoleon is a travesty of a movie. Historically inaccurate, poorly written, badly acted and a complete mess from beginning to end.
I've not done a film review before but I had to make an exception for this film. Hotly anticipated by many wargamers the early images from the production made us even more eager to see the final cut. What we got was so bad that the film has become the latest internet meme, with terrible review after terrible review. Far be it for me not to join in, so here's my take on two and a half hours of wasted opportunity and insult to history.
Tuesday 28 November 2023
Battle of Neds Cabin: Fire & Fury revisited
Posties Rejects got together at the weekend for some ACW action using Fire & Fury. I haven't played these rules since 2019 but we all picked things up quickly under Stuart's watchful gaze.
Union Order of Battle
3rd Corp c/o McDowell
1st Division (c/o Hatch) 1st, 2nd, 4th & 6th Wisconson + Gun
3rd Corp c/o McDowell
1st Division (c/o Hatch) 1st, 2nd, 4th & 6th Wisconson + Gun
2nd Division (c/o Ricketts) 1st, 2nd, 3rd & 5th New York + Gun
3rd Division (c/o Reynolds) 1st, 2nd, 3rd & 4th Pennsylvania + Gun
Cavalry Division (c/o Pleasanton) Vermont Cavalry & Gun
+ Reserve Artillery (dice for quantity in 2nd turn)
Confederate Order of Battle
2nd Corp c/o Jackson
2nd Corp c/o Jackson
1st Division (c/o Starke) 1st, 2nd, 3rd & 5th Virginia + Gun
2nd Division (c/o Lawton) 1st, 2nds, 4th and 6th Arkansas + Gun
3rd Division (c/o AP Hill) 2nd, 3rd, 5th & 6th Alabama + Gun
Cavalry Division (c/o Wheeler) Texas Cavalry
+ Reserve Artillery (dice for quantity in 2nd turn)
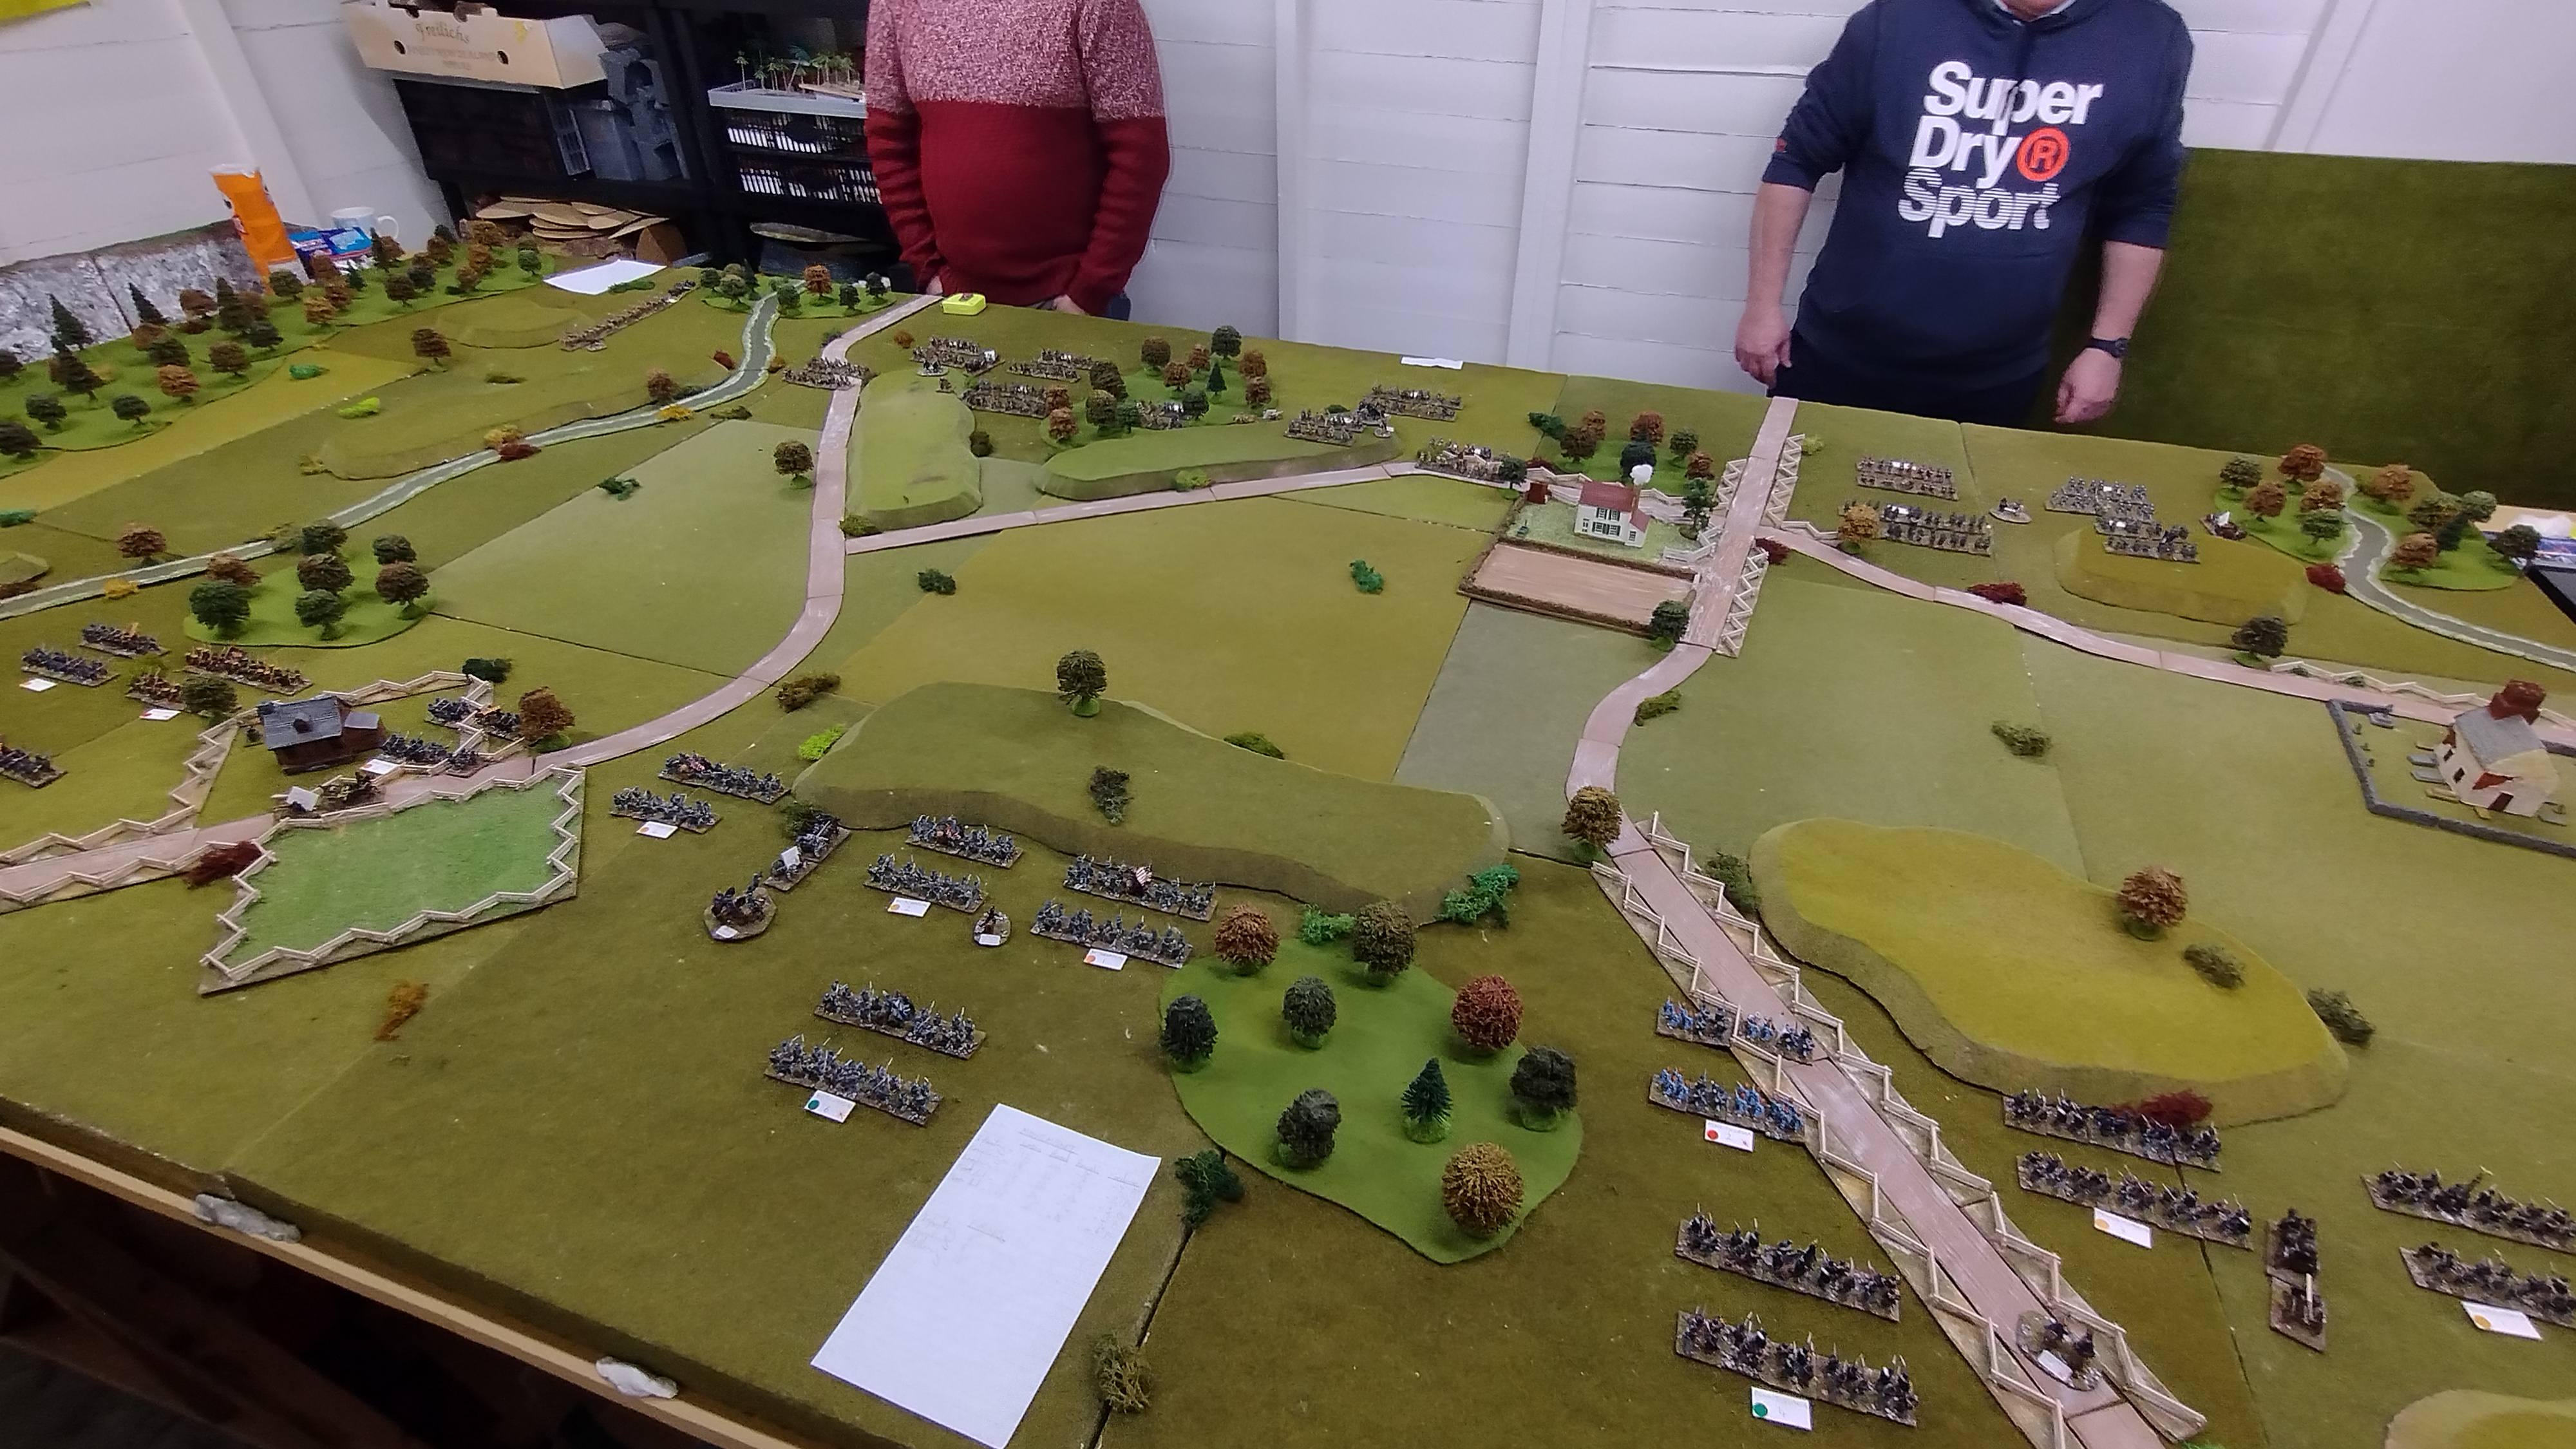 |
| The initial setup. Artillery reserves would come on later in the game. |
 |
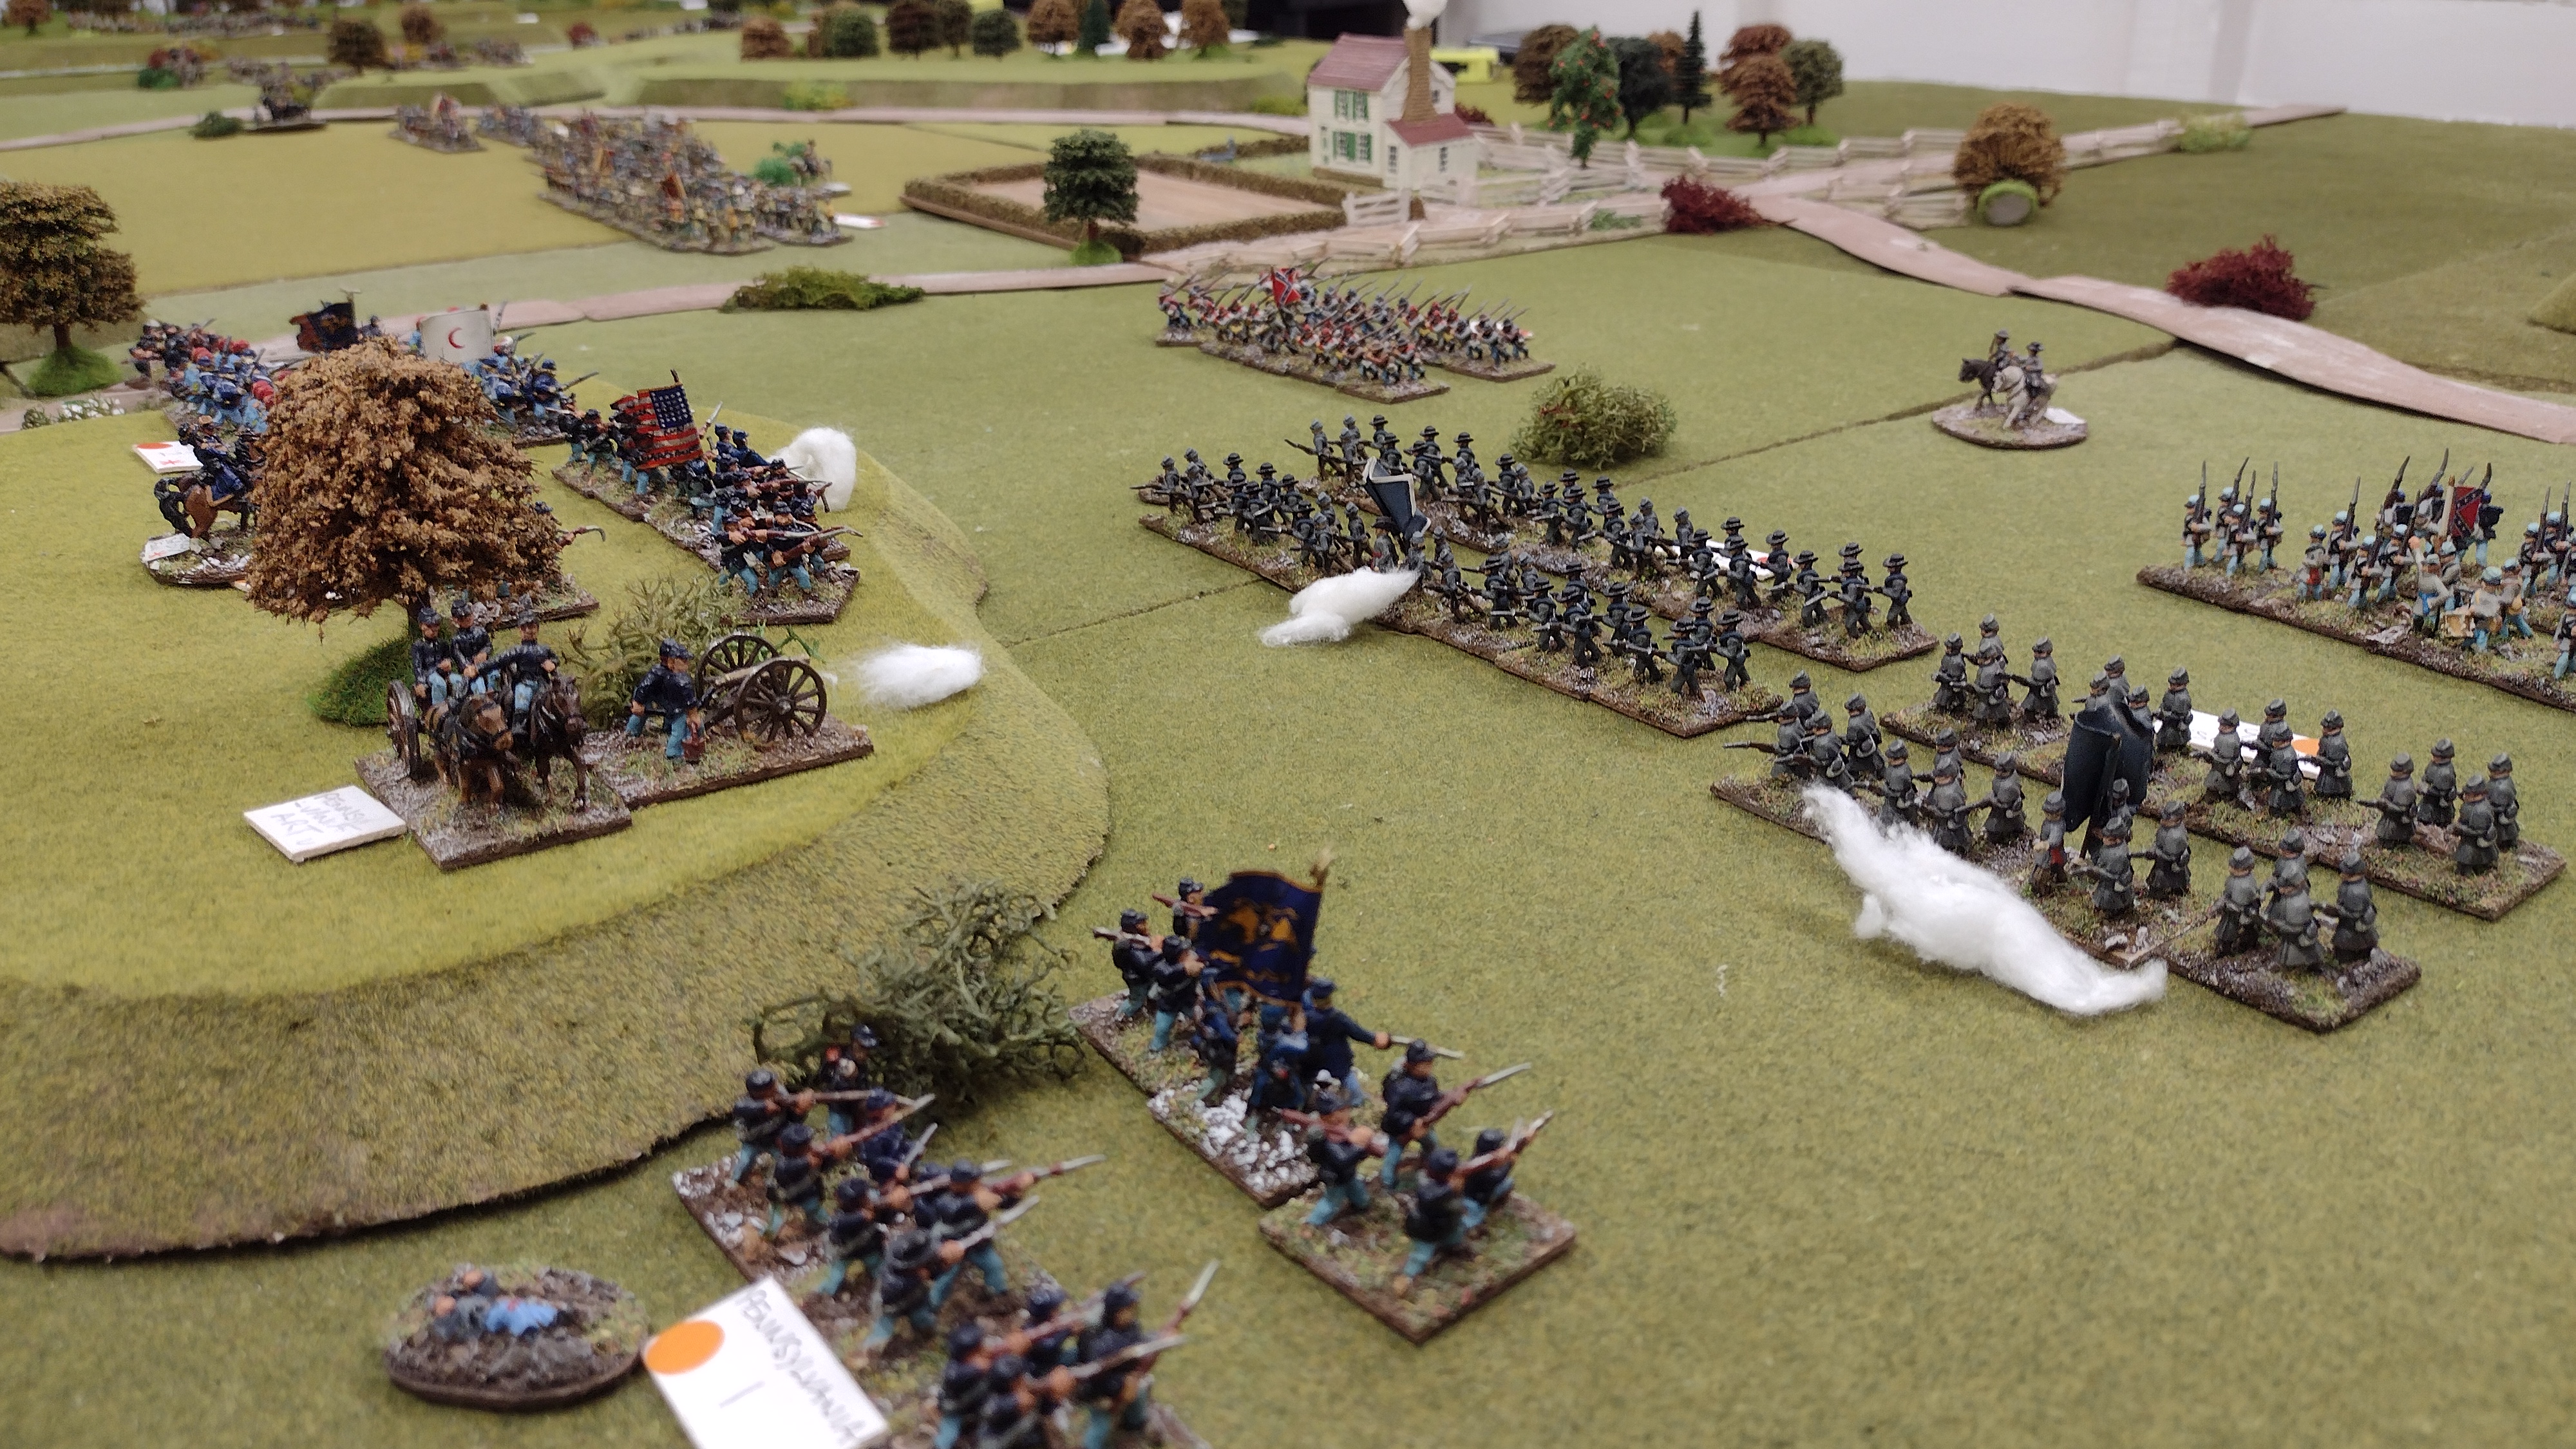
| The Federal line was anchored on a ridge line |
 |
| The Confederate players advance towards the Union positions |
 |
| New player Dan turned a humble wood into a formidable redoubt |
 |
| My Wisconsans watch the approaching rebels |
 |
| Much of the fighting took place on the right flank. |
 |
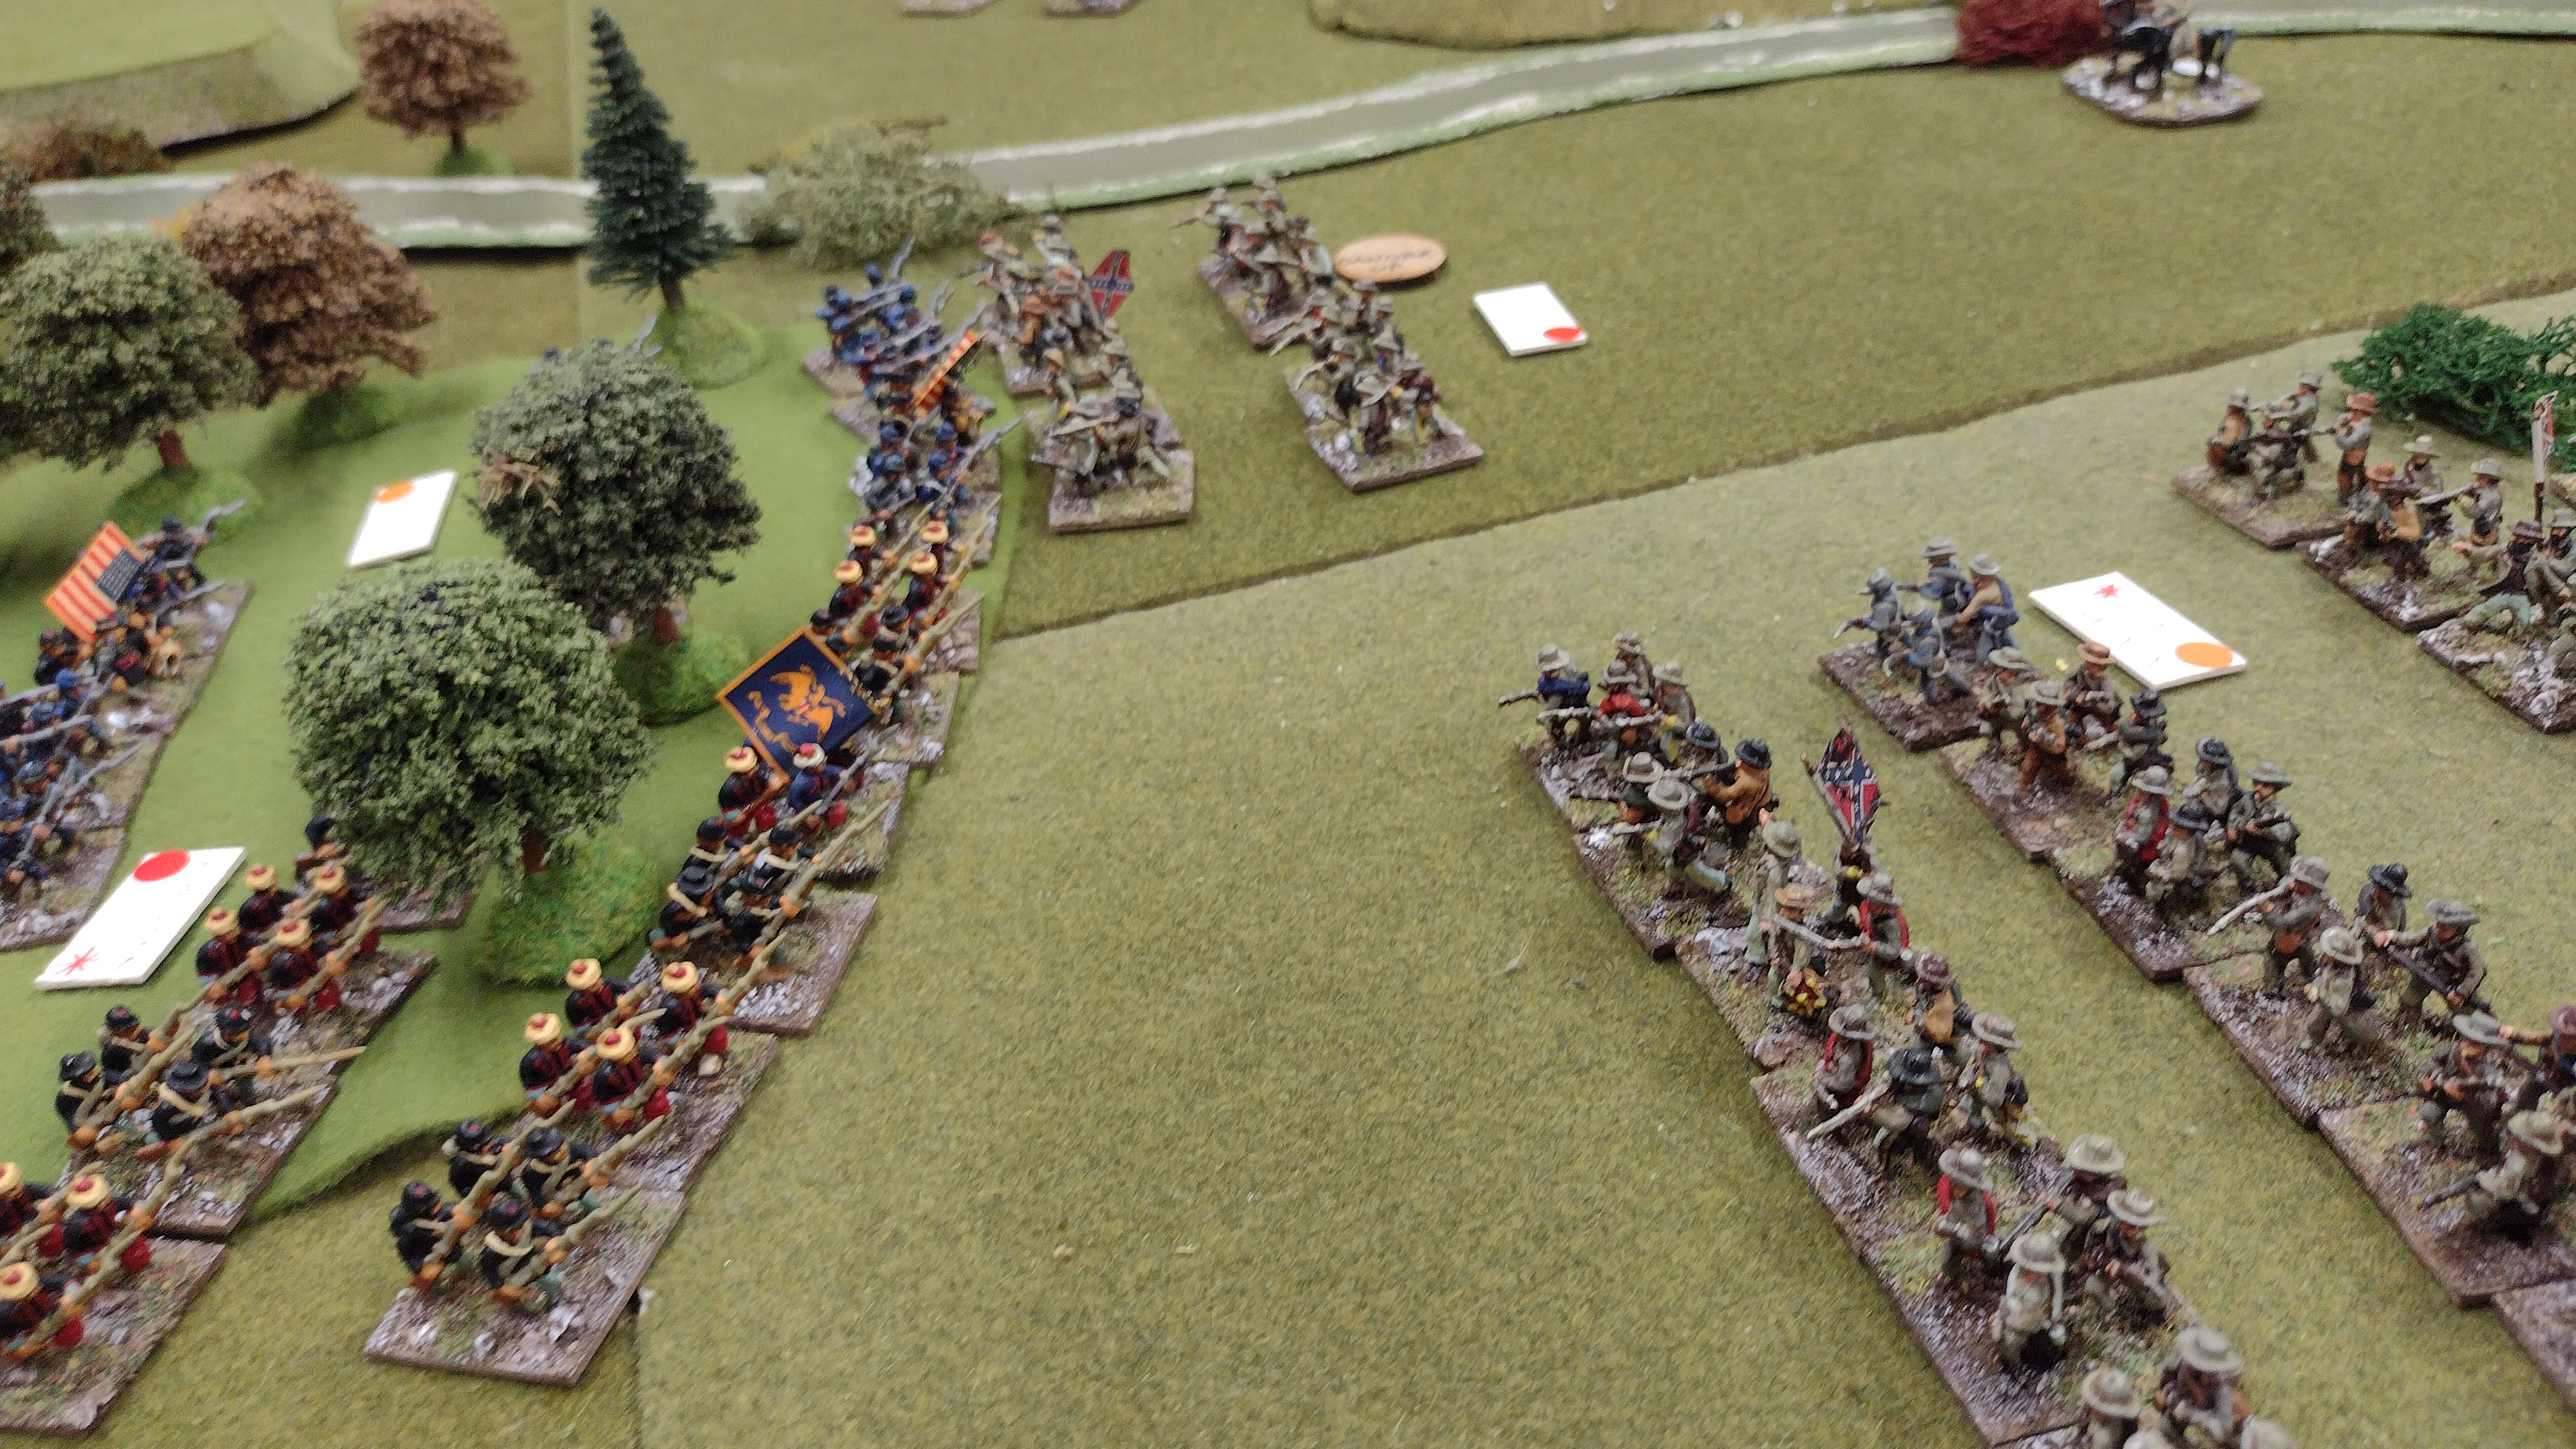
| The Rebels charge up the ridge in the first of several back and forth melees |
 |
| Union troops are pushed back |
 |
| On the right flank, the Pennsylvanians charge downhill, bayonets fixed in an attempt to disrupt the Confederate advance. |
 |
| Extremely high rolls on both sides made the melee very exciting. |
 |
| The Pennsylvanians are touched back up onto the ridge and hold their position |
 |
| Meanwhile, Dan's New Yorkers fight bitterly for the woods. |
 |
| Richard's Virginian's charge uphill and I roll a double one, but so does Richard. There's an immediate second turn of melee and I roll 11 but Richard rolls a 12 and I'm pushed back |
 |
| But then the Union right flank crumples. Both sides are being worn down but the Union troops have the worst of it. |
At this point in the game, it was getting later in the afternoon and I decided another round or two of melee would not improve the union position so I conceded the game. When Stauart totted up the points the Confederates had won by three points, a narrow win but one that would probably have only widened further had we played on.
Friday 17 November 2023
6mm Medieval Building Kickstarter
Phil Page (aka 6MilPhil of Slug Industries fame) sent me a few buildings to review from his new 6mm Medieval Village Expansion Set Kickstarter. I already had one of these models earlier in the year so I jumped at the chance to get my hands on the full set for a review video. I wasn't disappointed, with every model being wonderfully sculpted and full of character. There wasn't a single flaw in the casting of any of these models and I'm more than happy to recommend them.
All views expressed in this product review are my own and reflect my genuine and independent view of the product.
Phil Page's YouTube Channel - Includes video of lit interiors
Slug Industries on Facebook
Sunday 12 November 2023
Warfare 2023 Show Review
The Warfare 2023 wargames show took place this weekend and Posties Rejects drove down to Farnborough to enjoy the show. As always we shot a load of pictures, talked ourselves hoarse and spent loads of money. A brilliant day was had by all concerned.
Are you a Grognard? Or a Beer and Pretzels type of gamer?
Are you a Grognard? Or a Beer and Pretzels type of gamer? Many wargamers would probably describe themselves, in a slightly self-deprecating tone, as a Grognard. But maybe you also enjoy newer, simpler, fast-play rules? I quickly look at the definitions of these two wargame archetypes and ask, do we need to pick just one?
Saturday 11 November 2023
Dense Woodland Build Tutorial
This wargame tutorial/walk-through is my take on how to create dense woodland for 6mm wargaming. This version has tree trunks holding up a thick canopy of leaves and represents patches of impenetrable wood (ie units can't pass through them). However, you could make the same model, without glueing the canopy to the trunks, thus allowing models to be placed inside the forest.
Sunday 5 November 2023
The 15 minute wargamer: Turning even short period of time into hobby time
Sometimes we don't have hours to spend enjoying our hobby, but that doesn't mean we can't make even the shortest period of time, hobby time. Breaking down tasks into smaller pieces means we can tackle the largest of projects, watch the longest of videos, or even play big games, even if we only have 15 minutes to spare.
Tuesday 31 October 2023
RE Play Wargames Show
A short video of the RE-Play Wargames Show which took place at the Royal Engineers Museum in Gillingham on Saturday. This was a new show organised by the Milton Hundreds at the request of the Museum. I think it was a great success, especially considering it was put together with just a few weeks notice. My understanding is that there are already discussions about running this event again next year and I think the Rejects would certainly enjoying participating again.
Friday 27 October 2023
RE-PLAY - A new and exciting wargame event at the Royal Engineers Museum
Posties Rejects will be at the new RE-Play event at the Royal Engineers Museum tomorrow. Our game has been chosen because there is a link with the Royal Engineers so please come along and see if you can find Captain Wynne and his men from No2 Company.

Confirmed Clubs running games at this event:
The following list is accurate at time of writing but I guess as this is a 'new' event it could be subject to some last minute changes.
- Shepway Wargames Club, Hauhausen '89, Cold War gone hot.
- Skirmish Wargames, The First LRDG 1916-1917, British Empire vs. Turks at a desert oasis.
- Medway Wargames Society, Gladiator arena, 2 tables (P), Star Wars Shatterpoint skirmish
- Tunbridge Wells Wargame Society, What a Tanker! WW2 tank skirmish
- Maidstone Wargames Society, Dogfight '69, El Salvador vs Honduras, "The Football War"
- Friday Night Fire Fight, Last Argument of Kings, large scale fantasy skirmish
- Fire When Ready UK, Star Wars Legion Grand Army game
- Posties Rejects, 6mm Zulu Wars, The Battle of Inyezane 1879
- Rainham Wargames Club, 1/600 American Civil War Ironclads
- Real Time Wargames, The Glittering River, Naval actions from the Russian Civil War, 1/600
- Milton Hundred Wargames Club, The Battle For Villers Bocage, Rapid Fire WW2
Confirmed Traders at this event:
Again correct at the time of writing. For such a small venue and new event this is a pretty good selection of traders. I have my shopping list prepared!
- The Pit Gaming Shop
- KR Multicase
- Sheppey Models
- Debris of War
- Brigade Models
- Cuirassier Books
Monday 23 October 2023
What is the point of Demo games: A personal perspective
What is the point of a demo game at a show? My personal view is that its a form of hobby outreach, encouraging non-historical wargamers and non-wargamers alike to give our wonderful hobby a try. So it should come as no surprise that one of my personal bugbears is the unlabelled demo game. This is a subject I have discussed many times (so I apologise if you've followed my channel or blog long enough to have heard this before), and it is a phenomenon that is thankfully becoming rarer and rarer. But its not entirely gone away.
Sunday 15 October 2023
Monetising your hobby: A personal perspective
A discussion of the pros and cons of monetizing our hobby on YouTube and my own personal choice regarding advertising revenue and creative control. I have touched on this subject before but now I explain in full the reasoning behind my decision not to monetize my channel.
I hasten to add that this shouldn't be taken as a criticism of those who have gone down this route. Every wargamer on YouTube needs to make the decision that is best for them and their channel, and I would love to hear your views on this sometimes divisive subject.
Friday 13 October 2023
Muddy Roads: A Terrain Tutorial
A quick build tutorial on making flexible roads for wargaming in various scales. These are more of my felt-backed terrain pieces for use on fleece mats.
Casualty Rates in Wargames
My Sunday video from last week...which I inexplicably forgot to publish on the blog!
Are the casualty rates in most wargame rules unrealistically high? Or do mechanisms such as figure removal represent a more complex picture of declining unit effectiveness?
Sunday 1 October 2023
Wargamer Wellbeing
The mental health benefits of our hobby are well documented, often discussed but rarely seen until they are taken away by illness or prolonged hobby furlough.
Friday 29 September 2023
Muddy Streams: An easy build water feature for 6mm wargames tables
A quick and easy tutorial on how to make simple, flexible streams and water features for wargaming. These are specifically made for 6mm scale gaming but the same techniques can be used for a variety of projects for a range of scales.
Sunday 24 September 2023
How Many Historical Wargamers are there?
How many historical wargamers are there in the UK? This is a question that has been asked before and finding an accurate answer is tricky, to say the least. I’ve often described our community as being a niche within a niche but is it even possible to speculate how many of us there are?
Sunday 17 September 2023
A Change of Format: That you probably won't even notice
This week I forgo my regular talking point video and instead discuss a few small changes I'm making to my channel format. I've been drilling down in the channel analytics and looking back at the last year to see what worked, and more importantly, what didn't.
Sunday 10 September 2023
Irregular Unit Sizes
Does it really matter how many figures you have on base? When modelling units of nominally the same strength, does it really matter if you are one figure short?
Sunday 3 September 2023
Instant Armies: Are Mini Painters an endangered species?
Could colour 3D printing eventually become cheap enough (and good enough) to make miniature painters an endangered species? Could we one day see fully 'colourised' starter box sets similar to the current Waterloo starter set for Black Powder? Ultimately the answer may not be 'Can the technology be developed?' but rather 'Is there a market for it?'
Wednesday 30 August 2023
Painting Tutorial for 1/1200th Ships
A short tutorial on painting 1/1200th scale ships from Ark Royal Miniatures for use with the Mad for War rules. This is a basic tutorial, mainly using contrast paints, for a speedy and simple finish. If you want to get reasonable-looking ships on the game table quickly, this is one of the ways to do it.
Sunday 20 August 2023
When Serendipity Strikes: Never ignore the Gods of Wargaming
Sometimes it feels as if the Gods of Wargaming are dropping not-so-subtle hints about what project you should do next. I'm talking about those moments of serendipity when the stars align and everything seems to be telling you to start a new project. This has happened to me twice in the last year and both times has led me to exciting new projects.
Monday 7 August 2023
La bataille de la mission impossible: A WWI battle report.

I've been very busy with home DIY recently but I've reached the point where I could take the day off for a game with my fellow Rejects down the Shed-o-War. So it was with great eagerness that I arrived at Stuart's on Sunday for whatever game he was running. World War One and his in-house ruleset was the order of the day and I was initially very happy with that because we have had some cracking games with these rules and his 6mm figures. Of course, I hadn't factored in being beaten before the game had even started by the scenario he presented us with and by the impossible French objectives. That's not to say I didn't have a good time of course (the usual banter and joviality were on top form as always), but having an outside chance to achieve victory, as opposed to none, would have made it better.

As is our way we started with a pre-game cuppa and picked sides randomly. Myself, Richard, and Steve were the French as this is an early war set of rules, we would be attacking the Germans across largely open countryside. Ray and Surjit played the Germans and while they were outnumbered about 3:1 their job was to hold as many objectives as they could by the end of the game. They started holding 24 points worth of objectives such as crossroads, buildings, woods, and hills, and it was the French player's job to take at least half those points by the end of the game. However, all but three of the objective points were in the last third of the 6' deep table. his meant that the French would have to move at double speed, unopposed if they were to even reach those objectives, let alone have time to fight for them. There was a dice roll at the beginning of the game for a French Double move (the Germans rolled to see if they could react to our sudden attack...they did, and we lost the extra move turn) but even that still left most of the objectives out of our reach, even without German troops trying to delay us!

I have to say at this point that I don't think this is a fault of Stuart's rules (although more on that in a moment) but of the scenario design. It's a pity because we had a great time and our artillery fire was significantly more effective than the German players for most of the game. In these rules, the artillery roll one d10 per gun to hit (hitting on a 5+ in the open, 7+ in soft cover, and 9+ in hardcover), and for each successful hit, the player then rolls two d10s for casualties. Rolling a 10 on the casualty dice counts as a double kill and forces the target unit to make a Courage test. I can say without any hubris that I was the uncontested master of the 10s throughout the game (my dice rolls were charmed) and still, it counted for nothing because the game was being decided on objectives captured and all those in front of me were too far away. And of course, there was also the small matter of the German defenders trying to slow down our advance.

This brings me to the one single bone of contention in the rules for this game. Stuart is of course tweaking and refining his WWI rules with every game and following our last WWI game, he made a small change to the Melee rules that I think was probably a mistake. I would say that of course because myself and Steve found the change to our mutual disadvantage, but let me explain and maybe you can draw your own conclusions.
Melee is decided by a series of d10s. One for each base of figures still in play. Additional dice can be added for defending favorable ground, charging, etc. In addition, defenders usually hit on a lower dice roll than attackers so the 'favorable ground' bit is effectively applied twice. So for example, four attackers attack four defenders in a slit trench which is classed as light cover. The defender would get four d10s for troops, and +1d10 for favourable ground. The defender hits on a 6+. The attacker meanwhile gets four dice for troops, plus one for charging, but hits on an 8+. So in a straight fight, the defender in cover has an advantage. (There are other dice that can be added for trained or specialist troops but for the purposes of keeping this example simple, I'm leaving them out).

The wiley attacker will therefore bring as much firepower to bare on the defender before going into the attack. This may mean targeting the position with artillery or weakening the defender with rifle and machine gun fire before getting stuck in with Boyonets. In Fig 2 below, the defender has been whittled down before the attacker charges in. Now the defender only has three dice to the attacker's five, although the hit differential remains the same with the defender hitting on a 6+ and the attacker on an 8+.

So the attacker is incentivized to bring as much overwhelming manpower to bare as possible, to swamp the defenders and take the position. So in Fig 3 below both the attackers and defenders have taken casualties but now the attacker brings two companies to swamp the defenders. In this example, the defender gets 3 dice for figures and one for the softcover hitting on a 6+, while the defender gets 6 dice for troops plus one for charging, still hitting on an 8+. The attacker still has a hard job but by bringing lots of troops to the melee, and with a bit of luck on the dice, stands a chance at winning the melee and taking the position.

Now we get to the rule change that caused such consternation on the French side. In a previous game, the 'ganging up' tactic seen in Fig 3 upset the defending players and much moaning ensued. Stuart decided to change the rules meaning that only stands in base-to-base contact could be counted in the melee. In this example that would reduce the attackers' dice by three, making the assault significantly harder to win despite outnumbering the defenders 2:1.
Now consider this extreme example in Fig 4. The defender has been battered by artillery and denuded by rifle and machine guns until only one of the original four defenders in the company remains. Meanwhile, the attackers have crossed the open ground unharmed and now attack the position with two full-strength companies. The recent rule change means the defender gets 1 dice for troops and one for the softcover, hitting on a 6+. Most of the attacker's troops are discounted so they only get two dice for troops in direct contact with the enemy and one for charging, hitting on an 8+. Despite being outnumbered 8:1 a defender in soft cover still has an advantage in melee.

At this point is worth pointing out that in the open the cover advantage falls away and both sides would be hitting on a 6+, but even so, there is little point in trying to overwhelm an enemy position under the new rule changes as all 'additional' bases are ignored.
As I am writing this I appreciate this may look like I'm really worked up about this (having written a few hundred words with supporting graphics) but I want to repeat that on the whole we enjoy Stuarts WWI rules and personally I had a great day playing this game. Putting aside the unwinnable victory conditions (every umpire can have an off-day when creating a scenario) my only criticism was this rule change, and I believe Stuart is giving some thought to changing it back to how it was. Hopefully, this article will help convince him to do just that before our next game!
Sunday 30 July 2023
The History Hook: What inspired you to play a particular period?
What hooked you into playing a particular historical period? Was it a great movie, an inspiring history book, or a really good museum? Was there a particular story or item that grabbed your attention and left an impression on you that only wargaming could satisfy?
Tuesday 18 July 2023
Bosworth Armies in 6mm
My 6mm Lancastrian and Yorkist Armies for the Battle of Bosworth, 22nd August 1485. Richard III's army is slightly larger but Henry Tudor has more experienced continental troops in his army.
Sunday 16 July 2023
Travelling to Shows
How far have you traveled to visit a show or convention? Here in the UK, we are a bit spoilt for opportunities but that doesn't mean we wouldn't travel hundreds of miles for a good show.
Wednesday 12 July 2023
6mm Tavern or Alehouse
I was given this lovely little model by Phil Page (aka 6mil Phil) at Salute. It took longer than planned to finish it because I kept getting sidetracked by other projects. The model is finely detailed and was a pleasure to paint. Check out other 6mm Medieval buildings by Slug Industries sold through Brigade Models.
Sunday 9 July 2023
Talking to Non-Wargamers at shows
When wargamers put on demo games at shows we never know who may come up to our table to chat. Not everyone will be a wargamer, and at some shows, like last weekend's Rapture Gaming Festival, most of the visitors will have never seen a wargame before. So when we talk to members of the public should we change how we present our hobby compared to how we would talk to fellow hobbyists?
Tuesday 4 July 2023
Dutch Raid on the Medway: Mad for War at Rapture
Last year Posties Rejects were blown away by Barry Hilton’s "Raid on the Medway" game at Partizan so we convinced him to bring it down to Kent to run the game in Chatham Docks, the target of the Dutch raid back in 1667. The Rapture Gaming Festival stretches across the whole of the 80-acre site with computer games and wargaming rubbing shoulders with boardgames and RPGs, reenactors, and cosplay.
The Raid on the Medway, during the Second Anglo-Dutch War saw the Dutch fleet, under the command of van Ghent and de Ruyter, battle and burn their way up the river towards Chatham Dockyard in Kent. All that stood in their way were a handful of English ships, a chain barrier at Gillingham, and the fortress of Upnor Castle.
The Dutch engaged fortifications with cannon fire, burned or captured three capital ships and ten more ships of the line, and captured and towed away the flagship of the English fleet, the Royal Charles.
Posties Rejects played three games across the two days of the Rapture Gaming Festival inside Chatham Docks. The question now is, did we replicate history or did the British successfully defend the docks from the attack?
For two excellent written accounts and many more photos from an excellent weekend's gaming, please take a look at Rays' Blog Don't Throw a 1, and Richard's Blog, My Wargaming Habit.
Sunday 2 July 2023
For the Love of Heavy Metal
Are the days of metal miniatures numbered? Plastic and resin miniatures have become much more common in the wargaming hobby over the last decade or more, but metal minis are still dominant in the historical wargaming market. But will advances in 3D printing options be the final nail in the coffin for metal wargaming figures?
Sunday 25 June 2023
Writing your last orders
Have you made a plan for the disposal of your collection when you are no longer around to enjoy it? Would you consider including your wargaming miniatures in your will? And if you have done this, what prompted you to do so?
Sunday 18 June 2023
Wargaming your Guilty Pleasures: What's yours?
What are your wargaming 'Guilty Pleasures'? Which periods do you play (or would like to play) that are a bit off the beaten track? Periods, wars, or battles that are not commonly seen on the pages of hobby magazines or are considered uncommon or too niche to be supported by a rule system or figure line?
Monday 12 June 2023
Broadside 2023: Posties Rejects Smugglers on the Kent coast
The Broadside Wargames Show at Gillingham is our 'local' show and Posties Rejects always run a demo game at this event. For 2023 we put on a fictitious clash between Government troops and smugglers somewhere on the Kent coast. A few days ago I posted a video of the show featuring our game and a short slideshow of the other games at Broadside. The quality of the games was very high this year and despite the rising heat during the day, everyone seemed to be having a great time. We were busy with visitors all day long and had a really excellent day.
Skirmish at Francis Bay - June 10th 1784
Smugglers on the Kentish Coast by Posties Rejects
“Smuggler.—A wretch who, in defiance of the laws, imports or exports goods without payment of the customs.” Dr. Johnson
Kent is a perfect location for smugglers. Close to France, with good transport links to London and with gently sloping beaches making landing goods easy. Smuggling is as old as taxation itself but in the 18th century high import taxes on goods such as silks, brandy, tobacco, and tea were highly prized by so-called ‘free traders’. And with plenty of wealthy customers to service, there was a lot of money to be made for those that could avoid being caught.
One group of smugglers that would have been well-known in the local area was the North Kent Gang. They operated in areas like Chalk, Gravesend, Reculver, and Ramsgate. During the 1780’s they brought their contraband ashore and stashed it in caves near Margate. Initially, trade was small, supplementing low incomes, but eventually the ‘business’ grew into what would now be called an organized crime network. Violence was soon being employed to ‘protect’ the business and clashes with law officers or revenue men were common. In Gravesend where our group meet, the Three Daws Pub is a famous smugglers' den, and at one time there were tunnels from the pub up into the town so that contraband could be moved without being seen.

The game portrayed today is a fictitious encounter, but may still have been an occurrence many times in reality, as the government tries to stop the smuggling operations. Our game is set on the South coast of Kent, hence the white cliffs. Various locals have gathered to await the arrival of their goods from France which unfortunately have arrived late due to a swell in the channel. So, as the French fishing vessel lands on the beach with barrels of Brandy, silks, and various other goods the sun is just starting to peak over the horizon. This is not good for the smugglers as they will have to unload all the goods in the early morning sunshine. A very dangerous time to be moving contraband indeed. A local snitch has decided to make some money on the side and has informed the local government forces of a landing in the area. As they search along the coast they spot a group of men and women behaving suspiciously close by on the cliff tops. Let the game commence!
Sunday 11 June 2023
The Mini Painters Learning Curve
Is there a risk with contrast paints that the quick route to painting could create a new generation of painters who are unable to develop their skills because they haven't learned the hard way? Is there value in being rubbish at the beginning of our painting career, and should we learn to love the mini painter's learning curve?
Sunday 4 June 2023
Has IGOUGO had its day?
Has IGOUGO had its day? Is it time for this tried, trusted but a flawed system to step aside for random activation rules systems?
Wednesday 31 May 2023
Making 6mm Flags: Size is not an issue
Several people have asked for a video on how I have made the flags for my 6mm Wars of the Roses project, so here is a step-by-step tutorial on how I make flags for 6mm miniatures. Making flags for 6mm miniatures is no different from making much larger ones. A bit more fiddly to be sure, but the process is essentially the same.
As always I would love to hear from you. Do you make flags the same way? Or do you have any tips and suggestions that other viewers would find helpful?


Printed Sources Wars of the Roses Flags (mentioned in this video):
'Wars of the Roses Heraldry'
by Dr Mike Ryan Jones & Bob Prichard BSc (Hons), BA (Hons)
Instaprint (Rugeley) Nov 2018
ISBN 978-1-911645-01-6
Battle of Bosworth Nobles and Knights Profiles
by Bob Prichard BSc (Hons), BA (Hons)
Instaprint (Rugeley) Nov 2018
ISBN 978-1-911645-00-9
Standards, Badges & Livery Colours of the Wars of the Roses
By Pat McGill & Jonathan Jones
Freezywater Publications 1992
The Lance & Longbow Society http://lanceandlongbow.com/
Heraldic Banners of the Wars of the Roses (in 3 Volumes)
By Thomas Coveney
Freezywater Publications 1996-7
The Lance & Longbow Society http://lanceandlongbow.com/
Sunday 28 May 2023
In defence of BIG Battles
I play plenty of Skirmish games with my friends, but as a group, we also enjoy big battle games. Look in any wargames magazine and you could be forgiven for thinking that every new set of rules is for skirmish wargaming. Certainly, there are plenty of excellent skirmish rules out there but I think it would be a sad day indeed if BIG battles were to fall from our repertoire.
Friday 26 May 2023
Double Dial Counters from Foxtrot Charlie Miniatures

Today's post is a quickie, to show off a recent purchase from Foxtrot Charlie Models. I have been looking for a way to keep track of Battle Moral in my Wars of the Roses games using Test of Resolve. I recently did a review video of these rules and in it, I explained that each company has a number of resolve points that are lost during the melee or firing phases of the game. Armies are typically divided into three Battles (sometimes more) and each Battle has a morale value based on the number and type of units within it. As Resolve is lost from its constituent companies so Moral Points are removed from the Battle. When the Battle reaches zero morale points it has to test to see if it continues fighting or withdraws.
My order of battle stretches the size of the Battles way beyond the rules authors' design parameters, meaning my Battles will start the game with quite large Moral Values. I couldn't figure out the most elegant way of keeping track of Morale...until now.


These MDF Double Dial Counters from Foxtrot Charlie Models are exactly what I needed. There are 8 dials in a pack for just £10.75 so they were also a very economical solution to my requirements. The Dials come unassembled but were really easy to put together and can then be decorated as required. I decided to replicate the groundwork of my bases so they match my Wars of the Roses armies and blend in with the game mat I am using.

That's one more task off my to-do list and at a very reasonable price too. 👍👍👍
Monday 22 May 2023
Partizan Video Report
Yesterday three members of Posties Rejects traveled up the A1 to Newark and the Partizan show. As usual, I shot a load of pictures but this time I also took a bit of video and decided to combine them into a visual show report.


Wednesday 17 May 2023
Test of Resolve: First Impressions
I recently decided I would have a proper playthrough with the Test of Resolve rules using some of my Wars of the Roses miniatures from Baccus. I only used about a third of my collection to keep the game small and manageable so I could focus on the rules. The main purpose of this test was to identify any areas that I needed to work on and in that regard, this was very successful (more on that in the video). I kept both sides roughly equal but their composition was different with a little variation in terms of quality and troop types. The aim was to see 'regular' combat between similar units but also see how asymmetric melee worked out. In this regard, I think it worked really well because there was a range of different fights taking place, each with different circumstances and factors to take into account. The result was a very interesting and hard-fought little battle.
Test of Resolve is a ruleset specifically designed for the Wars of the Roses and is well supported with scenario books and free downloads on their webpage. They also have a Test of Resolve Facebook Group that is worth a look around. I bought these rules last year, but I have been so busy painting my 6mm armies for the Battle of Bosworth that this is the first chance I have had to playtest the rules.
Tuesday 2 May 2023
Battle of Sodbury Hill 1471 - A War of the Roses 'What-If' game
Over the weekend the Rejects assembled in the Shed-o-War for an excellent and very exciting Wars of the Roses game using Stuart's 28mm collection of figures. Ray and Steve were the Yorkst commanders and faced off against Richard, myself, and Surjit as the Lancastrian commanders. This time, rather than posting lots of pictures I thought I would try making a short video of the game. It's not by any means a full report of the action, but will hopefully convey the excitement of the action.
The Order of Battle
Lancastrians (Richard, Surjit & Lee)
C/O Duke of Somerset
Men-At-Arms, Retinue Bill, Retinue Archers x2, Shire Bill & Light Gun
2iC Prince Edward
Men-at-Arms, Retinue Bill, Retinue Archers, Irish Bonnachts, Shire Archers & French Crossbowmen
3iC Earl of Devon
Men-At-Arms, Retinue Bill, Retinue Archers, Shire Bill, Shire Archers & Light Organ Gun
Yorkists (Steve & Ray)
C/O King Edward IV
Men-at-Arms, Retinue Bill, Retinue Archers x2, Shire Billmen, Light Gun
2ic Duke of Gloucester
Men-at-Arms, Retinue Bill, Retinue Archers, Shire Bill, Shire Archers & German Handgunners
3ic Lord Hastings
Men-at-Arms, Retinue Bill, Retinue Archers, German Pikemen, Shire Archers & Light Gun

Subscribe to:
Posts (Atom)