Friday 29 March 2019

Normandy Farmland - Making fields

Over the last couple of weeks, I have been gathering materials and experimenting with several ideas for mass producing some cheap and easy terrain fields. During the Painting Challenge, I made a load of Boccage hedgerow suitable for 15mm Normandy games and quickly realised I needed fields to put between the hedges. Commercially produced wargames terrain can be quite expensive to buy and at a recent show, I looked at some simple ploughed fields that ranged in price from £7-12 depending on their size and complexity. I needed quite a lot of these and quickly came to the conclusion that I could replicate the commercial examples for a fraction of the cost. The following examples are the product of that lightbulb moment and have been produced for under £2.00 each. 


So the technique is very simple and well within the ability of most modellers. The key to success I have discovered is using the right materials. I experimented with various products, including rubber matting and a range of sealants and pastes. In the end, I found some thin MDF for the baseboards and paintable exterior window sealant/caulk for the textured surface (details below). These can then be finished off with regular acrylic paints, flock, tufts etc to produce a range of effects. The best thing about these materials is the finished fields are very thin (not more than 2mm) and sit flush on the surface of your game mat or table.

I sourced sheets of 1mm MDF online and cut it onto an assortment of different sizes. Then score the surface to give the plaster/caulk something to key into. 
Everflex One Hour Caulk / Flexible Decorators Filler is a fast drying flexible decorators filler and sealant which can be overpainted with all paint types. Importantly it remains flexible when dry so it doesn't crack when bent. I bought a brown version but it also comes in white. Using a spatula I spread it across the board to a depth of no more than 1mm. 


Any suitably textured scraper could be used to create the furrows in the plaster. I, of course, went for the over-engineered option and made myself a brush using offcuts of wooden lolly sticks. I like the 'rough' look this gives but if you want cleaner furrows a cheap comb would probably achieve the same result and would be easier to clean! 

The Caulk I used surface dries in an hour but I left it overnight to cure fully and then sprayed all over with my usual brown primer. The caulk remains flexible so it won't crack or crumble if the boards flex when handling them. Once dry a light coating of spray Matt Varnish sealed the surface and it is ready to add some greenery. This is the fun bit, turning this basic ploughed earth into a wide range of different fields with different crops in them. The main cost in making these - other than the MDF - is the greenery. So fields with lots of grass tufts, vines or other plants will be more expensive than simple ploughed earth but the level of detail is entirely up to you.


I have made sixteen fields with sizes ranging from 7"x10" down to 5"x7". Total material costs came in at less than £30 although I am sure that with a little more sleuthing online the MDF could be bought a lot cheaper. As with all things, there are economies of scale and I'm sure the 'per unit' cost could be brought down even further. Either way, my homemade fields look as good as the commercial ones I recently saw on sale, and most importantly at a fraction of the cost. 

Sunday 24 March 2019

Painting Challenge IX - Body of Work

The Challenge is over and I have that empty feeling that follows the hectic activity of the last three months. There is a void in my life and the only thing that will fill it is to start planning for Challenge Ten! But first I need to cap off this year's festival of painting with a 'Body of Work' photo. Its been mixed bag from me this year, with additions to several existing armies rather than starting a new project. My original target of 600 points was smashed fairly early and everything on my original to-do list has been completed.


Slightly amazed at how much I have painted!
So, I think a breakdown is required although I am aware that I'm probably the only one that will be interested in this. I racked up a total score of 845 Points and reached 31st place. Neither of these figures is a personal best, but considering I was also the Tuesday Minion, I'm pretty happy with that tally. I even managed to take a week off for a family holiday in the middle of the Challenge (as I keep reminding the wife whenever she rolls her eyes at my latest project).

Period
Zulu War    12.1% (102 Points)
Fantasy      18.6% (157 Points)
Punic War  27.9% (236 Points)
WWI         7.3%  (62 Points)
WWII        34.1% (288 Points)

Scale
6mm          40.0%  (338 Points)
15mm        38%  (321 Points)
28mm        17.6%  (149 Ppoints)
40mm        4.4%  (37 Points)

Stats aside, and on a personal level, this has been the best Challenge I have taken part in. I have managed to get a lot of lead painted - far more than I would 'alone' - and have added to several existing armies in my collection. There is always more that can be done so don't be surprised if more AZW units turn up in Challenge Ten.

Aside from the obvious joy of getting stuff painted, I have also been able to participate (in a small way) to the competition itself and that has been enormous fun. Being a minion was both a rare privilege and great responsibility and it has given me a whole new perspective on a competition I thought I knew well. I've said it before but I'd like to thank all of the Tuesday Terrors for being such a great team and for letting me adjudicate their incredible entries. And while I'm in 'Oscars' mode, I'd also like to thank Curt, the Great Snow Lord himself, for running this madness every year. It is the highlight of my hobby year and the other nine months are a pale shadow by comparison. 

Wednesday 20 March 2019

Iberian Scutarii in Hannibal's Army

These weren't on my original plan for the Challenge but as I have hit my target and found myself with a 'spare week' I decided to dig them out and get them painted. Actually to be honest I'd forgotten I had bought them and I only rediscovered then as I rummaged through one of my lead mountains (yes, that's plural!). I'm using these Spanish Scutarii as allies in Hannibal's 2nd Punic war army. In the To The Strongest army list, I can only take two of these units but I can upgrade them to Veterans if necessary.


The Scutarii were named for their shields, the scutum, which was very similar in design to that used by the Romans in the Polybian period. The shield was a large oblong, big enough to cover the body, but light enough to be carried in one hand. The Romans used the scutum to form what was in effect a shield wall and there is similar evidence to say the Spanish employed the same tactic. The Scutarii were well-equipped medium spearmen and therefore quite mobile. Their main weapon was the all-metal heavy throwing spear - the Soliferun - which would be thrown at short range before closing in for hand-to-hand combat. This is where their secondary weapon, the short straight edged sword known as the gladius hispanniensis, would come into its own. The later Roman Gladius was influenced by these weapons, which is just one of many examples of how the Romans learned from and absorbed military ideas from the cultures they fought and defeated. 


Given their description and the tactics they used I have chosen to arrange these figures with the front rank presenting the shield in a 'wall' about to throw their Soliferun prior to charging into melee. Various sources describe the shield designs of these troops as colourful, similar in appearance to Gaulish shields. However other sources (and some examples I found online) are more uniform in appearance with a deep red colour being a common colour. I decided to go with the latter design to give the units a distinctive look, but also to reflect their determined and disciplined quality.


Incidentally, I have found a lot of information online (some of it useful, some of it less so!) but my main reference has been the excellent Armies of the Macedonian and Punic Wars by Duncan Head. It was an expensive book to buy but it has time and again proved its value with information that I couldn't find elsewhere.

Tuesday 19 March 2019

1/48th Scale Supermarine Spitfire Mk IIa

A bit of a departure from my normal scale, this model was a 'Secret Santa' present from my work colleges. I have been putting off building it as I haven't built a model Spitfire in, well, let's just call it 'a long time'. Instead, I promised myself that if I had time at the end of the Challenge I would give it a go. I did, and I have and here it is.


The aircraft is a Supermarine Spitfire Mk IIa and its marking and paint scheme identifies it as No 71 "Eagle" Squadron, Royal Air Force, North Weald, England, August 1941. North Weald is just 12 miles due north from where I live and is a place I have visited often. They have some excellent little air displays and a small but interesting collection of heritage aircraft on display. There is also a very interesting museum nearby that is well worth a visit.


I'm not actually keeping this model as I don't have anywhere to display it, so it's going to my Brother-in-Law to become part of his massive collection of WWII memorabilia. No doubt he knows a Spitfire pilot or two that can sign it. 

Monday 18 March 2019

Kung Foo Panda

Todays entry is small and is just a little bit of whimsey. I came across this model last year and couldn't resist buying it, just for fun. The Panda is 19mm tall (including the hat) and is made by Bombshell Miniatures. I've not heard of them before but a quick look at their website shows an interesting and eclectic mix of fantasy, sci-fi and steampunk miniatures in various scales. The handful of points I'll get for this figure isn't going to rock my final score by any massive amount, but it was great fun to put together and paint.


The blossom-covered tree I found in a local model shop and all it needed was some filler (and a dab of paint) to turn the wireframe into something better resembling a knarled wood trunk. I also knew I had some suitable bases I could probably use and sure enough, I found this one. Its resin but that's about all I can tell you. I have no idea when or where I bought it, I'm just glad that it has finally found a use.


In order to fix the Panda to the base, I had to cut away and file down the integral base. With the bottom of the feet now flat I inserted a pin in one of the legs so that I could get a strong bond with the new resin base. A tiny dab of fast setting epoxy was then used to bind the two together in what I hope is a strong bond.


I have a couple more entries that I am trying to finish for the end of the Painting Challenge, so I'm heading back to my painting desk to crack on with those. 

Sunday 17 March 2019

Spring Skirmish 2019 Photo's

I've just got back from a very pleasant morning at the Skirmish Toy Soldier and Wargames Show in Sidcup. I regularly attend this little show with it'a s quirky but friendly atmosphere, as do many of the Rejects. This time it was just Postie and myself at the show but I reckon between us we spent enough for a hoard of wargames (especially Postie with his bottomless pockets!). As usual, I shot a load of pictures and there were some cracking looking little games on display. One that seemed to catch the eye of nearly everyone was a 54mm Sudan demo featuring modern recasts of old toy soldiers (pictures below). As is the norm I spent more time chatting to friends than I did shopping but that is the attraction and charm of this little show. 

Rainham Wargames Club - A very nice looking Sudan game

Several companies of redcoats

Facing defences

Tunbridge Wells Wargames Society 

The Old Guard - Another Sudan game, this time using The Men Who Would Be Kings rules.

A clash of infantry

Medway Wargames Society playing a Games of Thrones inspired battle

Wildlings and giants! 

The Bring and Buy had plenty on it but unfortunately not a lot of punters...at least while I was there. 

The Emperors 10th Games Club - Their game hadn't started yet but I ended up having a long chat about the Walking Dead Boardgame. 

Milton Hundred's put on an excellent What a Tanker game set in the Russian Steppe. The Teddy Bear Fur 'steppe' looked excellent. 

A T34/85 lays in wait

Milton Hundreds in their distinctive yellow shirts. 

Skirmish Wargames - And another Sudan game  "What a carry on up the Nile" set in 1884

Probably the best terrain on display and an overall excellent looking game

Another view of the Skirmish Wargames table

Privateers of London - Battle of Havanna 1748 - Featuring some very old, bet very nice NavWar ships

Maidstone Wargames Society - Yes you guessed it, another Sudan game

Excellent looking units

Ahhh...I'm guessing there was a theme to this show, which explains all the Sudan games! 

The Trader hall wasn't a full or as busy as it has been in previous years, but the retailers that were there looked like they were doing a brisk trade. 

Postie haggling for a discount from Colonel Bill. 

The highlight for many was the display by Replica Metal Soldiers and Models. These are old school replicas of 54mm figures and painted in the old style too. 

Ranks of British redcoats to make this old wargamers heart skip a beat. 

This lot represents a serious amount of lead (and cash) on the table...but boy does it look good. 

I want's...

I will be exploring their website forthwith! 

My loot - Mostly grass tufts from Debris of War to restock my dwindling supplies.
Once again an excellent show and plenty of friendly faces and conversation. I've just realised I missed out a picture of another new shirt by Art of War shirts that I also bought. So all in all a very rewarding morning. 

Friday 15 March 2019

The Battle of d'Artenay-Pas-Vraiment - 1870

On Sunday I braved high winds and terrible traffic to join the Rejects for a game in Posties Shed-o-War. However, for a change, our leader wasn't running the game, the honour instead falling to Reject Richard. He had brought his excellent figure collection along for a Seven Years War* Franco-Prussian War game using the They Died for Glory rules. This is the second time I have played these rules and both times we have had an excellent game, even if the result wasn't what I had hoped for. In fact, I enjoyed them so much I have bought a copy for myself.
(*Doh!)

The Setup
This is a hypothetical scenario based on the military situation at the time. August and September of 1870 have seen the irresistible onslaught of the Prussian War Machine against an ill-prepared and poorly lead French Army. The Prussians and their allies under the direction on Moltke have swept the Imperial French forces from the North and have commenced the siege of Paris. However, the Teutonic hoard has failed to destroy the armies of Napoleon III, allowing them to retreat in a disordered fashion to Orleans to try and regroup. 

In order to counter the threat of a French counter-attack to lift the siege of Paris, Moltke has ordered a probe in strength towards Orleans with the intention of pushing Napoleon away south and perhaps capturing Orleans in order to stop its use as a base and rallying point for the French. 

Both sides were given a briefing, each of which contained detailed objectives and advice.

The German Briefing
French forces of unknown strength have fallen back on Artenay-Pas-Vraiment during the previous day.  Your task is to capture the town and the railway station and to clear the main Paris-Orleans road of hostile forces preparatory to an attack on Orleans.  
The enemy may be reinforced from the South. However, it is unclear whether the French Troops are in full retreat, falling back on their supports, or covering a new offensive from Orleans. Some caution may be required. However, if this is only a rearguard then speed is of the essence and the attack should be progressed vigorously in order to prevent the enemy from escaping off the field.  
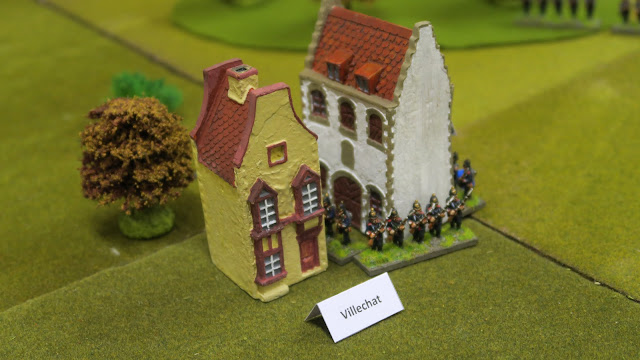
You must take: Assas; Villechat; Artenay-Pas-Vraiment; The Train Station; Autroche; Control the Paris-Orleans road by deploying troops across it south of Artenay-Pas-Vraiment.  

The French Briefing
German forces have advanced south during the previous day, and your rearguard have camped overnight around and south of Artenay-Pas-Vraiment. Your task is to hold the town and station for as long as possible, delaying the German advance on Orleans, and keeping open a route to withdraw your own troops south.
You are unlikely to receive reinforcements of any significance as the mina body of the army is withdrawing through Orleans rather than stopping to fight the enemy. It is essential to delay them for as long as possible.
You must hold: Artenay-Pas-Vraiment; The Station; Assas; Villechat; Autroche; and not allow German troops to deploy across the Paris-Orleans road south of Artenay-Pas-Vraiment. 

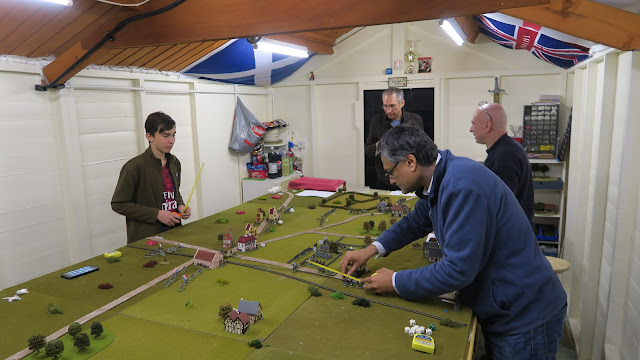
With the orders given the game began. Surjit and Stuart's commands were already on the battlefield and they were able to commence play immediately. My troops came on in turn three so I had time to observe and take a few photos before play commenced. 

The Order of Battle
French Army
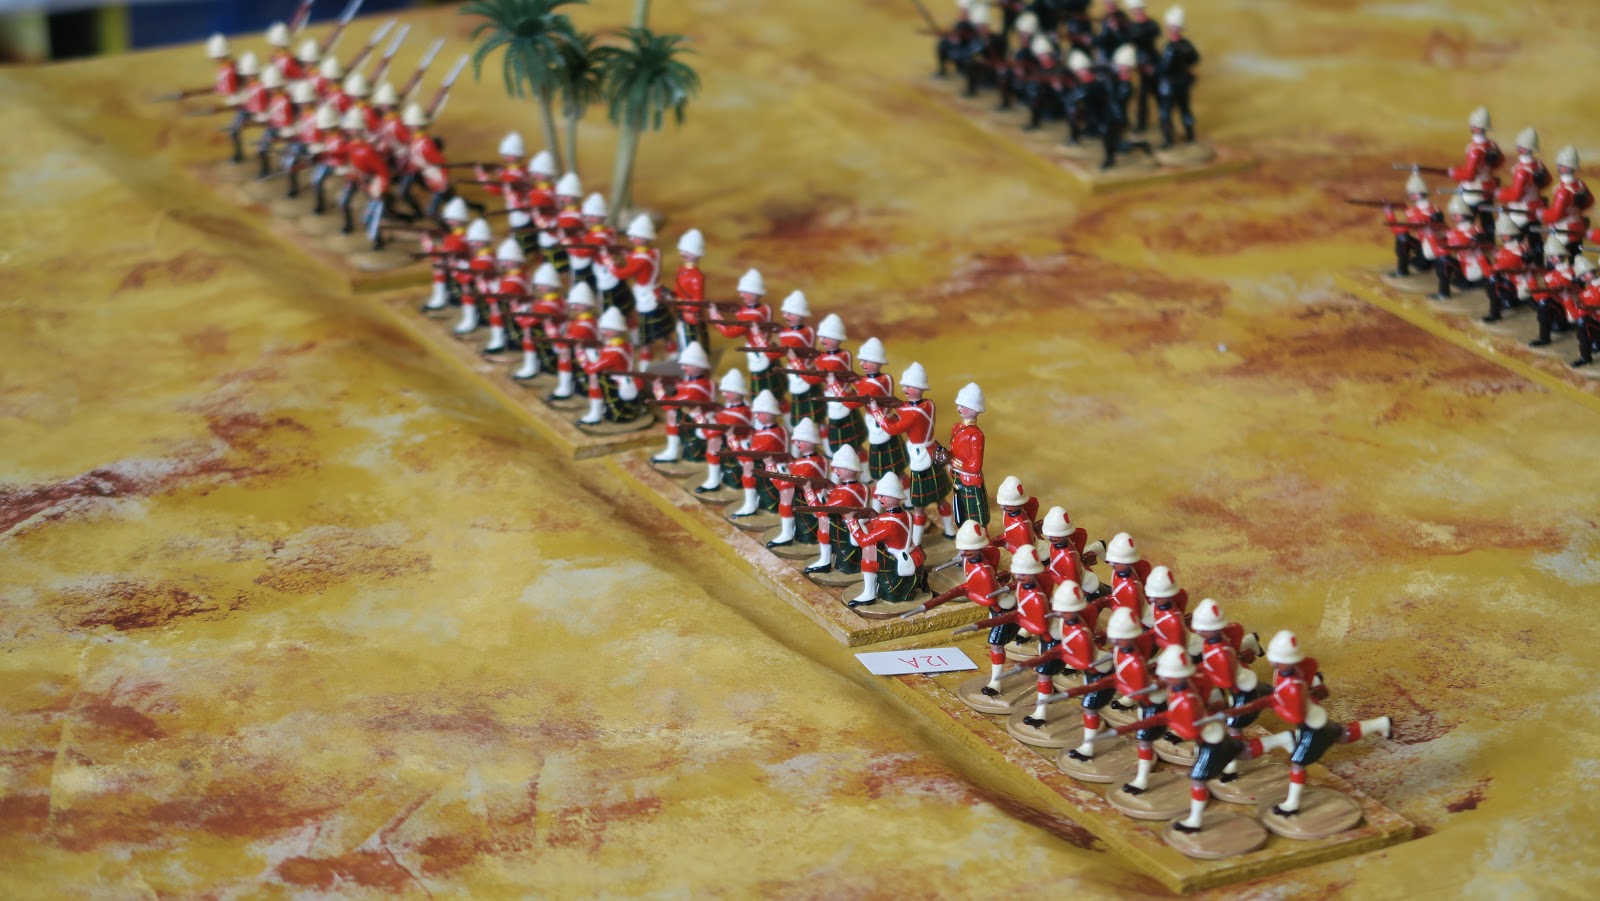
18th Line (8)* (in Assas), 18th Line (8) (in Villerhay), 96th Line (16) (in Autroche), 45th Line (16) (in Artenay), and 50th Line (16) (in the Station)
*Number of figures in the unit

Deployed by towns with Divisions
2 x 4pdr & 1 x Mitrailleuse

Deployed across Orleans road and railway south of Artenay.
48th Line (16), 36th line (16), 74th Line (16), 78th Line (16), 1st Zouaves (16), 1st Turcos (16), 2nd Turcos (16), and 3rd Turcos (16)

Arriving at Point F in turn of players choosing
8th Cuirassier (12), 9th Cuirassier (12), 3rd Dragoons (12), and 10th dragoons (12)

Arriving Turn 3 at Point E at Umpires Discretion (Never deployed)
1st Grenadiers (Line) (16), 2nd Grenadiers (Line) (16), 3rd Grenadiers (Line) (16), 1st Voltigeurs (16), and 1x 12 Pdr

Prussian/Bavarian Army
Bavarians deployed in deep column between Dambon and Railway line, north of La Boule D’or farm.
Lieb Regiment (20), 1st regiment (20), 3rd Line (20), 4th Line (20), 8th Line (20), 10th Line (20), 13th line (20), Jagers (20), and 2 x 4pdr

Prussians deployed on road between point C and Poupry
IR 2 1st Pomeranian Gren (20), IR42 (20), IR15 (20), IR54 (20), IR9 Colberg gren (20), IR21 (20)
IR61 (20), and 2 x 4pdr

Prussians arriving on road at point D,
IR 8 Leib Grenadier (20), IR48 (20), IR12 (20), IR52 (20), IR20 (20), IR35 (20), IR24 (20), IR64 (20), and 2 x 4pdr

Prussians arriving turn three at entry point B north of Assas and Villerhay
7th Magdeberg Cuirassier (12), 6th Brendenberg Cuirassier (12), 16th Altmark Uhlans (12), 3rd Brandenberg Uhlans (12), and 1 x 4pdr Horse Artillery

Prussians arriving at point B from East on road to Artenay
1st Leib Garde Hene-Dormstadt (20), 2nd Grosse Herzog Regt Hene-Darmstadt (20), 3rd Regt Hene-Darmstadt (20), 4th Regt Hene-Darmstadt (20), and 1 x 4 pdr


The Action
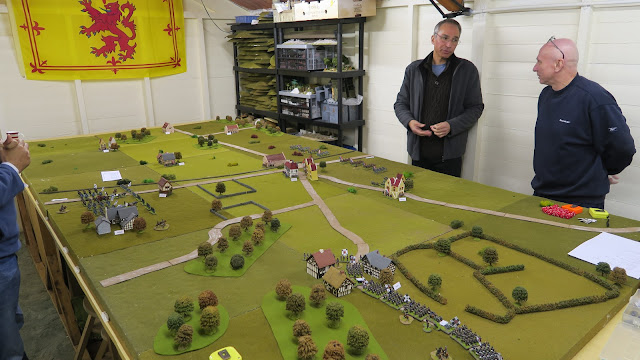
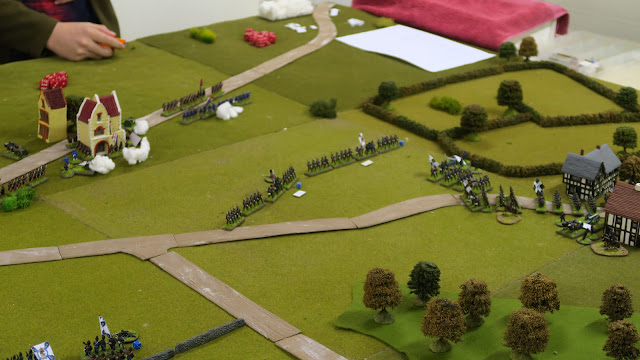
The initial setup with the Prussians and Bavarians poised to attack Artenay

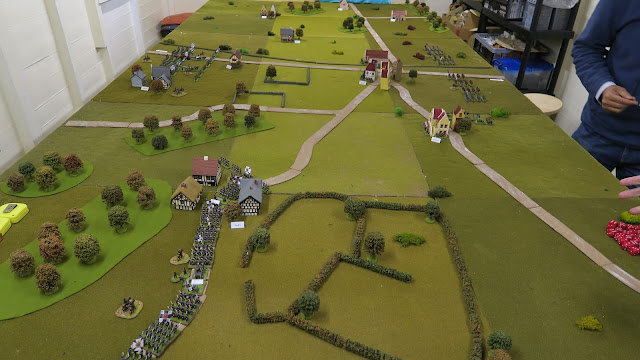
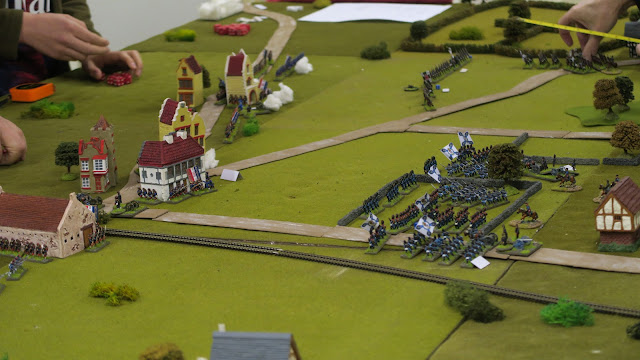
Another view of the initial setup. The French can be seen south (to the right) of the town of Artenay


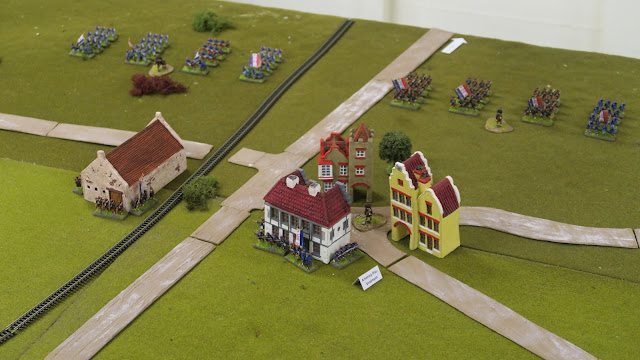
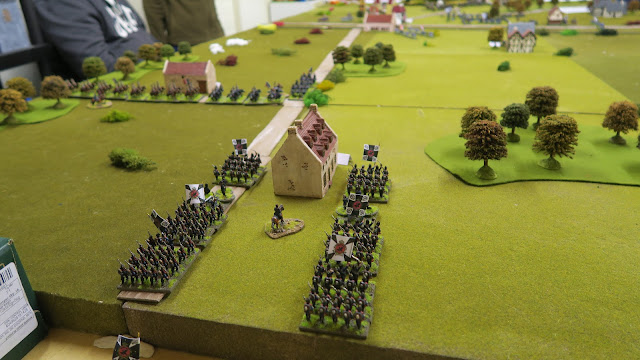
French south of Artenay. Some troops are already in the town and associated Railway Station

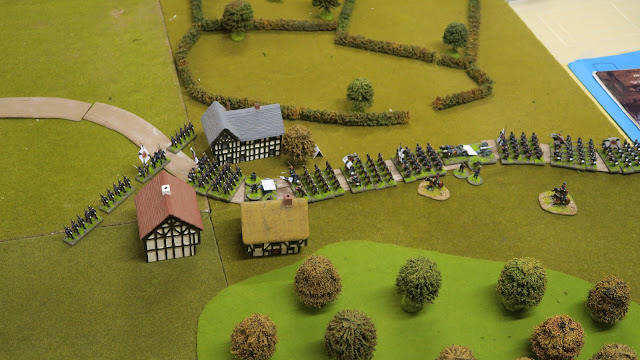
Prussians on the road to Artenay with one unit in skirmish at the front

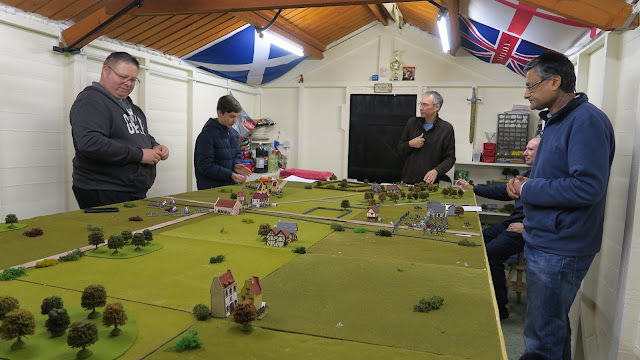
The game commences. I'm sat in the corner waiting for my troops to turn up.


The Bavarians advance with a coupleof units in skirmish formation to provide cover

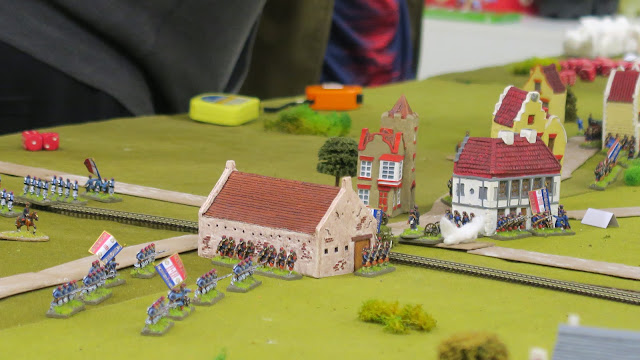
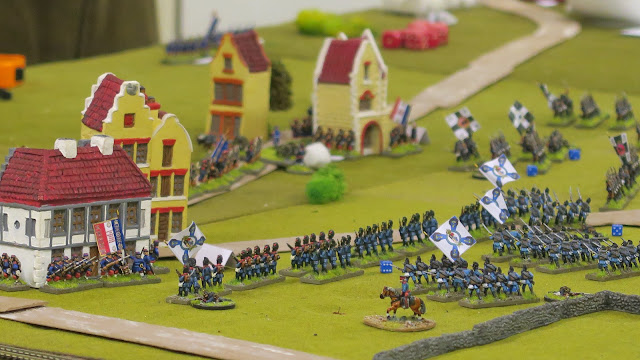
The french move more units into and around the town

The Bavarian advance continues

Players deep in the action

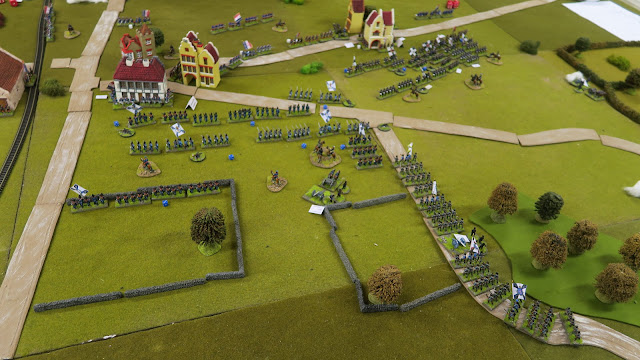
Both the Bavarians and Prussians are moving rapidly towards the French towns. They are coming under sustained fire but not enought to stop the advance. 


The Prussians now have two units providing a skirmish screen but the following units are still tryin to get down the road.

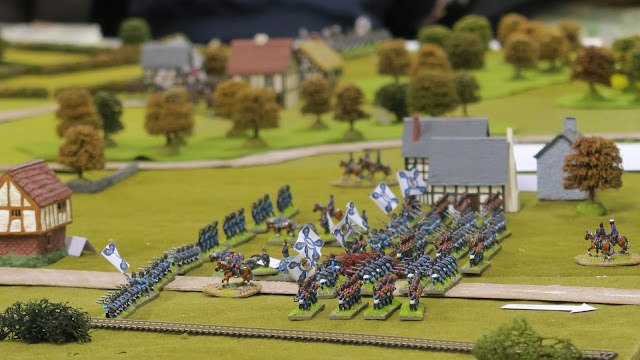
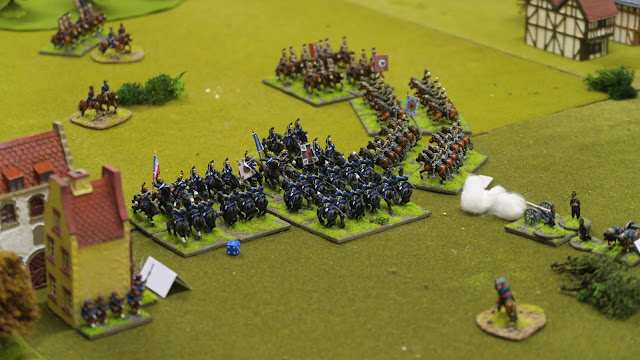
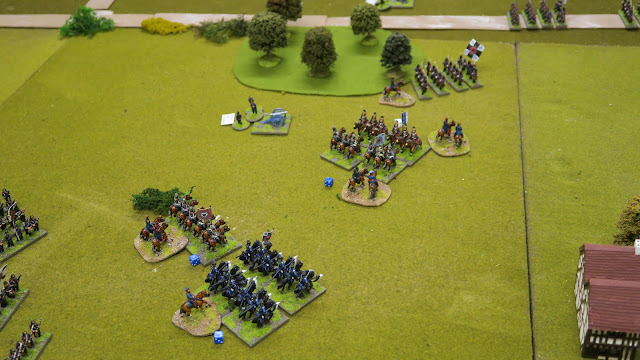
Meanwhile, French cavalry appears on the battlefield and thunder down the road towards the main area of the battle.

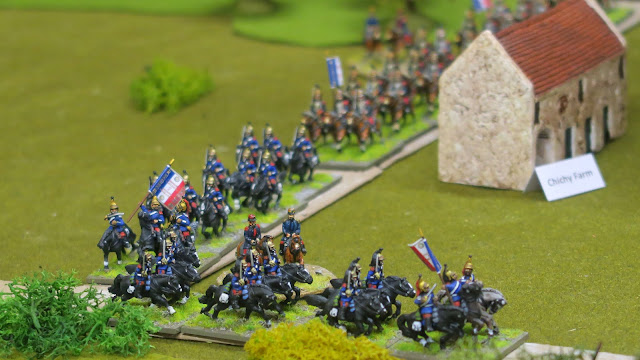
Cuirassiers and Dragoon move around the farm

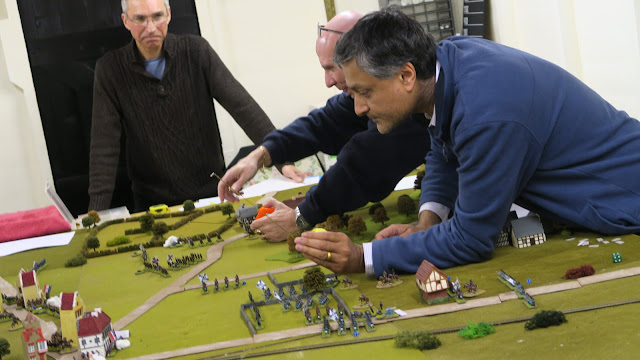
Players and umpire deep in thought

My first troops arrive on the Table! Courassiers and Uhlans and a Horse Artillery battery

More troops for me... Prussian Line regiments

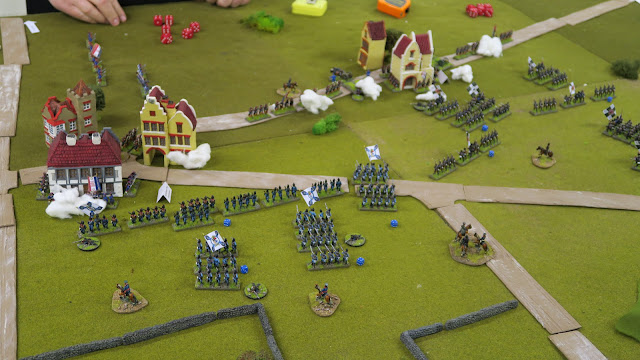
Surjit and Stuart seems to have stopped in front of the French towns. More units are in skimish formation and bith sides are exchanging fire. 

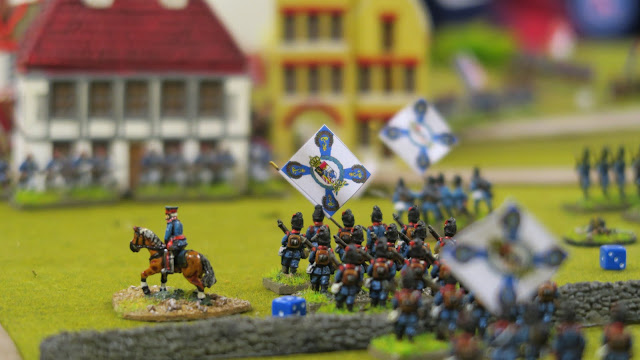
Meanwhile I coax some extra movement out of my front regiments by changing to Skirmish formation. This brings me just inside the range of the Ffrench Cavalry and I am able to fire upon them. 

In these rules firing on Cavalry in a column is devastating and I reduce two cavalry units to half strength in one volley.

The follwing turn my Cavalry charges the french cavalry who counter charge. Now I'm normally s**t with cavalry but this time I win three out of four of the melee. 

Meanwhile I'm not seeing a lot of movement over in the main attack against our objective, the town of Artenay. 

I've managed to move one of my line regiments into charge range and storm into the town on Villerhay. My remaining cavalry charge into the remaining French Cavalry... I cross my fingers...

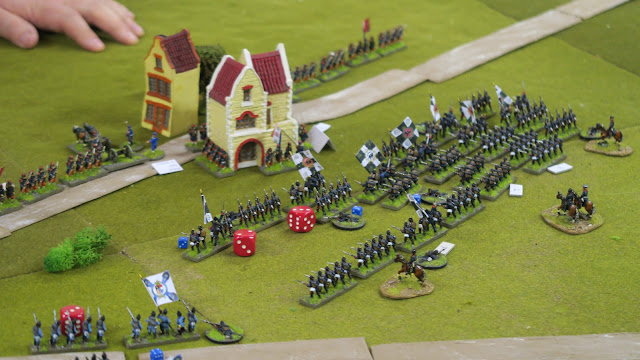
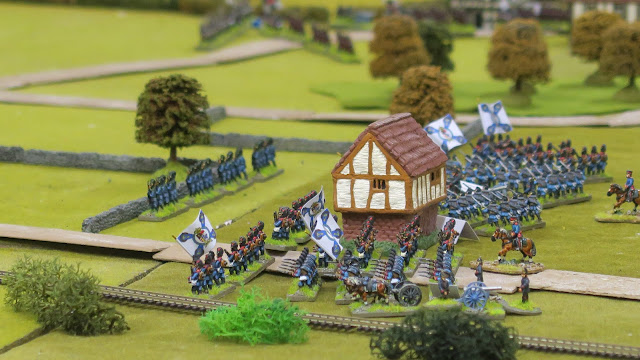
Prussians stand before the town echanging fire. The French are being reduced in number, but they still hold the towns and thus far the Prussians haven't tried to assult the town. 

Neither have the Bavarians who have lost a couple of units (they retreated) with the remainder standing almost stationary and swapping fire with the French. Prussian reinforcements are arriving but it will take several turns to get them into position. 

Meanwhile my troops take Villechat and prepare to move on to the next town. My Cavalry have pretty much decimated the French cavalry (I was in shock) and are preparing to chase the rest away. 

Prussian reinfircements streem up the road. 

My Cavalry form up and prepare to hit the remaining French. 

Meanwhile my line regimants are advancing towards the Railway station. 

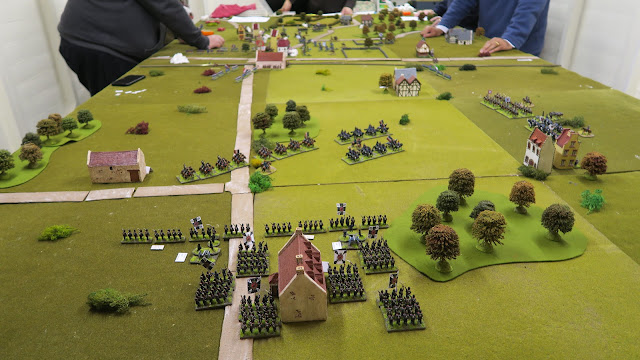
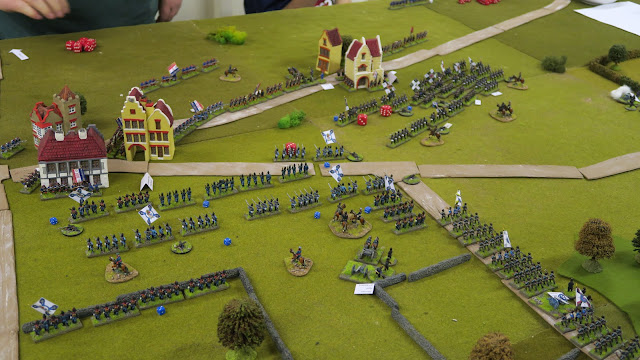
The battle in front of Artenay looks like it is about to reach a climax as our reinfircements reach the front. 

Our Objective, the town of Artenay still looks a long way away!

Another objective, the village of Autroche. 


However, with time short and the French already accruing victory points for holding the towns beyond the 7th turn, there was now little chance the Prussians and Bavarians could turn the situation around and win. Richard called the game to a close and declared it a French Victory.


Analysis
This batrep was unashamedly focused on my end of the table as it felt very much like I was having a separate game from the other guys. I'll be honest I'm not entirely sure what 'went wrong' in their sector of the battlefield. They had overwhelming superiority in numbers, space to manoeuvre and some very clear objectives as laid out in our briefing. For reasons unclear to me, they became bogged down in a firefight within spitting distance of their objectives instead of pressing home an assault to oust the enemy from the villages. True, such an assault would have been very bloody, but it was necessary if we were to gain any of our tactical objectives. 

For my part I felt my infantry came on a turn too late, and given time restraints were physically unable to reach the enemy in the time allotted. That was partly due to starting late (I was stuck in traffic and arrived an hour late). My troops were the only ones to take an objective and I had spectacular success against the French Cavalry (amazing, I know!) but ultimately we had to succeed across our whole front, not just on one flank, if we were to win this game. In retrospect, I think our Commanding Officer became too focused on beating the enemy troops and in the process forgot the objectives laid out in our mission briefing. By the end of the game, despite grinding down the French forces in front of us, we had failed to thwart the French tactical objective to delay the Prussian advance and it was therefore only fair to call this a French Victory.

Despite my side loosing the game I think we all had a great time. The rules are easy to understand and each turn skipped along quite quickly. In fact I enjyed the game so much I decided to nuy the rules in the vain hope that I'll be better prepared when we play this period again!