I went to the Cavalier Wargames Show today and decided to share my pictures and my thoughts through the medium of YouTube! It's not long, but I hope it gives you a taste of the show after a two-year hiatus.
Sunday, 26 February 2023
Hard times
How are high street game stores and small traders surviving hard times? I recently spent a pleasant half an hour (and a few quid) in a local store and I was the only customer in the shop for over half an hour.
Friday, 24 February 2023
Norfolk's Battle at Bosworth
The first half of this week's entry missed the posting deadline last week by just a few hours. I hadn’t quite sorted the flags out and didn’t want to rush the job, so I reluctantly decided to delay posting by a week. On the plus side, it means you get a double helping of 6mm War of the Roses this week!

With Richard II’s independent command of mounted knights completed it's now time to move on to the main fighting contingent of his army. Sir John Howard, the Duke of Norfolk commanded the Vanguard and was in the thick of the fighting right up until he was killed. The loss of the commander would probably have been fatal in armies with better command and control, but in the press of men, how many would realise their leader had fallen? As with other commanders I have based the Duke of Norfolk on his own base with a Standard Bearer. He also brings some foot knights/Men at Arms and Archers to the fight clad in his livery.

Accompanying the Duke in this week's submission is his son, Sir Thomas Howard, the Earl of Surrey. He commands a company of Retinue/Billmen and a company of Archers. Thomas was wounded at Bosworth and imprisoned in the Tower of London for three years. However, he was released in 1489, and his title of Earl of Surrey was restored. He appears to have been loyal to Henry VII and in 1487 was sent north to put down a rebellion in Yorkshire. He remained Henry's lieutenant until 1489 when he accompanied the king to France. In 1501 he was made Lord High Treasurer, effectively entering Henry’s inner circle. He remained loyal to Henry’s son, Henry VIII, and enjoyed significant military success in the king's service in Scotland well into what would be considered extreme old age by the standards of the day.

After falling a little behind last week, this week I have caught up and got quite a bit done. So today I have the infantry of the Earl of Shrewsbury and Lord Zouch, plus three artillery bases and two hand gunner companies. First, we have Sir George Talbot, the Eldest son of John Talbot, 3rd of Shrewsbury. He was Knight of the Bath to Richard III and fight with him at Bosworth, where he was captured. However, he must have been able to retain favor and switched sides as he fought with Henry VII at the Battle of Stoke Field two years later.

Sir John de la Zouch, Lord Zouch was a Yorkist nobleman and politician loyal to Richard III, under whose command he fought at the Battle of Bosworth. He had grown in political power under Richard, mainly because his family's influence in Northamptonshire was of value to the King. Defeat at Bosworth resulted in him suffering attainder and forfeiture of his property, but he was eventually restored to royal favor in the Tudor court, due partly to a marriage connection to the new King's mother.
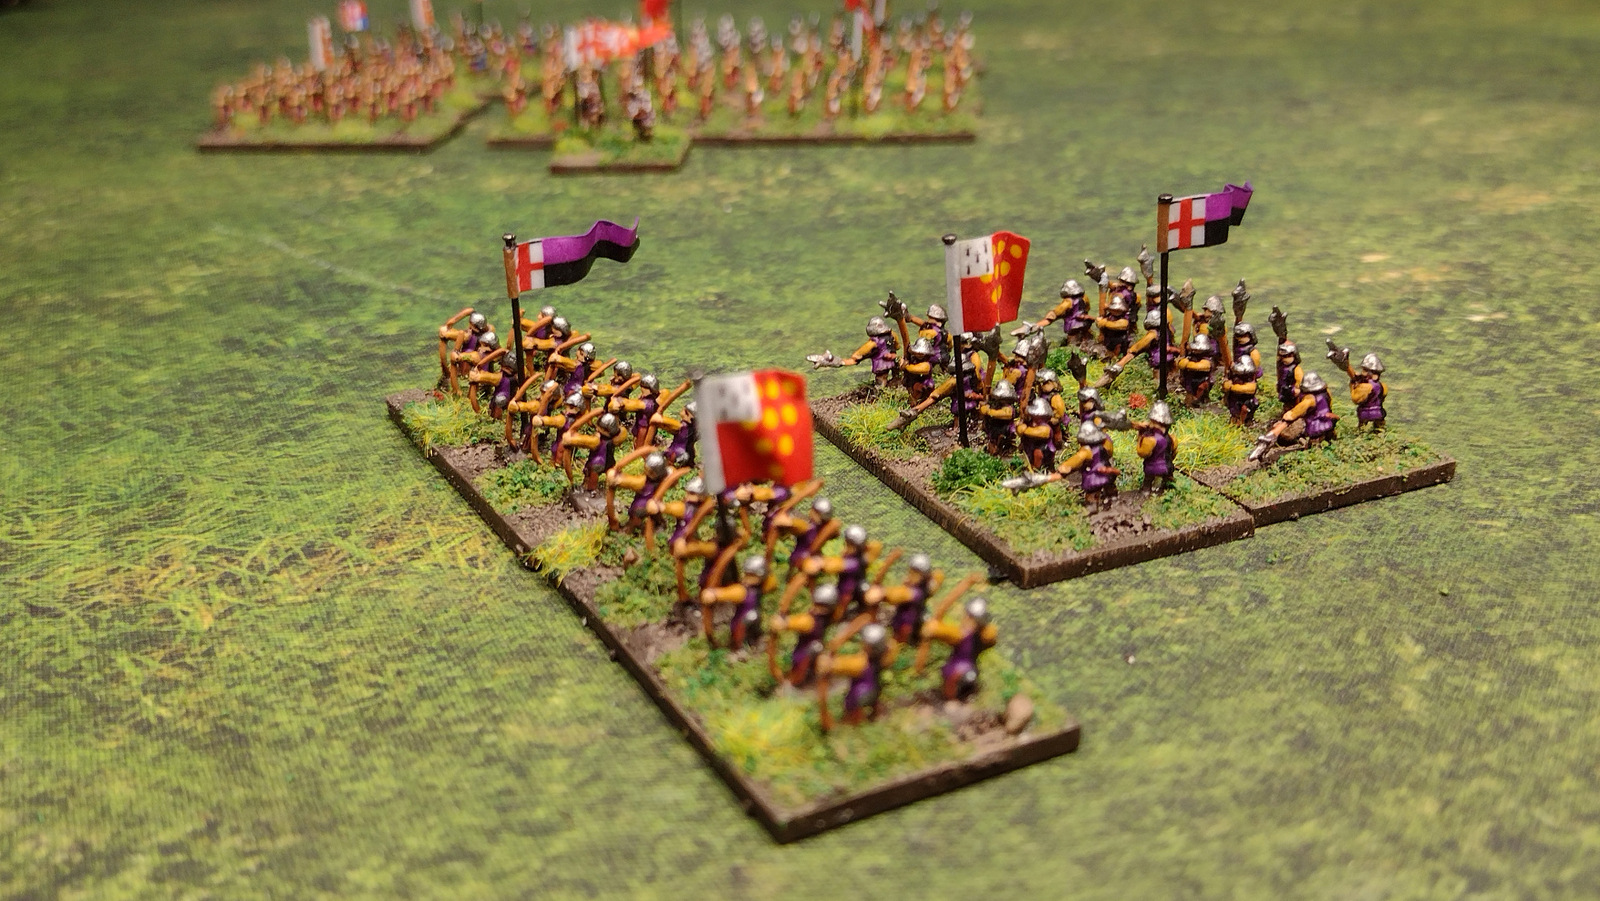
There are three Artillery pieces. These were typically companies - mercenaries in effect - who were paid to ply their expertise for one side or another.

Lastly, I have two small skirmish companies of Handgunners. Again these are dangerous weapons, relatively new to the battlefield and, at close range, quite deadly. Sharp-eyed viewers will notice there are fewer figures on these bases than the hand gunners I did for the Lancastrians. There’s no cunning research behind this, I just didn’t have enough figures to put 8 on a base as before! That being said, the Test of Resolve rules are figure agnostic, so a bit of variation is fine so long as the bases remain the same size.

I've got a lot completed now and the end is definitely in sight. Now I will start looking at Sir Robert Brackenbury's command.
Sunday, 19 February 2023
AI and Solo Wargaming
Could we one day see Artificial Intelligence used to enhance solo tabletop wargames, providing more realistic generals to fight against on our game tables? Could AI for instance enable us to play against accurate facsimiles of famous generals from the past, providing wargamers with more realistic and challenging opponents in solo games? Or is this one step too far for a hobby that has one nostalgic foot planted firmly in the past?
Thursday, 16 February 2023
The Battle of Bavai August 1914
It has taken me a few days to bring myself to write this post. I've been too busy crying into my sauerkraut with the muffled cries of "das ist nicht fair" occasionally being heard. But I'm jumping ahead of myself, so let's start at the beginning of this sorry tale.
Over the weekend five members of Posties Rejects came together in the shed-o-war for a WWI game using Stuart's early war rules and his massive 6mm collection. Ray and Mark played a small British force tasked with holding back a numerically superior German offensive led by myself, Surjit, and Steve. Sides were determined as usual by picking from a metaphorical hat (bits of folded paper tossed on the table for us to scramble over!) and then the British players were taken out to see the battlefield and be introduced to their mission objectives. The German players sat and waited...and waited...and waited. We could only assume one of two things. Either they were crying into their warm beer over the situation they were handed by the umpire or were arguing between themselves about what to do. After the battle, we found that it was both, so potentially a good start for the German players.
Order of Battle (lifted from Ray's Blog post for this battle, Don't Throw a One)
British2nd Corps 5th Division BEF (C/O Ray, 2ic Mark)
13th Brigade
2/Kings Own Scottish Borderers
2/Duke of Wellington’s
1/Royal West Kent’s
2/Kings Own Yorkshire Light Infantry
14th Brigade
2/Suffollk
1/East Surrey
1/Duke of Cornwall’s LI
2/Manchester
9 Batteries of Field Artillery
2 Batteries of Heavy Artillery (off table)
5th Cavalry Brigade – attached
2nd Dragoons (Royal Scots Greys)
12th Lancers
20th Hussars
1 Battery of Horse Artillery
1 Ambulance
1 Field Hospital
Germans
1st Army 3rd Corps (C/O Lee, 2ic Surjit, 3ic Steve)
5th Division
9th Brigade
8th Grenadiers (3 Battalions)
48th Infantry regt (3 Battalions)
10th Brigade
12th Grenadiers (3 Battalions)
52nd Infantry regt (3 Battalions)
11th Brigade
20th Infantry regt(3 Battalions)
35th Fusilier rget (3 Battalions)
12 Batteries of Field Artillery
Additional units attached
3rd Uhlans
3rd Jagers
1 Battery of Horse Artillery
Engineers and Pontoon Bridge
1 Ambulance
1 Field Hospital
The Action
The following is brief and I would recommend taking a look at Ray's post on this battle on his Blog Don't Throw a One for more pictures and some naturally biased analysis 😉
We were told at the start that this game was all about terrain objectives. The battle started with 30 points of objectives all in British hands. The Germans would need to capture enough objectives to win the game, so destroying enemy units was not necessary to win, although we would still need to force the Brits off objectives to claim them. Speed and the correct application of force where necessary were vital for the German players.
 |
| The starting positons with virtually no British on the table and lots of German units primed and ready to attack. The Brits don't look very happy. |
 |
| My troops in the center were destined for some hard fighting. |
 |
| The first nasty surprise of the day. One of two off-table artillery barrages. The brits would place the grid and roll a d10 for where the barrage landed (10 on a d10 moved the whole grid closer to their line). From the start, their artillery was very effective/lucky! |
 |
| The German offensive begins. Moving at double speed I instructed both my sub-generals to move as quickly as we could. This would mean applying overwhelming force to sweep away opposition so that the following units could leapfrog to the front and continue moving swiftly. |
 |
| On our right flank, Surjits Brigades move forward but some are pushed back by accurate artillery fire from the Brits. |
 |
| In the Centre, my troops push forward quickly overwhelming the first British defensive line and helping to clear defenders from the village on the crossroads. These were our first points for the villages, crossroads and the T junction seen in this picture. |
 |
| On the left flank, Steve's engineers are taking their time building a pontoon across the river, but the infantry Brigades under his command are sweeping forwards and keeping pace with mine. |
 |
| My Brigades push forward, largely foregoing a chance to fire their rifles in favor of the extra movement. But there were some strong points that needed to be overcome. |
 |
| This building represented a small village. We needed to capture the village and the crossroads for the terrain points. For the units involved this was achieved in just one turn, while other units passed by and continued to advance on the British second line of defense. |
 |
| Steve's Brigades have likewise cleared the small village by the T junction and now push towards the center, adding their numbers to my Brigades also heading that way. The British players looked understandably flummoxed at this point. There was nothing they could do to stop us and both sides knew it! |
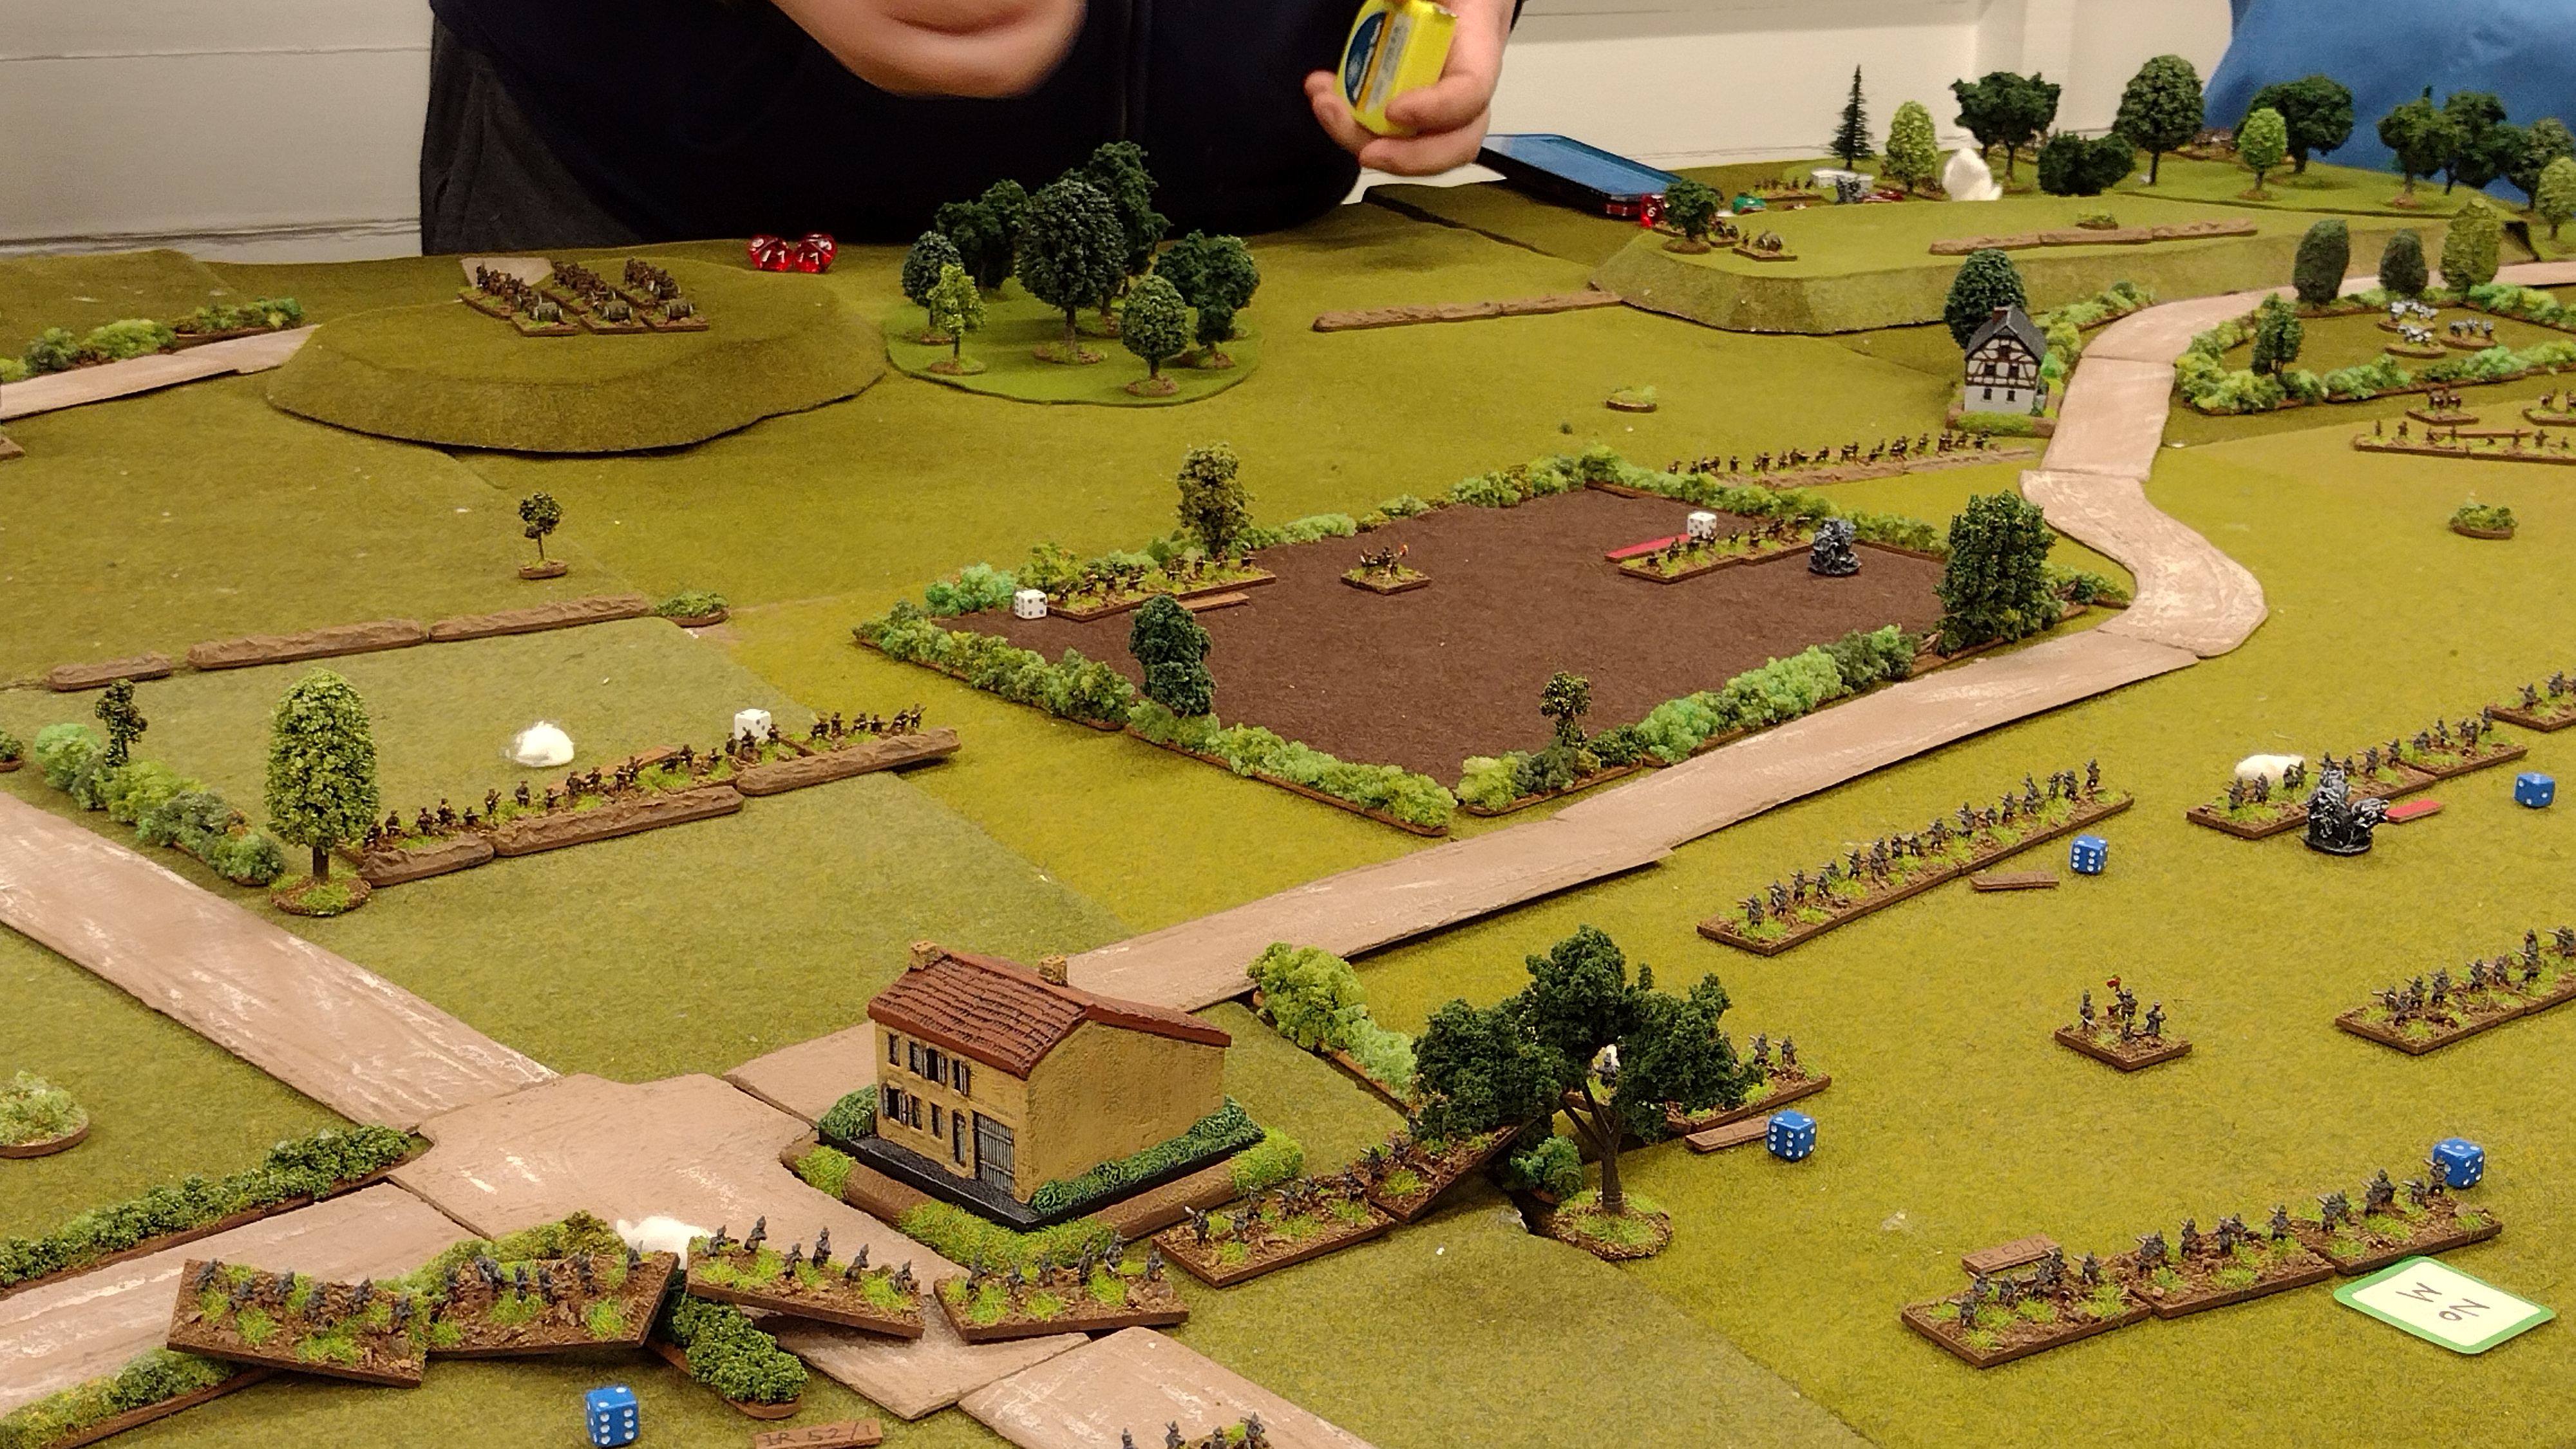 |
| Except over on the right flank Surjit seemed to be having problems taking a field. The British here were spared German artillery fire because Surj decided (against my advice) to target the British artillery on the hills at the back of the table. This lack of artillery support for the infantry advance would prove very costly indeed. |
 |
| Meanwhile, after what seemed like an eternity, Steve's engineers had finally constructed their pontoon bridge, and his Lancers and Jagers swarmed across quickly. There looked to be several possible terrain objectives and not a sign of any British troops defending them. Ripe for the picking? |
 |
| But of course, that wasn't the case. Dismounted cavalry and a machine gun stood in their way. Steve weighed up the possibilities and decided his lance-wielding Uhlans would charge... |
 |
| Meanwhile, our offensive has reached the British second (and only remaining) line of defense. Again Steve and I used artillery and some rifle fire to soften up the opposition while other units leapfrogged to the front and charged the positions. The Britsh hardly put up a fight and were forced out of their slit trenched with barely any pause. |
 |
| However, over on the right flank two combined attacks by one of my Brigades and one of Surjits, failed to dislodge an increasingly weakened British unit in trenches next to the filed. And in the field, Surjit had not taken full control with the British fighting for every inch of dirt (and the terrain point it represented). |
 |
| Meanwhile, in the main town, a single British Brigade knows it cannot possibly hold its ground when the German offensive reaches it next turn. |
 |
| Over on the left flank, the Uhlans charge the dismounted cavalry and push them back easily. |
 |
| A swift follow-up charge wipes the defenders out easily. One more terrain point for us and now there truly is nothing stopping us from taking the undefended village on the left or the undefended hill before us in the next turn of movement. |
 |
| The fight on our right flank grinds on, but British defeat here can only be one turn away. |
But this is the point at which our host and umpire Stuart said the game had come to a conclusion. We assumed we had played out the set number of turns but we later found out that the end was rather more arbitrary than that, with the game scheduled (unbeknownst to either side) to end at a set time regardless of the situation on the table. The German players had taken a lot of terrain objectives and one more turn would have seen us take at least three more without any opposition. By my estimation, we would have gained an additional 4 or five points by playing one more turn...but the Umpire had spoken and both sides waited as he counted up the terrain points held or captured.
The Germans had captured fourteen points out of thirty, meaning the British had held onto sixteen points to win the game!
 |
| Moments before these two knew they had lost and had faces like slapped arses. Then Stuart announced. As you can tell, Ray was very happy with the result!! |
Analysis
What can I say that doesn't sound like sour grapes... The British put up a good fight, making us battle for every inch over on the right of our line. Their tactics were sound, but they were also impossibly unlucky with their dice rolls. They lost every initiative roll of the game and consistently failed morale checks for units following melee, far beyond the bounds of normal probability. They were understandably and justifiably unhappy, right up to the announcement of the winners!
On the German side, I think we performed well. We kept moving (ignore the pro-Britosh propaganda on Ray's blog) and I don't see how we could have progressed any further across the table. Having cleared all opposition, one more turn would have seen us sweep up a load of terrain points for a decisive victory. But as is often the case, we had a great time and were not so much beaten by the opposing players, but by the Umpire. Such is the price of gaming in the shed-o-war, and I wouldn't have it any other way.
Sunday, 12 February 2023
Wargaming Modern Warfare: How soon is 'too soon'?
How soon after a conflict has ended, is it ok to wargame that period? How soon is 'too soon'? This question discusses the ethics of making a game out of recent (or even ongoing) conflicts. Not discussed in the video (but encouraged in the discussion) is the question of whether the boundaries of what is acceptable are different for tabletop wargames versus computer wargames? I would also love to hear the perspective of Veterans of recent wars who wargame the period they fought in.
Tuesday, 7 February 2023
The Battle of Montebello 1859

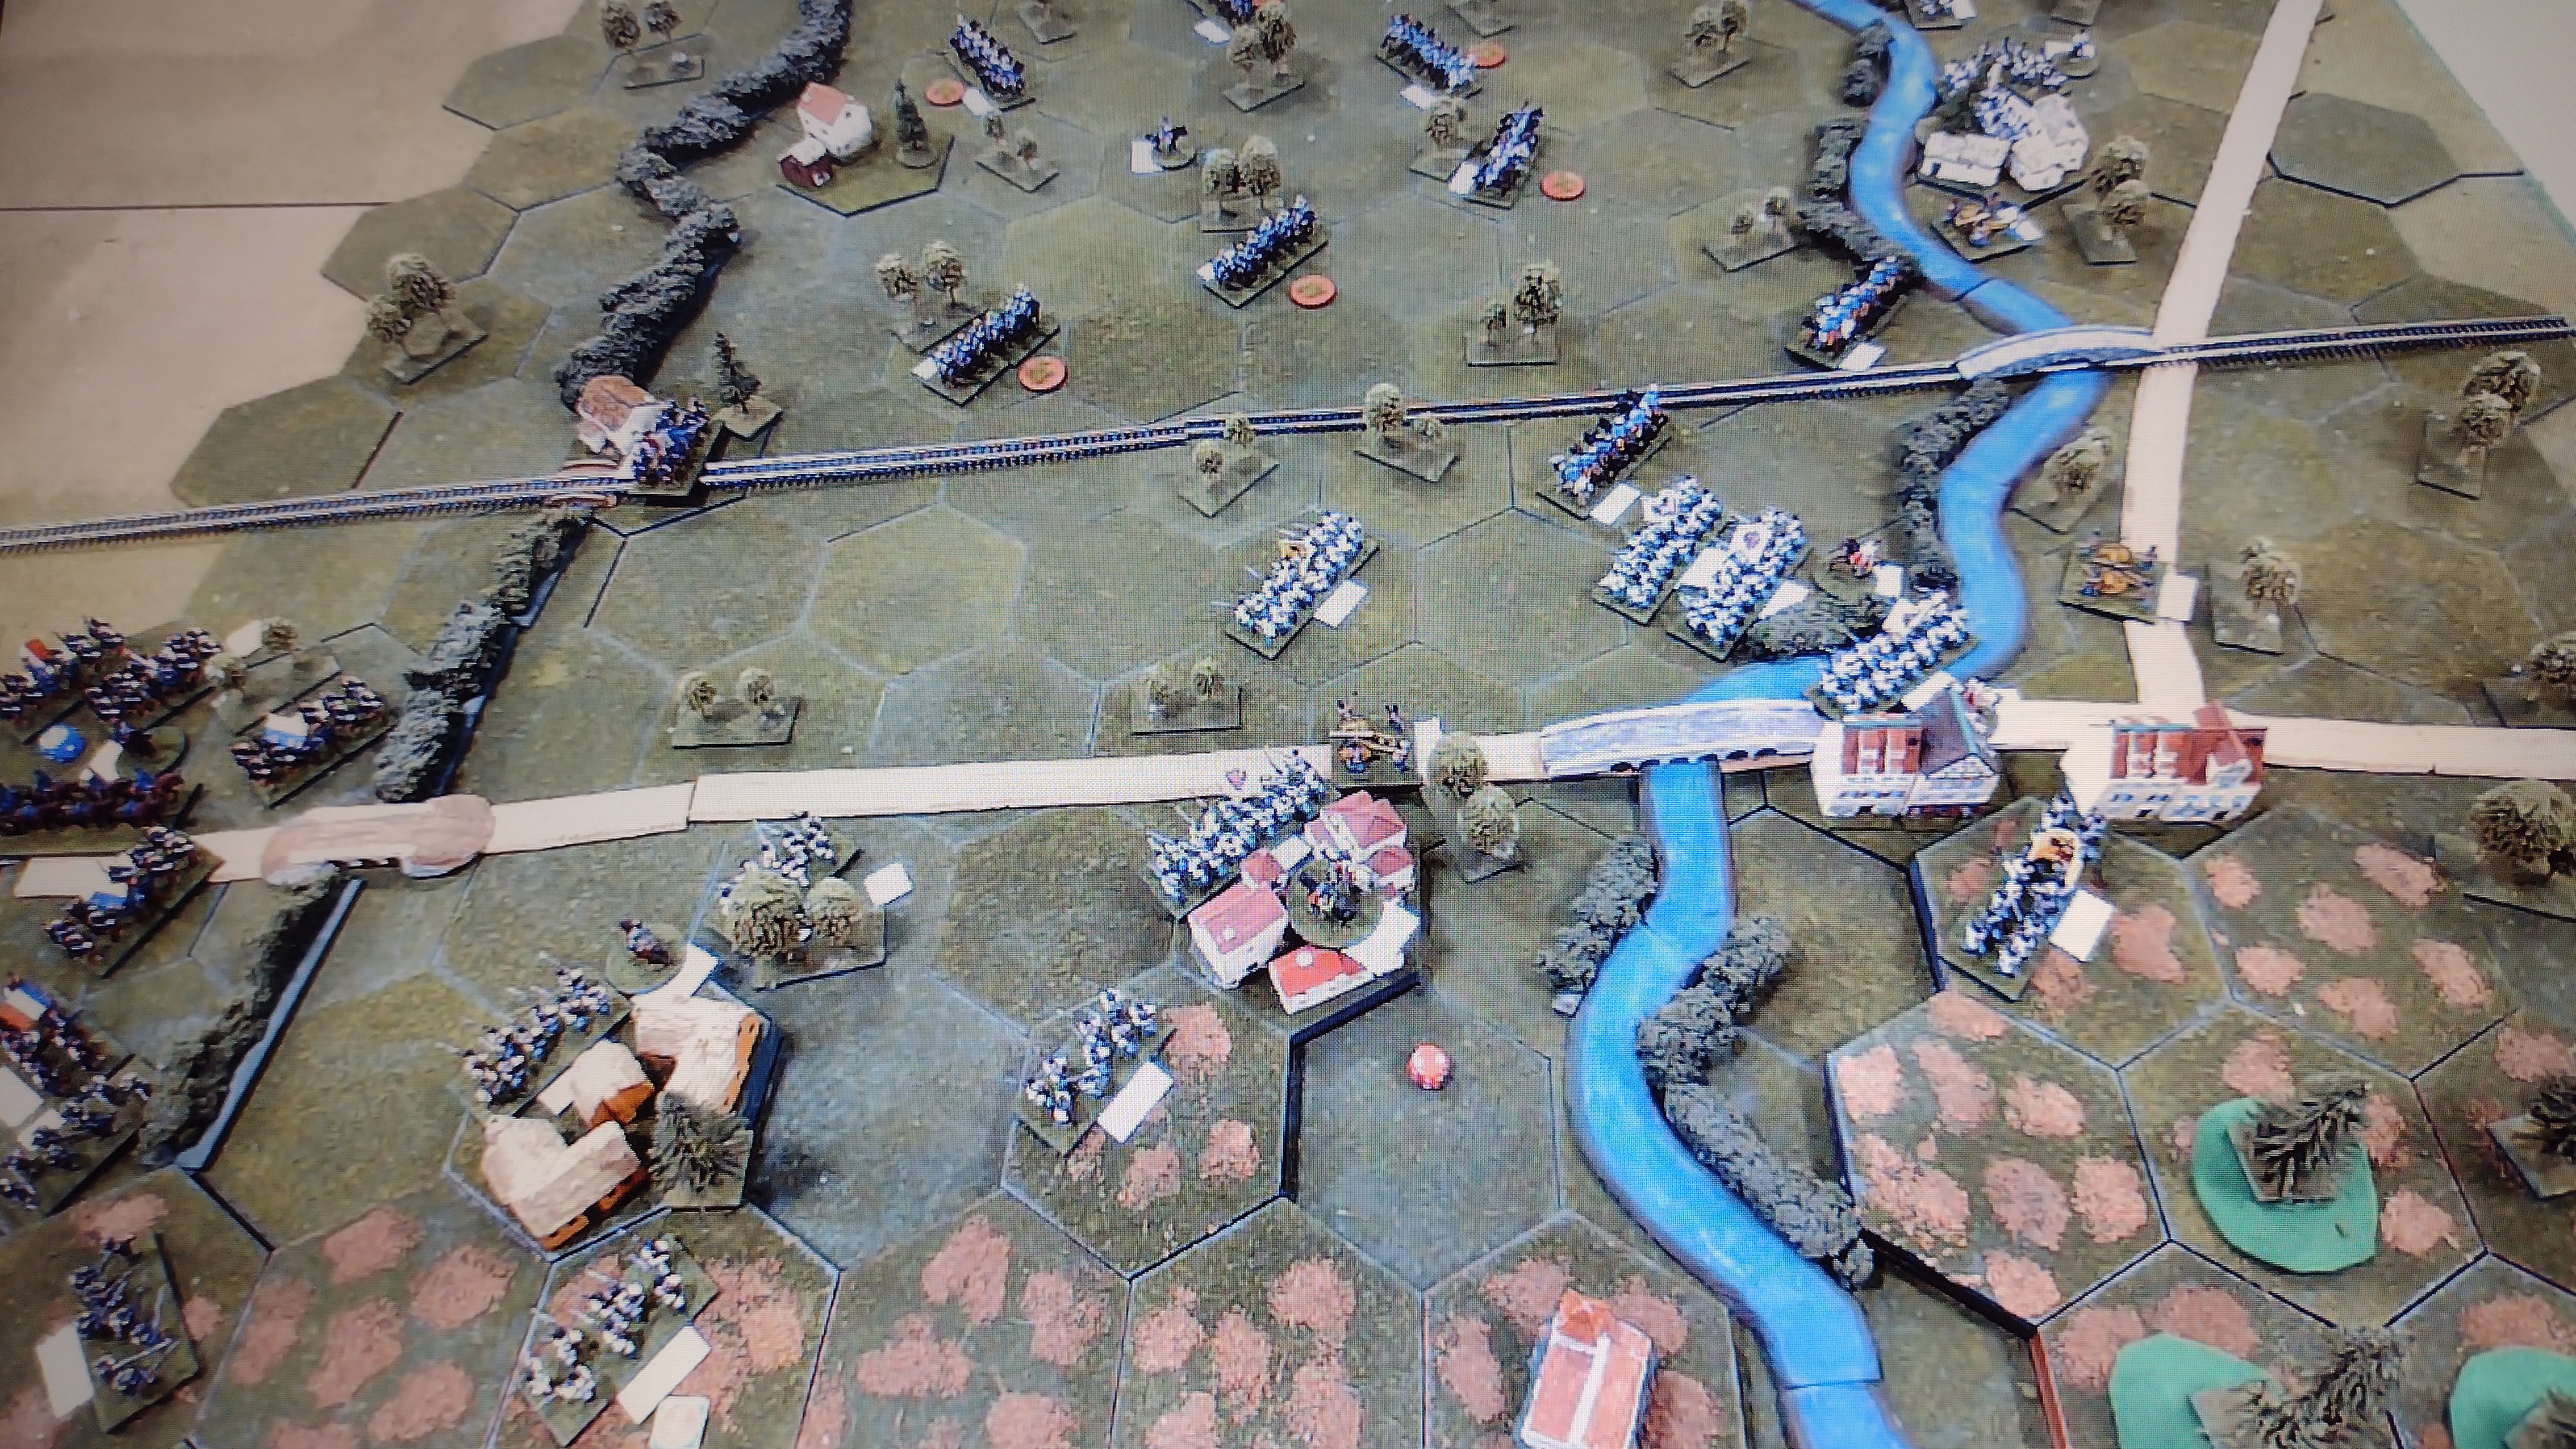
Over the last couple of Monday Evenings, the Rejects have been kindly hosted by Jonathan Freitag in the US for a remote (zoom) game of Fields of Honor. Once again we were playing a historical encounter from the 2nd Italian War of Independence. Myself, Steve and David would be taking the Austrian side and Surjit, Ray and Richard would be the French players. Plans were hatched, ordered prepared and last week we all gathered at Jon's place (via the magic of Zoom) for a much-anticipated game.
The following is an abridged version of the detailed briefing that Jon sent to the Austrian Players.
Gyulai’s uninspired offensive in Piedmont ground to a halt without ever contacting the enemy. Concerned that the French would attempt to turn his left flank Stadion’s V Corps was ordered across the Sesia River to move on Casteggio and Voghera. This was a reconnaissance-in-force and was determined to discover French dispositions, interdict the Voghera-Piacenza Road, and thwart these perceived threats.As the Austrians approached Casteggio, they ran into Sardinian cavalry screens positioned to prevent surprise attacks from the Austrians. The only means of crossing the River Coppa in this area are via two bridges: the bridge at Casteggio and the railroad bridge to the north of that town.Being heavily outnumbered, the Sardinians traded space for time as they slowly gave up ground to the approaching Austrians. Meanwhile, Forey’s division of the French 1st Corps quickly marched on Casteggio. By the time they arrived in the area, Stadion had already taken first Montebello and then Genestrello as the Sardinian cavalry retired.It is now 2pm and the Austrians occupy Genestrello, Montebello, and Casteggio with Schaafgotsche’s Brigade. Hesse’s right wing is marching upon Lungavilla from the north but all of Paumgarten’s Center Wing is East of the River Coppa. Reports suggest that the French are rapidly bringing Forey’s Division forward to contest the Austrian gains.

I'll leave the full detail for Jon to include in his battle report, but you get the picture. At the start of the game the Austrians control most of the table, but all their reserves are on the wrong side of the River Coppa with Fore's French Corp advancing rapidly to recover the ground only recently captured by the Austrians.
Steve took the lead as Stadion and controlled the Left Wing of the army. He would be guarding the captured towns and the bridge at Casteggio. David took the right wing and would be entering the battle from the North, so he would initially face the Sardinians. I took the reserves in the center and it was my job to get everything over the coppa in good order. As Brigades came on in different turns this was no easy feat, trying to ensure the roads and crucial bridges remained clear.
That relief was short-lived because almost as soon as I got my lead elements across the railway bridge I made a mistake... a big mistake. I moved a column of infantry forward to make space behind for more units crossing the river and presented a tempting target for the French. Ray's infantry punched forward and attacked my column, destroying it entirely in the ensuing melee! At this point in the battle, I was convinced we had lost the game. Most of our reserves were still struggling to cross the river and Steve's flank was being whittled down by Surjit's relentless attack. The only bright side was that the Sardinians at the Northern end of the battlefield (on the French left) were fast becoming non-existent with a series of painfully poor dice rolls. However we all felt there was still a lot to play for, so we agreed to continue the following week.
Part two of the game and the Austrians under Steve had a plan. Basically, keep doing what we had been doing and hope I could get the reserves across the river Coppa and into play. I'll be honest, I wasn't hopeful (I was still smarting from the last game). Steve, on the left flank, continued his fighting retreat. We had lost control of Genestrello but were trying to form a second line anchored on Montebello. Meanwhile in the North David's Hesse Brigade was mopping up the remaining Sardinains and pushing in on the French in the center. My troops were largely still in a huge traffic jam on the wrong side of the river!
Then the French started falling back. It was clear (with cooler heads prevailing) that they didn't have the reserves for an all-out assault on our position and were in danger of overextending themselves. However, if Surjit's attack in the south, along the heights, could make headway, then the French still had a chance. But in pulling back they also gave the Austrians just a little bit of legroom. I was able to get one reserve Brigade under Gaal, across the Casteggio bridge and up onto the heights to support the line on Montebello. Then I was able to get Bills Brigade across the bridge and started feeding units forward to press the French in the center and relieve Steve's weary troops.
 I think Surjit knew he had to make one more attack now, while he still could. I had moved infantry, guns, and some hussars onto the high ground behind Montebello but I didn't really have anywhere to retreat to if they were thrown back. Surjit threw everything he could muster at my infantry south of Montebello. Thankfully I'd put an Artillery piece in that hex so that evened up the melee dice, and my leader added a moral bonus to the subsequent saving rolls. It was a draw, meaning the French, as the attackers, were thrown back, and the crisis was averted. I didn't know this at the time but that was pretty much it for Surjit's command. Maybe he could have mustered another assault, but by this point, fighting through first Steve's troops and now mine, he was pretty mauled.
 Shortly after that, the French decided to withdraw. They had seriously damaged the Austrians (we were within one unit of breaking and falling back!) but were now outnumbered and penned in from all sides. Withdrawl in the fog of war was the sensible option, and save their remaining troops for the next battle.
As with previous games with Jonathan, I urge you to check out his blog Palouse Wargaming Journal for the full write-up of this and other battles. I'm sure he will have a lot of excellent pictures and a more reserved, impassionate observer's perspective, of the game than this biased version could present. Also, check out Richard's post on the game on his blog My Wargaming Habit.
Sunday, 5 February 2023
Wargame for Free
How can we wargame for free in a time of austerity and the rising cost of living? Today's video discusses a few simple steps to continue the hobby we love when money is tight and the hobby budget is being squeezed.
Subscribe to:
Posts (Atom)