 |
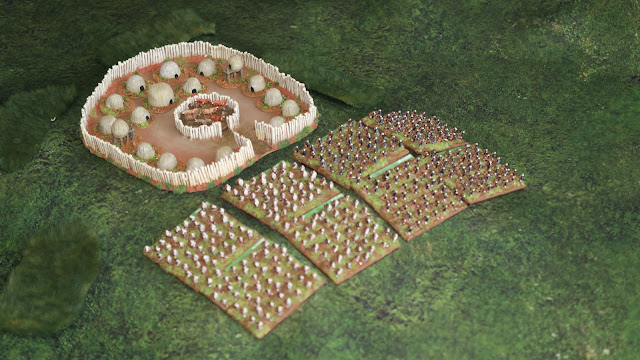
| A Zulu Umuzi, or Kraal. |
First off it has to be said that building a model Kraal for wargaming purposes requires a little poetic licence. My version has enough space for just under 20 huts but the real thing could have hundreds within its walls. I've tried to use a few contemporary etchings to get the general features right but there seems to have been a lot of variation, presumably depending on the size and location. Essentially the Kraal is a large roughly circular enclosure of thorn bush fence. Usually there is an inner wall within which the cattle are kept. The kraal would normally be built on a slight slope with the entrance downhill, allowing a combination of rain and gravity to wash through the site and keep the cattle area clear. In royal Kraals there may be an additional inner wall separating the royal compound from the rest of the settlement. I opted for a simple layout with a cattle pen at its centre and room to arrange my model huts within its outer walls.
 I started the build by cutting thin strips of wood (I used large lolly sticks) into rough curving shapes that combined would form the outer perimeter of the Kraal. I took some time to make sure the size was right and would adequately enclose my buildings so I ended up making an extra section to expand the dimensions of the Kraal. Then I cut cocktail sticks into 10-12mm lengths. To give a solid starting point I super glued the first upright post into position. Once set I then starting adding the other fence posts with PVA glue. I'd make 2cm of fence then do another section while the first dried and so on. Once the first lot of glue had dried I then brushed on a thin layer of PVA over both sides of the fence to really fix everything solid.
Next I cut a section of coarse sandpaper to the shape of the kraal and glued all the finished sections of fence around its edge. Once dried I then added sand to any exposed wood from the base of the wall which with another liberal coat of PVA which helped bind everything together. I also filled any gaps between the fence sections with additional sticks. At this point I decided the base was too wobbly so I cut some cardboard from a cereal packet and added that under the sandpaper, again using my trusty PVA. Now the model was reasonably solid and ready for painting.
A couple of coats of brown primer were needed to cover everything and once dried it was time to start painting. The fences were dry brushed with a light wood colour and highlighted with a pale sand colour. The ground was given a dry brush of terracotta to match the bases of the huts that Postie gave me. Once dry I gave the model my usual treatment of two coats of gloss varnish and then two of Matt varnish. The final stage was adding grass tufts and small bushes around the base of the walls.
I may make a larger version at a later date but for now this will suit my purposes nicely.


Hi Lee,
ReplyDeleteLooking very nice there Mr Hadley - all you need is a horse and cart with the Witts on board and you are good to go!
All the best,
DC
I'm sure that will feature at some point.
DeleteCracking work there Lee!
ReplyDeleteThank you mate
DeleteExcellent job!
ReplyDeleteThanks. I'm rather chuffed with it.
DeleteLooks great, interesting read and beautiful job!
ReplyDeleteCheers.
DeleteSuperb Kraal, a perfect camp for DBA !
ReplyDeleteThank you. I'm sure i'll find plenty of use for it.
DeleteNicely done Lee
ReplyDeleteThanks Dave. I enjoyed making it.
DeleteLovely and realistic !😎
ReplyDeleteThank you. ☺
DeleteWhat an excellent result Lee!
ReplyDeleteThanks, I enjoyed making it.
DeleteExcellent work Lee, and great gifts from Postie - not such an evil chap after all :)
ReplyDeleteHe's alright I guess... :) Postie knows I have a soft sport for the period as I always enjoy his massive AZW games.
DeleteExcellent Kraal Lee!
ReplyDeleteThanks, I'm really pleased with how it turned out.
DeleteVery successful and aesthetic. 😀
ReplyDeleteI'm giving some thought to another version, a larger military Kraal. But first I need more raw materials.
DeleteI did miss this on the day you posted it. And Iam not disappointed that I have gone back and found it. Absolutely splendid!
ReplyDeleteThanks Clint. I've been looking at more pictures (and several films) showing Kraals so I'm developing ideas for another one.
Delete